How would you repair these split V.G. Fir drawer-front stiles?

It split along the grain and the domino has the grain going in the same direction?  I don’t see it. 

I had suggested a similar approach using dowels, however going across the grain. 

Time will tell.  I suspect that the domino will split over time.
 
Added some white adhesive shelf liner to sink cabinet bottom.  Folded 2" strips into corners to limit future water intrusion to the bottom edges of the Melamine.  Looks almost new, can barely see the stuff.  It's all covered by a rubber mat with a large plastic tray on top that I put in there years ago, lots of spills happen under the sink, the tray and mat limit damage ad are easy to pull out and wash off.

Finished cab doors plus drawer fronts reinstalled, have now moved on to bulk processing a bunch of other cabinet doors the last couple days. 


Attachments

  • IMG_9332.jpeg
    IMG_9332.jpeg
    73.2 KB · Views: 56
  • IMG_9330.jpeg
    IMG_9330.jpeg
    123.2 KB · Views: 67
Packard said:
It split along the grain and the domino has the grain going in the same direction?  I don’t see it. 

I had suggested a similar approach using dowels, however going across the grain. 

Time will tell.  I suspect that the domino will split over time.

Hmmm, I hadn't really contemplated that the Dominos might split.  Found 3 more cabinet doors with similar issues - to be clear these repairs are not same as splits in the original post drawer fronts that were substantially more damaged (LOL - this thread has turned into a chronicle of kitchen refinishing...)

These door splits are all shallow and originate from the hinge cup mounting screws, if nothing else the mortise drilling will interrupt the crack propagation.  Cracks were all small enough that they likely could have been ignored without consequence, pretty comfortable there will not be further issues.

FWW - I did try your vacuum trick on the three new split repairs.  Loaded up the mortise with glue and stalled out the vac with rubber hose end on the other side of the crack.  It pulled glue through one crack and no luck on other two, but nice trick to have in the bag, thanks.
 
I don’t have a domino machine; I use dowels were domino owners would place a domino. 

With that preface out of the way, after reading all the above, I probably would have done this:

1.  Assuming that clamping will close up the split, I would skip trying to add glue to the void. 

2.  Using a self-centering dowel jig, I would drill for two 1/4” dowels running across the split, and one just before the split. 

3.  I would glue the dowels in the holes and clamp to close up the crack.

4.  Wait for the glue to dry.  Trim and sand the exposed dowels. 

I think my jig has a 3/16” drilling bushing.  I have never used that.  I would probably use the 1/4” just because I keep those dowels in stock. 

To match the strength of a domino, I would probably have to glue in 3 dowels. 

I suspect that the results would be essentially the same for dominoes or dowels. 

 
A mere coincidence that all the dismounted hinges ended up fully disassembled for deep cleaning while situated next to the espresso machine???

I'll let you be the judge......

[attachimg=1]
 

Attachments

  • IMG_9361.jpeg
    IMG_9361.jpeg
    129.2 KB · Views: 5,521
Ultrasonic cleaners work the absolute best for parts like this.  I don’t have one though.  What I do have is an old Crock Pot, which will hold the temperature at about 190 degrees F. 

Parts left in the pot with a healthy dash of dishwashing soap (I use Dawn) will, after 24 hours be spotlessly clean.  That backfired on me once when I used it on bronze hardware that had about 70 years worth of house paint on it.  The pot lifted off the paint (with a little brushing) and lifted off the patina on the (real) bronze, leaving a coppery-pink color of the original bronze castings.  It is 2 years now, and the patina is coming back.

At any rate, an old Crock Pot ($5.00 to $10.00 at garage sales) eliminates 90% of the labor associated with cleaning hinges, brackets, etc.

You can buy them new from Walmart at $30.00 (small) or $40.00 (large), the large being far more useful.
 
Packard said:
Ultrasonic cleaners work the absolute best for parts like this.  I don’t have one though.  What I do have is an old Crock Pot, which will hold the temperature at about 190 degrees F. 

Cleaned them with dish soap, a bit of citrus degreaser and a toothbrush.  I'm going to claim that the extra-dose-of-espresso induced jitters I had that morning were a reasonable substitute for an ultrasonic cleaner  [smile]

As it were, I owned a nice commercial Crest Ultrasonic bench top tank back in the late '90s at my business. (Not a cheap tool, ~$1300 + special solvents). It was pretty good on any complex shaped items with nooks and crannies but very hit and miss (mostly miss) on more open surfaces.  My understanding is that the scrubbing action is more effective when the sound waves have multiple opposing surfaces to bounce off.  It fell into disuse because it was a crap shoot if a part was going to come out and need further attention and delay completion of a job.  Did make a really cool sound when running tho.
 
The Crock Pot will soften and break the bond between paint and the substrate. But it will not necessarily remove the paint.  Mostly it will rub off with finger pressure, but a tooth brush is easier to use. 

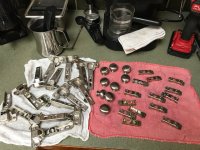
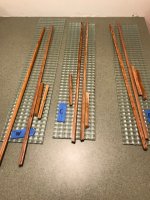
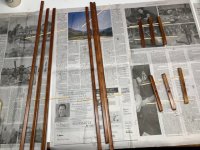
With moveable hardware it is necessary to lube the pieces.  I find that Lockease, a graphite imbued lube works well and leaves minimal residue. 

I bought a gallon of WD40 many years ago, and I sometimes dip pieces in a bath of that stuff.  I’m not sure what lubricant is left behind.  But it is effective in displacing any moisture residue.

If you run the pieces under hot tap water, the heat will naturally drive out any moisture. A hair dryer or heat gun will do so also. 

I had access to a vibratory tumbler where I used to work.  Left in the bowl overnight with crushed walnut shells as media, all the exposed surfaces gleam.  It also works to “sand” small wood parts. 

Small vibratory bowl tumblers are very cheap (but small) and are widely distributed to gun enthusiasts who load their own bullets.  It is used to polish the brass casings. 

You can get very hard paraffin balls and use that to tumble on a wax finish.  Years ago, that was how wood garment hangers were finished.

I understand that shellac flakes can be applied the say way, but I have not seen anything written or online to verify that. 

If I come across some small wood parts to sand, I will get a tumbler.  Load with playground sand for initial sanding and then walnut shells for the final finish.

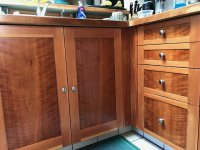
It always pains me to watch HGTV shows where they paint the kitchen cabinets with the doors in place and simply paint over the hinges.  It reeks of a cut rate job.  But I see it being done on kitchens that cost as much as $100,000.00.  (“No Demo Reno” is the worst offender in this regard.)

 
jonnyrocket said:
Very nice repair work!

I’m looking forward to see the picture of the full kitchen with all the repairs and refinished doors and drawer fronts in place. I hope you took a before and after!

Here you go, pretty much wrapping this up for now, other cabs will have to wait until spring.  First photo is old finish and second is new.
This particular door has a really cool herringbone pattern, it's a bit wider than all the other cabinets and he needed to use 3 veneer flitches to cover the panel.  New finish is much more red as the old finish had yellowed badly.


Attachments

  • IMG_9347.jpeg
    IMG_9347.jpeg
    103.5 KB · Views: 46
  • IMG_9369.jpeg
    IMG_9369.jpeg
    105.1 KB · Views: 48
The finish yellowed, or the wood?  I don’t know what type of varnish you used, but I do know that shellac is UV resistant and does not change color.  The underlying wood does change color.

In any case applying a amber shellac top coat might bring it closer in color.  The shellac can be removed with alcohol if needed.
https://www.shellac.net/news/7-questions-facts-myths-about-shellac-for-wood-finishing/#:~:text=A%3A%20Shellac%20is%20naturally%20UV,in%20the%20early%2020th%20century.
 
.......and I thought I could stop refinishing, had to go back for more. 

Kitchen has an island counter with some cool little windows using vintage reeded glass panels that were in the basement when we purchased house.  They were likely part of the original cabinetry and we recycled them in a few locations as decorative panels that are period correct of sorts.

Anyhow, the windows behind sink were beat up from moisture and I thought "hmm, nice little mini project, I'll pop out the glass and refinish the frames, will only take a couple hours". Once the glass came out it was obviously best time to do a bunch of tedious small areas near the windows and some adjacent trim. 

Quite a few hours later yielded below:


Attachments

  • IMG_9367.jpeg
    IMG_9367.jpeg
    126.2 KB · Views: 46
  • IMG_9374.jpeg
    IMG_9374.jpeg
    124.3 KB · Views: 49
  • IMG_9379.jpeg
    IMG_9379.jpeg
    82.5 KB · Views: 51
  • IMG_9375.jpeg
    IMG_9375.jpeg
    62.3 KB · Views: 56
Back
Top