(It's here!) Just ordered a Hammer A331!

Thank you [member=21249]RKA[/member] !

I found something crappy but semi workable at Lowe’s and finally ran a board through !

I’ll post pics tomorrow. It came out with a beautiful finish but there was some snipe. It is more than likely my technique - this is my first jointer. Anyone have any tips?

I’ll send pic tomorrow!

And no, the bag isn’t quite full yet ;)
 
mattbyington said:
Thank you [member=21249]RKA[/member] !

I found something crappy but semi workable at Lowe’s and finally ran a board through !

I’ll post pics tomorrow. It came out with a beautiful finish but there was some snipe. It is more than likely my technique - this is my first jointer. Anyone have any tips?

I’ll send pic tomorrow!

And no, the bag isn’t quite full yet ;)

Yes, look at my post (reply #49) above and listen to the podcast beginning at 17:00. 

The way the machine is setup from the factory will give you a little snipe.  The outfeed table is set slightly lower than the cutterhead.  See page 33 of the manual, top of the page - "8.3 Adjusting the joint." 

The outfeed table is easily adjusted to be even with the cutterhead, thus eliminating snipe.
 
So for me proper jointing technique involves two foam bottomed push paddles and a smooth consistent forward motion with strong steady downward pressure against the bed. You position your feet comfortably in front of the machine keeping in mind where you are going, not just where you start. Then with your dominant hand in the rear position use the front hand to insure contact with the fence and the bed below. Use the back hand to push the board forward while maintaining enough downward pressure to keep uniform contact with the bed. Just before your front hand reaches the blade area lift it slightly off the board while continuing a steady pace forward. Now place that front hand back down on the board just past the blade area. Now, as your rear hand reaches the cutting area slide it back a foot or so and then as you rengage contact move that front hand back and maintain your steady movement forward. Keep doing that back and forth Until you are near the end of the board. So the end goal is uniform pressure support of the board on both sides of the cutter head while providing a nice consistent feed rate with no stopping if possible. When you get to the end of the board (the last foot or so) move the back hand to the outbound side of the blade and leave the front hand where it was. Now maintain feed rate and focus on nice solid contact with the bed from both hands until the board is completely through the cutter head. The key to jointing is keeping that board in great contact with that nice big flat bed, especially at the beginning and at the end. It takes some practice but you will get it.
 
You want to make sure the board is sitting 'naturally' on the bed, ie if it has a bow, don't push that bow down to contact the bed, otherwise you'll never actually straighten the board. The main objective of the planer is to give a dead straight face, and edge, to reference off when it comes time to thickness plane. Pressure in the wrong spot/s will give you a nice clean board, but not a straight one.
Always plane with the 'bow up' - the ends touching the bed, gap in the middle. Not middle touching, ends in the air.
 
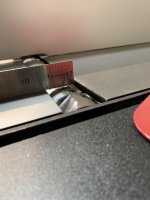
Thanks everyone! I am trying to adjust it now - so with the ruler trick, when turning cutter manually, I want it to JUST touch the carbide blade but NOT move the ruler. Is that right
 
This is what I mean:

It seems it's already really close, but moving the ruler maybe 1-2 mm.

[attachimg=1]
 

Attachments

  • IMG_1270.jpg
    IMG_1270.jpg
    714.3 KB · Views: 886
[member=67555]mattbyington[/member] it should just glaze it. Just make sure it pulls the ruler not lift it.

mattbyington said:
This is what I mean:

It seems it's already really close, but moving the ruler maybe 1-2 mm.

[attachimg=1]
 
I know I watched that as soon as it came out :)

Unfortunately no real technical help.

[member=18283]RobBob[/member] I listened to the podcast - that’s exactly what I need to do. You’re right.

The manual isn’t very clear though. Anyone know of any pictures or video on the adjustment itself ?
 
[member=67555]mattbyington[/member] your cutter is way closer than 1-2mm. You need to rotate the head such that the leading edge of the insert is just touching the ruler. Not flat as you have shown. Try checking again before adjusting.

mattbyington said:
This is what I mean:

It seems it's already really close, but moving the ruler maybe 1-2 mm.

[attachimg=1]
 
[member=45856]blaszcsj[/member]  got it thank you sir!! Will do!

Biggest issue right now is I don’t know how to adjust the outfeed table height. So I can’t adjust.

The instructions aren’t super clear. If anyone has any info or link I would be forever grateful!

I’m searching online but plan to call Felder technical support tomorrow!

Matt
 
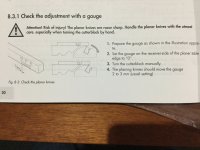
Turning the cutter should pull the ruler 2-3mm. Your machine looks to be calibrated correctly from the factory. Attached photo is from the Felder manual for my AD941.

View attachment 1
 

Attachments

  • 389890FC-9A22-4F2E-BD8C-F5BEA3C5A907.jpeg
    389890FC-9A22-4F2E-BD8C-F5BEA3C5A907.jpeg
    1.6 MB · Views: 365
[member=11423]egmiii[/member] thanks!! I wonder why I have snipe then. Maybe Just my technique ?

Matt
 
mattbyington said:
[member=11423]egmiii[/member] thanks!! I wonder why I have snipe then. Maybe Just my technique ?

Matt

First check to see if your infeed and outfeed tables are coplanar and not twisted. Seems to be a common complaint. If not you have found your problem. I'm not familiar with the setup procedure on the new style A3-31, when I had mine it was back in 2008 and I'm currently running an AD951 with a helical head from Hermance. Call Felder and they will give you the setup procedure. You also might consider joining the original FOG, more combined knowledge/info there than on these other forums.
 
Thanks [member=4907]kcufstoidi[/member] !

I ordered one of those "dial indicators" on Amazon - I've seen on Youtube they use those with a piece of wood to measure the height of the tables relative to both ends of the cutter head to measure co-planer.

So, will do that! And hopefully figure it out!

Matt
 
[member=67555]mattbyington[/member] If you are going to check coplanarity at zero position, first you need to establish flatness of each table. This will establish if there any excessive twist or cupping. you can do this by using a reference straight edge (I have a 24" veritas and 48" peach tree straight edges). Check straight down the long axis of the bed in the front, middle, and back. Use feeler stock to determine any gaps. Then do the same across the table in the short direction, then finally again in an "X". This can then be repeated on the table/bed.

After you understand the tables you can then use the indicator or the straight edges to determine if they are co planer by checking the relationship between tables. With the tables at zero, you can extend the straight edge across the cutter and check to see if there is skew between tables: front, middle, back. Then check the pitch of tables by extending the straight edge further over the second table and you can do the same check to determine if the tables have any rise or fall in relation to each other.

Does that make sense?

mattbyington said:
Thanks [member=4907]kcufstoidi[/member] !

I ordered one of those "dial indicators" on Amazon - I've seen on Youtube they use those with a piece of wood to measure the height of the tables relative to both ends of the cutter head to measure co-planer.

So, will do that! And hopefully figure it out!

Matt

Not sure which dial indicator you purchased, but the Oneway Multi Gauge is the right tool for the job. It’s not terribly expensive and you will find other uses for it as your tool collection grows.
 
I don't know if you have already seen this, but there is a thread on sawmillcreek where someone posted instructions (with pictures) on how to do some of the table adjustments (https://sawmillcreek.org/showthread.php?198789-Hammer-A3-31-Hinge-side-adjustment). Also, Rob Porcaro (rpwoodwork.com) has a couple of posts on his blog about setting up a hammer jointer/planer. I have had an A3-31 for a couple of years, and have had to adjust the jointer table a couple of times (more than I expected to be honest). If I were you, however, I would use the machine for a while before trying too many adjustments to the tables. If you have never used a jointer before, moreover, I would suggest to find a local woodworking school (community college perhaps) to get a bit of instruction, as technique may certainly resolve some issues.
 
egmiii said:
Not sure which dial indicator you purchased, but the Oneway Multi Gauge is the right tool for the job. It’s not terribly expensive and you will find other uses for it as your tool collection grows.

Ditto.  Excellent tool and very handy in the shop.

There's a used one for sale listed at Sawmill Creek and WoodNet.
 
Back
Top