Jessem TA Fence

simonh

Retailer
Member
Joined
Dec 30, 2017
Messages
206
Does anyone have the Jessem TA fence?  I see a lot of people with the MAST-R-FENCE but not much on the TA Fence.

I'm thinking of upgrading the Incra Wonder Super Duper Fence. I find it a really awful engineering. It's like someone designed it out of a bunch of 80/20 extrusions and box of bolts. The flip stop is awful, there are so many adjustments that you can tinker with and the incremental locking track on the fences is a waste of time. I also find the way you adjust the fences is just a fiddle with a hex driver through the holes meaning often meaning you have to unmount and hold downs or sacrificial fences etc. The offset fence for jointing is another fiddle along similar lines. Dust collection through the fence is OK but the big gap on the top somewhat defeats it. The right angle jig thing is pretty poor too.  All in all I like the LS positioner itself, that's a good concept and works well, but the rest is pretty poor IMO.

So, I'm thinking Jessem. I've got lots of their stuff and the engineering is spot on. This is properly engineered and CNC machined stuff. I can make a simple bracket that would mount the Jessem fence to the Incra LS and I could also use the Jessem fence in standalone mode for when it's a simple job that doesn't require the positioner. It looks like all the controls are nicely positioned on the rear and don't need any tools.

Anyone have experience of the Jessem TA Fence? How does it compare to the cheaper MAST-R-Fence?  It looks like the TA fence is a beautiful piece of engineering and the MITE-R-Slide II is a million miles better than the Incra effort.

Any thoughts?
 
I have had a Jessem Master Excel I router table for years and love it. I have seen the Excel II at Woodcraft many times and love it but the upgrades are not enough for me to make take the (expensive) plunge. If I remember the Ta fence’s main differences are 1. that you can micro adjust an offset in the two fence halves for jointing. In all these years of using a router table I have never had to shim the outfeed fence so I not sure I really need that (but I can’t help but think it is cool)!. 2. I need a torx driver handy to adjust the fence halves and I believe that the new one is tool less with knobs on the back side. 3. The slider is redesigned completely to slide on a carriage on a rail where mine is not removable as it slides on a chrome tube. Mine works great but the new one is much more elegant.

It has been a while since I drooled over one so I am sure that I have forgotten other features.
 
I have a Jessem TA fence which I purchased to upgrade my MastRFence II which I was not happy with.  I too had a very difficult time trying to find information on it when I was researching it and finally just bought it when Woodcraft had a 15% off sale. 

It's only been used a few times so far but I'm my experience it is a huge upgrade from the MastRFence II.  I find it much easier to dial things in on initial set up and  the fence itself adjusts more easily on the side tracks than its predecessor.  The micro adjust fence works great to support the out feed stock for cleaner profiles and more crisp fitting joinery.

I also bought the Miter Slide II that goes with it as I don't believe previous versions are forward compatible but the new Miter Slide II is backwards compatible if I understand correctly.  I've installed it and dialed it in but have not had the chance to use it yet on a project.  My only complaint so far is that there is not an incorporated storage system for the Miter Slide II like the earlier Miter Slide had where you could flip it out of the way when it was not needed (they suggest you pull it off and put it on your bench when its not in use).  However with that said, I found the MastRFence II did not adjust very well when the MiterSlide was flipped up so maybe its a blessing in disguise that you need to simply pull it off and store it separately.

Let me know if you have any specific questions and I will do my best to try and answer them.  Based on my first few projects with the TA fence I would buy it again.
 
Thanks for the responses.

I remember seeing the fence 3 years ago at a woodworking show. However, my Incra was new back then so I handn't found all the pain points back then and didn't give the Jessem too much attention.  I do have various other Jessem tools and the build quality is amazing.  So, I think I might see if anyone has any good black Friday deals. There's not many suppliers in Europe so it's much harder to see one or get good deals!
 
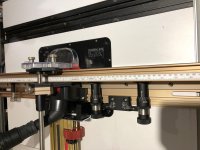
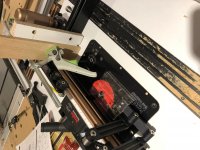
Here it is attached to my Incra LS positioner with some CNC'd brackets I knocked up. Had to get an angle on the vacuum outlet so we will see how that works. I use my CTL-SYS above the table and larger Dewalt extractor underneath. Next step is to mount the rails on the side of the CML-VL si I can use it without the Incra LS for simple stuff, need to get creative as they aren't quite deep enough to just slide into the track on the MFT profile.

I've not tried using it yet, but it feels solid. This thing is serious engineering and weight in all the aluminium. First impressions is that it's nice how it all fits together compared to the Incra having main fences, subfences and all the rest. Adjustments are super easy with the knurled knobs on the back and I can leave ClearCut guides in the front track while moving the fences. I also got the Mire-R-Slide and that feels so solid compared to the Incra right angle. 

I've got a little Christmas gift project coming up so I'll get to use it in the next week.
 

Attachments

  • IMG_1666.jpg
    IMG_1666.jpg
    660.1 KB · Views: 2,109
simonh said:
Here it is attached to my Incra LS positioner with some CNC'd brackets I knocked up. Had to get an angle on the vacuum outlet so we will see how that works. I use my CTL-SYS above the table and larger Dewalt extractor underneath. Next step is to mount the rails on the side of the CML-VL si I can use it without the Incra LS for simple stuff, need to get creative as they aren't quite deep enough to just slide into the track on the MFT profile.

I've not tried using it yet, but it feels solid. This thing is serious engineering and weight in all the aluminium. First impressions is that it's nice how it all fits together compared to the Incra having main fences, subfences and all the rest. Adjustments are super easy with the knurled knobs on the back and I can leave ClearCut guides in the front track while moving the fences. I also got the Mire-R-Slide and that feels so solid compared to the Incra right angle. 

I've got a little Christmas gift project coming up so I'll get to use it in the next week.

Wow, that looks awesome! Great work! I’ve been wondering how that fence could be adapted to fit the LS positioner since the first time I saw it. I love how the TA Fence color closely matches the Incra’s (other than the black adjustable faces).

One of the big bonuses I see is being able to use Jessem’s new Mite-R-Slide II with it (the Mite-R-Slide II won’t attach to the Incra fence). I think the Mite-R-Slide II looks like a better option than the Mite-R-Slide since it’s removable and even comes with the built in stop which would be a great substitute for Incra’s Right Angle unit and Incra’s stop.

Could you post more pictures of the custom bracket by chance? I would love to hear how it’s working out as well.

 
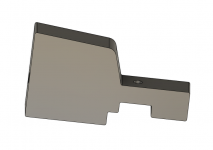
I've attached a render of the Fusion 360 model as it doesn't photograph too well once attached.  If you have access to a CNC I can send you the Fusion 360 file.  I just milled the prototype from 16mm Delrin as I had some around and it's quick and forgiving to machine whereas  aluminum is expensive and slower.  No real need for aluminium, but anodized black would all match the Jessem.  It is rock solid, the only movement is the usual in the Incra positioner arm/fixture. If you want serious rock solid where you could pickup the table before you moved the fence you can adjust the Incra and then lock down the fence on the side rails that come with the Jessem fence and mount to the side of the router table.

I just tried the jointing feature on the fence and it was amazing. So so easy to adjust. I simply set the fence back the desired amount, routed the leading edge, then just loosened the knobs on the back and turned the micro adjust to make the offset fence meet the routed edge. Locked everything in position and ran the entire piece of wood through.
 

Attachments

  • Capture.PNG
    Capture.PNG
    33.7 KB · Views: 651
Full beast mode with the slider!  The end stops are even sprung :)

To run the dovetails like the Incra right angle jig it will need a sacrificial backer board mounting on the fence so the cutter can go into the aluminium fence and also to give you something to clamp the pieces to as the small fence on the Jessem doesn't have any great clamping points. I'll by trying some dovetails next week so I'll post an update.
 

Attachments

  • IMG_1668.jpg
    IMG_1668.jpg
    615.1 KB · Views: 1,764
Unfortunately I don’t have a CNC :(

I could always make a custom bracket out of Baltic Birch plywood or MDF and paint it black.

If only Incra would make a few small changes to their Wonderfence. I can’t believe they haven’t made a tool free fence adjustment yet. Using the hex driver is kind of a pain. If they teamed up with Jessem like they did with the Incra Mast-R-Lift II they could have the best fence possible to go with their LS positioner.

Everything Jessem makes is top of the line. I can’t wait to hear how the
Mite-R-Slide II works for you. I was trying to think of how you could clamp boards to it for dovetails. Like you said a sacrificial fence would be needed. Maybe routing a groove in the sacrificial fence and putting a t track in the groove so you can use a clamp to hold your boards in place. That Jessem stop makes it super easy so you don’t route too far and go into your Mite-R-Slide II’s fence.

Please keep us updated!

Thanks!!!
 
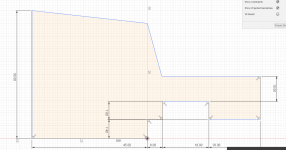
I've attached a sketch with the dimensions. It should be pretty easy to cut out using a band saw and a little sanding.
 

Attachments

  • Capture.PNG
    Capture.PNG
    130.8 KB · Views: 801
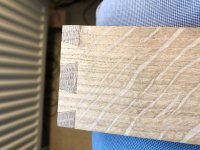
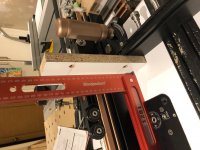
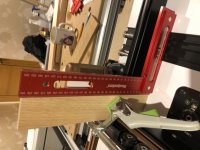
I cut my first dovetails on it last night.  I checked and Mite-R-Slide II was square to the fence out of the box, checked the TA fence was square to the table, then just needed a slight adjustment to square the fence on the Mite-R-Slide II which was easy job. 

After everything was square I drilled a piece of melamine scrap to attach it to the t-track so I had a longer support and somewhere to clamp the pieces to. I placed a couple of pieces against both fences and pushed them hard up then used a clamp as they are the strongest I have for holding the pieces. I double checked with a square that the pieces were squared perfect.  Then pushed through, I set the end-stop so that the Mite-R-Slide aluminium fence wouldn't touch bit.  Everything worked very smoothly. Only slight issue was my Festool clamp interfered with the bit gaurd operating properly, but that's easily fixed maybe something like you suggest that will go into a t-track such as the Armor B5-HH clamp.

For the last operation on the dovetails with the piece flat on the table I used a Jessem stop on the fence to stop the cut going too deep.  The only caution is the thickness of the stop so you sometimes can't do the nearest cut with the fence in place otherwise it will hit the stop. I think some sort of very thin
 

Attachments

  • IMG_1675.jpg
    IMG_1675.jpg
    842.1 KB · Views: 1,018
Thanks for the update! The dovetails turned out great, nice work!

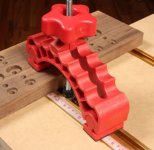
This is what I was thinking for clamps:
[attachimg=1][attachimg=2]
I’m not sure they would be totally out of the way but they would definitely be easy to use with the t track.
 

Attachments

  • BB8660BC-76CD-4492-973E-D1ABA7DA284A.jpeg
    BB8660BC-76CD-4492-973E-D1ABA7DA284A.jpeg
    1.1 MB · Views: 5,162
  • B9828EF1-9E7A-4554-BCB0-F9C6F9013963.jpeg
    B9828EF1-9E7A-4554-BCB0-F9C6F9013963.jpeg
    733.8 KB · Views: 5,150
And as far as thin pieces sliding under the Mite-R-Slide II’s safety guard/stop I was thinking you could attach a piece of scrap wood to the bottom of the guard to fill up some of the gap if that makes sense.
 
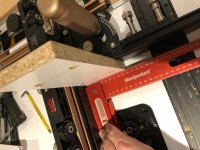
Here's a few picture I took this afternoon.  I'll let you know once I get a better jig hooked up. I did manage to get the Festool clamp to work as long as the handle is angled down. It was extremely easy to put the wood in and clamp everything and it checked out perfectly square through the cut.  No clamping down the right angle fixture etc...
 

Attachments

  • IMG_1677.jpg
    IMG_1677.jpg
    680.8 KB · Views: 1,248
  • IMG_1678.jpg
    IMG_1678.jpg
    659.5 KB · Views: 1,005
  • IMG_1679.jpg
    IMG_1679.jpg
    725.8 KB · Views: 1,400
  • IMG_1680.jpg
    IMG_1680.jpg
    594.3 KB · Views: 1,178
I made an Jeseem > Incra finger stop for half-blind dovetails. Small bit of 6mm plastic milled down to 3mm with a couple of prongs that clip into the two holes on the Jessem stops.  Works well and easily disposable if you get the bit a little close to the bit it's only made out of plastic so will snap rather than cause any damage.
 

Attachments

  • IMG_1719.jpg
    IMG_1719.jpg
    689.8 KB · Views: 830
I just found an great use for the Mite-R-Slide. I was making a small picture frame and had cut the 45 degree mitres on the table saw. As everyone knows a picture frame is a real test getting the accuracy for the mitred corners. I wasn't happy at the small gaps as the mitres weren't perfect. I know a lot of people either use a special sled on the table saw for picture frames, or a quick pass on the shooting board with a plane.

But, I was curious if I could do it with the Mite-R-Slide. So, I set the fence to exactly 45 degree using a couple of Woodpecker triangles (you need the angle 135 to set the fence). I used a straight cut bit, offset the rear fence 1/64" to act like a jointer and aligned the fence to the outfeed fence. Held the piece against the Mite-R-Slide and registered off the main fence and just made a light pass to joint the ends. The result is amazing perfect mitres.

I gave up a while ago relying on the table saw for bevel cuts on small parts and instead use a quick cut on the table saw to hog away material and then a 45 degree router bit. I'm really pleased to be able to get super accurate miters too on the router table now.
 
Hi guys,

I am thinking about the same as [member=66875]simonh[/member] to attach Incra LS positioner to Jessem TA fence. My priority no.1 is easy to use as it will be in community workshop. It means. If it is yours, you have a time to learn how to use your specific tool. But in community workshop, everything have to be as easy and dumb friendly as possible. It means, laser lines everywhere, robust constructions with no play and precise stops (90°, 45°). That is why I am considering this hybrid. It seems, that LS positioner is much easier to use in terms of positioning the fence and maintaining right angle or paralel line.
My question is. Is LS positioner strong enough to keep the fence (any fence) in paralel. Does it bend when you force your piece towards the fence at start? I don't want something, what will bend and screw the piece. Of course, I want to buy the Clear cut with it, so the force, will not be massive. But, I want to get rid of the two T tracks and nobs. As LS is just one leaver.
So, is Incra LS positioner sturdy enough?

Thanks in advance for your experiences.
 
The Incra LS positioner is situated in the middle so has maximum stability right at the point of the router bit. You don't really get much deflection at the edges with either the Super System fence or the Jessem fence.  One advantage with the Jessem fence is that if you install it so it can work stand-alone with the side rails then even when using the LS Positioner you can lock the sides down too if you wanted. 

I tend to be using the Incra more for just joinery - dovetails, box joints, tenons etc. and have learnt to really appreciate the Jessem TA used stand-alone for edge treatments or groves and dados in boxes, jointing etc.. Leaving one edge fastened and pivoting the other end gives very small changes at the bit for quite large changes at the other end, so adjustment is easy.

I'd say that after using the Jessem alot since my initial review I haven't found any flaws. All the adjustments are so easy.  I even made a small video of using the Mite-R-Slide as a shooting board -
 
I'd recommend going to the JessEm site and downloading the 3D PDF model as this allows you to get a good view of how everything on the JessEm fits together, and you can take dimensions from the drawings. See:https://jessem.com/collections/rout...fence-for-router-tables-with-jointing-feature under the 3D version tab.

On the JessEm side rails I unbolted the part that is usually screwed to the underside of your router table. My initial hope was that I could then just bolt it to the side rails of the MFT using the T-track. Unfortunately, the JessEm side rails aren’t quite tall enough for the bolt holes to align with the T-track.  My first preference would have been to mill some adaptors that fit in the MFT T-track and then the side rail would have bolted onto them as this would make it easy to remove them or adjust.  But I couldn’t be bothered as I just wanted to use it, and in reality I'll probably never remove them!  So instead, I tapped a couple of M6 holes (as I have plenty around in various length, the original bolts are ¼-20) in the MFT extrusions between the T-track and V groove. They don’t have to be spot on as you have up-down adjustment when you tighten to level with the table, and the rulers can also move to calibrate with the center of the router bit.

This will probably make more sense if you get the 3d model and pan around to look at the JessEm extrusions and how it all fits together.

Just a thought... I'm using longer extrusions on the sides of the CMS-VL (a couple of the MFT/3 side extrusions) to make a wider table than the standard CMS-VL.  This may make a difference as to whether the you can align the JessEm scale on their rails to the center of your router bit depending where on the table your router plate is located. A quick measurement looks like you need around 300mm behind the bit and about 120mm to the front.
 
Back
Top