Kodi,
Cheese and Holmz made some interesting contributions to your previous query regarding floor loading.
Removing subfloor for joist cavity access and subsequently replacing it ("patching in") will not yield as stiff a subfloor as pulling up the existing flooring for the bathroom and then replacing it after the sistering work is done.
Your attic floor will be stiffer if you take up the whole bathroom floor and corresponding (covering the rest of the 12' span of those floor joists) floor area outside the bathroom/on the other side of your partition wall, and then replace all of it after the sistering is complete.
This is definitely preferable to just pulling up the area over the two cavities and then repairing them.
Also cut out the subfloor underneath the partition wall that's above the sister cavities. Removing these 3/1/2"x14 1/2" sections of subfloor will make life easier when you want to roll your 2x10s up to mate with the existing joist.
As for the sistering of the two joists;
I'd get (4) 2x10x8' joists, as knot and defect free as you can buy. Be sure to inspect them at point of purchase for twist, warp, crown, etc. as these aspects will make the job more difficult. I'd also double-check their height (the "10" dimension) against your existing attic joists before install. Rip as necessary to remove any crown or small discrepancy if the new joists are marginally taller than the existing.
After your subfloor is up (and any bridging/blocking removed), it's helpful to inspect the existing joist thoroughly with a flashlight. Note any fasteners from the ceiling below, etc., that would provide obstructions to mounting your sister joists to existing. Remove/repair as necessary. Check both sides of each joist*.
From your previous thread, it sounds like there's more room from the bathroom side of the partition wall to feed sister joists into the cavity.
Take an 8' 2x10 and lay it down and feed it through.
Take a 2nd 8' 2x10 and drop it into the next cavity.
At this point, you should have a new 2x10 on either side of one of your joists to be sistered.
One 2x10 should be butted against the bearing wall in the bathroom, the other should be butted against the other bearing wall, 12' away.
Roll/stand them both up so that they are parallel to the existing joist. Clamp in place.
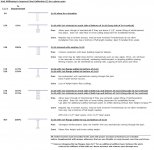
Drill paired holes the length of the assembly;
Make 2 holes, top hole is 1/4 to 1/3 down from top edge of joist, bottom hole is 1/4 to 1/3 up from bottom edge of joist.
1st pair of holes is 6" from bearing wall. Each subsequent pair is 12"-16" from there.
Hole diameter for 'tails' (the 4' of sister, starting at the bearing end) is 5/16". The tails will be lag-screwed in with 5/16" x 3" lag screws.
Hole diameter for center (where you have a 'triple': existing joist flanked by 4' of sister on each side) is 5/8". The center will use carriage bolts, washers, and nuts. If you can get nuts with integrated nylock washers, that's great insurance against them loosening. 6" carriage bolts should suffice.
When you've done all of your drilling, UNCLAMP.
Lay the sisters back down on their faces. Spread construction adhesive on the face of each sister. Tip up in place. Be sure to push one carriage bolt through in the middle and run a pin (anything to be sure the lag holes in the tail are aligned) through the tail.
Clamp up. When you're satisfied that the sisters are where you want, that they don't have any crown above the existing floor joist, and that all looks good, screw the assembly together.
At this point, you have one joist sistered. It's not the same as putting in a 2x10x12', bearing on both ends, but in this instance it's arguably the next best thing.
You now have one joist sistered.
Repeat this process for the second joist.
Now you're ready for subfloor.
Treat yourself to a cold beverage.
[wink]
Dave