Kitchen cabinet case construction with Domino

Joined
Apr 2, 2010
Messages
14
Good Day:

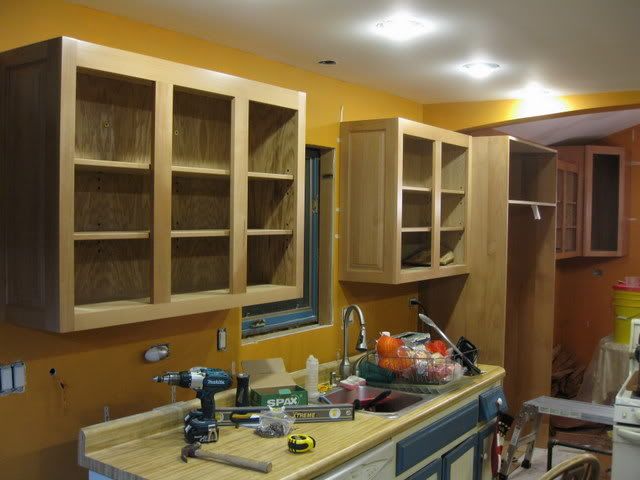
I have started to make my own kitchen cabinets and I am using the domino for the case construction.  I just have a few questions on it's use.

1.  When I am using the dominio for the sides with 90 Degree attachement is there an easy method to ensure that both surfaces of the domino are referenced perfectly so there is no offset when the cabinets go together?  (the first base units didn't line perfectly, but I slowed down a bit and clamped the stock and it went much better).

2.  I am using 3/4" prefinished birch plywood for the case and back.  I want to domino the back to the case to ensure everything is square.  I am planning to cut the back 1/8" smaller that the overall size of the case for both height and width and then domino the bottom and the right hand side only.  Then I was was going to predrill and screw the back to case.  I was wondering if anyone uses this method or could recommend another method.

3.  If anyone have questions or comments feel free to give me a shout.

Thanks,

Michael
 
As long as you are using the fence on both pieces as your reference point, you should end up with flush joints.

 
I usually put the backs inside the case the rear of the case rabbited. squared glued and pinned
 
I agree with the others.Also i use the medium witdh setting.That gives me a little room to play if it does not line up right.

BTW    NICE DOGS :) :) :)
 
I have found that it is always "user error" when the pieces don't align.  There can be a tendency to hold the Domino too far forward and exert and upward or downward force causing misalignment.  The best approach that I've found is to hold most firmly on the fence handle and push the Domino from the back (around the cord).  The speed at which you plunge seems to affect the mortice dimensions.  Too fast and the mortise is sloppy. Slow and steady works best.
 
Most of the misalignments I have seen were because the user referenced from the base and not the fence. It's a VERY common mistake and has happened to me when I thought I was referencing from the fence.

The best way I know to avoid it is to always have the surface into which you are plunging hanging off the side of the table. That way, you know absolutely certainly that the base isn't sitting on the table and fooling you.

Tom
 
i found the Dominos allot more accurate if you go slow and have good dust extraction and for what your doing i would use the setting a size bigger hole than the domino you are using to give a bit of play for your self
 
I happen to be building many cabinets right now for our kitchen. I have a Domino and was considering it for the boxes but decided to use dado/rabbit joints and 3/4" backs. I used my TS with Wixey DRO and quickly and accurately cut the dados and rabbits. The box parts squared themselves up perfectly and I was able to assemble them with glue & screws by myself. I have used the tenons for the face frames and ff to box.

Mike
 
My personal suggestion is to route grooves/dadoes/rabbits when making cabinet cases.

I started building cabinet that way 60 years before the Domino was invented.

Please do not get me wrong, I was an early adopter of the Domino. I own two of them and use them daily. However, for me the Domino works much better assembling face frames and attaching face frames to cases.

Each of us builds cabinets differently. Personally I know that when I use a 19mm top quality back on a cabinet, with will remain sturdy square and true for decades. Typically I use grooves and dadoes to hold backs 19mm or more in so I have material to scribe when needed and there is room for French cleats to support the cabinets, be they uppers or lowers/base. All the upper cabinets and most of the bases I have made for my own homes have 19mm backs.

Unfortunately I own a custom cabinet shop specializing in working with retail designers and installers. Even in my own home I encountered rebellion from those who had to lift the uppers with 19mm backs into place. With base cabinets, trades such as electricians and plumbers did not care for drilling and sawing the thicker material. Of course the structural integrity of the cabinets is not their responsibility.

So, to remain in the cabinet business, I build them to customer specification. If asked what I think about using 6mm backs on uppers, I am tempted to suggest hiring stronger installers. The reality is I stiffle such remarks. I make sure they sign the purchase order.

As I see it, base cabinets tend to be a bigger problem. Hardly ever does the cabinet maker provide the counter top and even if we do, it is attached separately and later in the install. This leaves the base cabinets somewhat wobbly until installed, and then the walls are adding support. I find that a real problem when the building settles. To me it makes better sense to let me use 19mm backs and if needed loan installers deeper hole saws!
 
Carroll,

In long-term use, what have you found is the benefit to going with a 19mm or 3/4" cabinet back as opposed to a 12mm or 1/2" back?

I've always loved using French cleats, but haven't you had a lot of opposition from customers that they take away usable inside depth and what's your response to those people?

Thanks
 
Ken Nagrod said:
Carroll,

In long-term use, what have you found is the benefit to going with a 19mm or 3/4" cabinet back as opposed to a 12mm or 1/2" back?

I've always loved using French cleats, but haven't you had a lot of opposition from customers that they take away usable inside depth and what's your response to those people?

Thanks

Hi Ken,
You ask very good and important questions.

As you of all folks well know, to stay in business you need to make what your customers want. When asked I recommend French cleats with uppers. Of course I recognize they will cost depth. Often uppers can be installed such that slight gaps with the wall are hidden, in which case why leave material to be scribed? See, this is why every cabinet job has to be considered individually.

One way I explain the depth issue, especially about uppers, is that in many cases when the shelf is excessively deep stored material can get lost.

If the cabinet is narrow, then a back of 6mm or 12mm can be good practical design. For this reason I stock those thicknesses in addition to 19mm. Often designers come to me because they value my reputation building wide cabinets. This is where using 19mm backs makes sense. I suggest adding another person to the install crew.

As I say, it is the customer's choice. Trust me, when the specifications are contrary to what my experience tells me is appropriate, I make sure the purchase order and the contract are very clear. I remain in business because of a lot of satisfied designers and retail installers who consider me a trusted vendor and virtual business partner. They reorder because they value my judgment and experience. Frequently I have far more training in structural and mechanical engineering than my customers. I do my best to not come across as arrogant. But I have found many ways to explain my recommendations.

Chances are I have also driven away installers and designers who do not share my vision. There are other cabinet shops in Southern California.
 
Ken Nagrod said:
Carroll,

In long-term use, what have you found is the benefit to going with a 19mm or 3/4" cabinet back as opposed to a 12mm or 1/2" back?

I've always loved using French cleats, but haven't you had a lot of opposition from customers that they take away usable inside depth and what's your response to those people?

Thanks

Again - I'm working on my first (and likely only) kitchen set of cabinets. I wanted the boxes to be sturdy that's one reason I used 3/4" backs. I also, by suggestion, added a 1/2" deep x 1.6" wide groove in all the upper backs about 4" from the top to accept the 1/2" tk x 1.5" wide BB ply I leveled and attached to the walls. This made it effortless to install the cabinets with my 17 year old son. Plus, since I referenced all the hanging grooves from the same reference point of the cabinet dados the cabinets were perfectly square and level to each other - no scribing required.

IMG_1587.jpg


Mike
 
Mike, you know you have to take a ribbing for having that Makita drill in the picture, but very nice job.  A little different look with the raised panel end on the uppers.
 
I've recently did some uppers with just dominoes and glue in the mortise only, no mechanical fasteners.  It was fun construction.  Good old gluing and clamping.  I wish there was some sort of portable case clamp that would pull the box together and square it like the big industrial ones do.  I've thought about rigging up the big Jorgensen 6200 band clamps with some sort of oversize version of the little corner pieces that smaller band clamps use for picture frames.  Would 2 or three of those pull a cabinet together like a big hydraulic case clamp? 
 
Hello

I am a cabinet maker and make all my boxes out of 15mm prefinished birch. I use it for the backs on all my boxes as well. I even use it as solid tops for all my lowers except the sink box.  I am a little confused as to why you would take the time to domino the cases. I have always glued the joints then used a 15 guage finishing nailer to tack it togeather then predrill and coutersink wood screws on all butt joints. I have a domino but think that you must be adding a lot of time to your assembly time, and for what a no stronger box.  Now I build all my cabinets with applied panels on the ends like the pictures above, so having screws in the outside of the carcass are no big deal. I could see if you were not using an applied panel method where the domino maybe usefull.........anyone care to share an opinion on this?? 
 
Mmmm....

When you read the hard cold truth of what Madera says, I have to agree. It is a pain building kitchen carcasses using the domino. It's really down to the extra hassle of ensuring the mm precision of cutting the holes. It does become a brain fry sometimes when your flipping the sides over to cut at the right place, marking ect.

The end result is you want a carcass. Aligning the sides and building it up with a nail gun, then screws is just fine and will give a perfect structure. Remember you've also screwing these all together, dropping a worksurface on them - they are going nowhere.... I think some times people loose focus of what they are attempting to achieve, and insist on using a tool to the n'th degree.

I've got to build some carcasses up soon, so will use my nail gun and screws for one. Domino is great, but some jobs just don't need it.
 
madera said:
Hello

I am a cabinet maker and make all my boxes out of 15mm prefinished birch. I use it for the backs on all my boxes as well. I even use it as solid tops for all my lowers except the sink box.  I am a little confused as to why you would take the time to domino the cases. I have always glued the joints then used a 15 guage finishing nailer to tack it togeather then predrill and coutersink wood screws on all butt joints. I have a domino but think that you must be adding a lot of time to your assembly time, and for what a no stronger box.  Now I build all my cabinets with applied panels on the ends like the pictures above, so having screws in the outside of the carcass are no big deal. I could see if you were not using an applied panel method where the domino maybe usefull.........anyone care to share an opinion on this??  

With me it's mostly subjective.  I enjoy the M&T joinery with the Domino.  As you say, with kitchens the joinery is covered.  So it just boils down to satisfaction and enjoyment.   Have you tried it?   If so wasn't it more fun?  Doesn't it make building kitchen boxes feel almost like woodworking?

It doesn't take that much more time.  You get your work process tuned up and you can really get busy.  There are ways to streamline it.  Use the pins and the outriggers for spacing holes so there's no measuring.  Go with the 6mm or 8mm Dominoes which are easier to press in with your thumb.  Buy or make the little plate for box building which makes things go faster and fit better.  Use the tight fit for the front mortise and it's all self aligned.  Assembly is a breeze, just squirt some glue in the mortises and pop it all together.  Drop it in the pipe clamps spin the handles and you're done.  You'll have the cases ready so fast you'll have to have a bunch of clamps on hand.  And they are sweet looking cases, no exposed fasteners.  Way cool.  Rabbets and dados are cool too, but not as cool and not usually applicable to frameless design.

I'm getting excited just talking about it.  I was seriously considering sourcing the cases for my next job but I think I just talked myself into doing it myself.

 
Well, I've attached photo's of my first Domino project. Custom office (for a mate).

Everything is made by melamine sheet material. I've got a portable edgebander to do all of the lips (3mm ABS).

[attachthumb=#0]
 
The rest of the pictures...

[attachthumb=#0]

[attachthumb=#1]

[attachthumb=#2]

[attachthumb=#3]

[attachthumb=#4]

[attachthumb=#5]
 
Back
Top