Let's make some Drawers

Overtime

Member
Joined
Jan 25, 2007
Messages
265
Let's make some Half Blind Dovetail drawers using some Festools along with a bunch of other fine woodshop machines and tools.
  I'm making 6 drawers for two small cabinet base units.

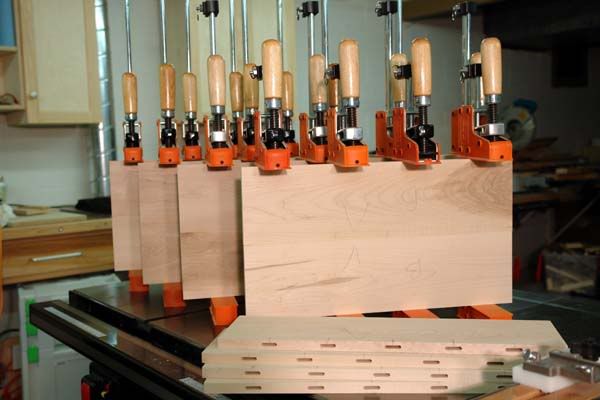
Wood -  American Soft Maple         -  drawer boxes
              1/4" baltic birch ply          -  drawer bottoms
              3/4" furniture grade ply   -  false fronts (drawer face) full overlay
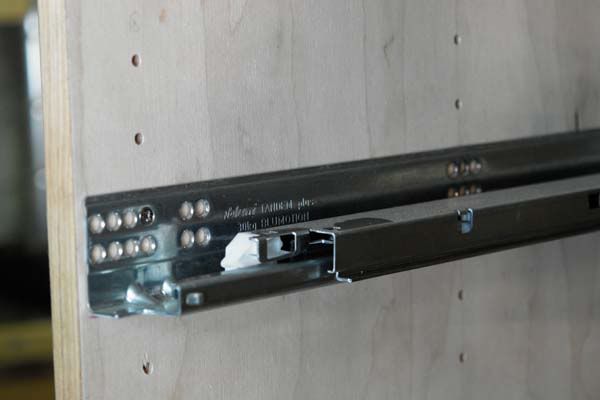
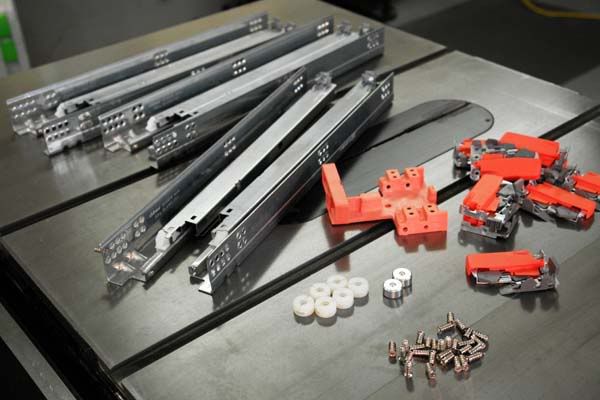
Hardware - Blum

Cabinet type - Frameless 32mm (euro)

DrawerParts5.jpg


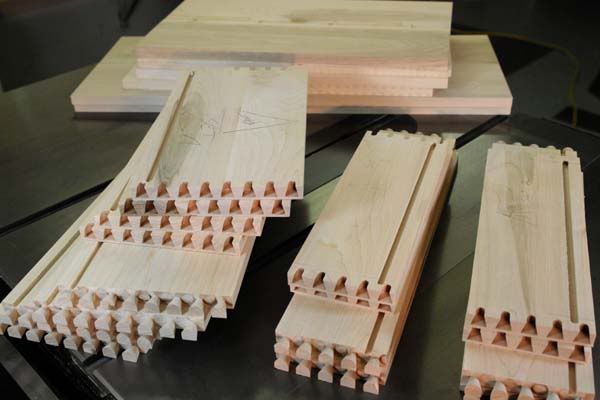
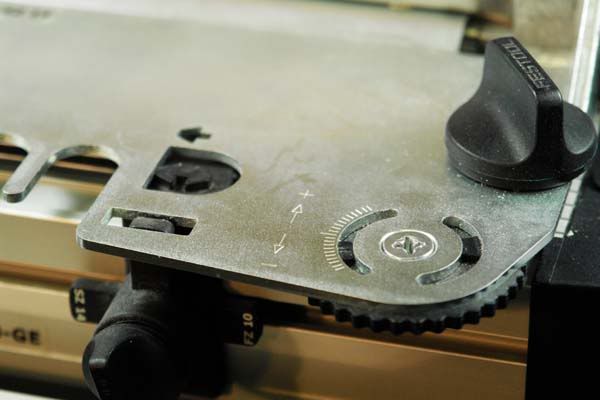
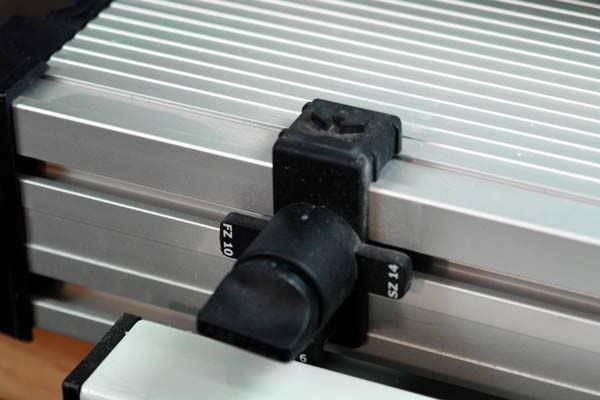
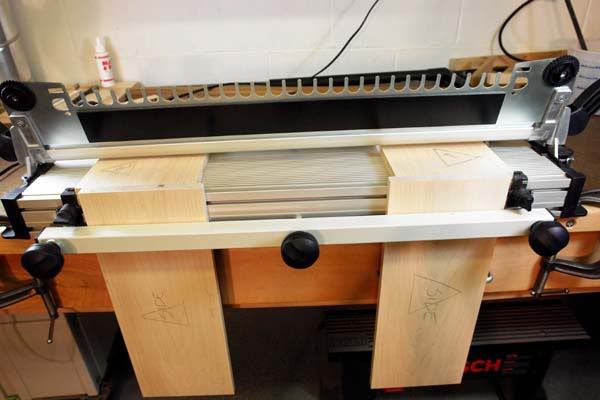
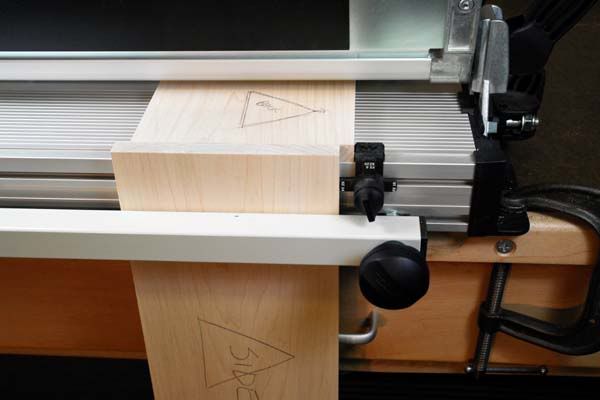
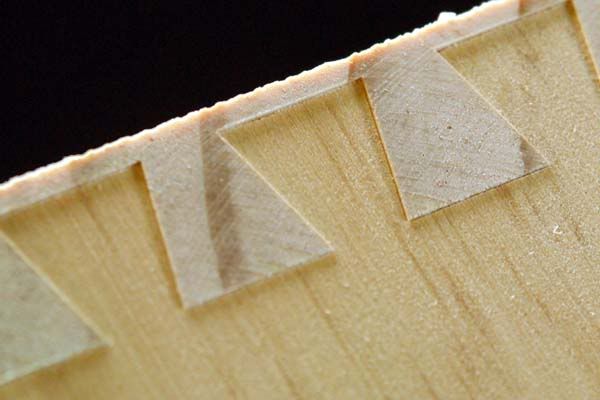
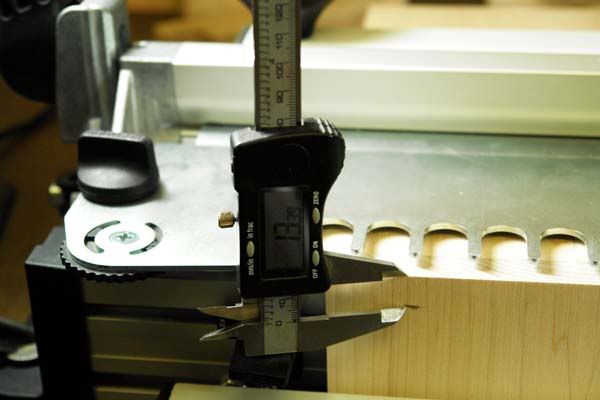
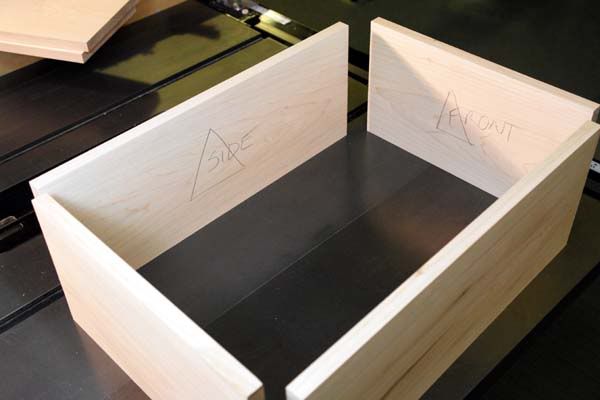
I will be using Festool's VS 600 Joining System and the OF 1010 to rout the dovetails.

Also featuring a combination of the metric and inch measuring systems ;D and 32mm system - LR 32

I'll cover the set up and use of the VS 600 using the SZ 14 template.

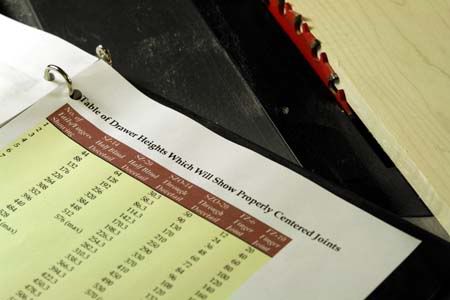
And we'll get a look at Blum's drawer hardware and drawer specs for installation.


A table full of Goodies  8)

DrawerParts4.jpg


Blum's Tandem Plus Blumotion drawer slides - 562H4570B  18 inch slides.
   They are real nice - nicest drawer hardware I have ever used. They weigh about 2.5 lbs each side thats 5 lbs for a pair.

R and L Standard Locking Devices - T51.1700.04

Orange Jig is T65.1000.02 Drilling template for locating and drilling for locking devices and Tandem slide runner rear hook.

And Deep thread Pozi system screws, for mounting the drawer slides. 661.1450.HG  Flat head for 5 mm system holes, 14.5 mm length

Nylon Drawer Front Adjusters 661.1300.HG  and 65.2950.10 marking gauges ( locators 2 ) I'll be adding faces to the drawers.

These Parts and specs can be found here http://www.blum.com/us/en/01/40/10/index.php
To view download Tandem brochure (6.65 MB)

The drawer slides are located on pages 20 and 21 note specs call for 16 mm or 5/8" max drawer side thickness. ( this falls in the range of thickness for the VS 600 FZ 14 template) for half blind dovetails.

The rest of the hardware can be found on pages 48,52,53,54

DrawerParts8.jpg


These system screws come in short or long (shown here) for 5/8" or 3/4" cabinet wall thickness.
They are made to fit into the standard 5mm system holes. They grip very tight.

If you are using the LR 32 or are drilling 5mm system holes in plywood, sheet goods etc. then you do not need to use pilot holes, vix bits, and wood screws.

 
The bottom drawers are a little tall and required a glue up.

DrawerParts3.jpg


The Domino was used to make this so easy and accurate. Tight Bond 3.
     Having your tools properly set to cut square and true with good sharp and clean blades makes each step of the process smooth.
The Domino joint was done after the stock was planed and sanded to it's final thickness. The joint or seam is so good that only a scraper and a quick buzz with a ROS was needed to bring it flat. I used 5mm dominos with all set at the middle wide setting. Perfect, love that tool  :)

The Maple stock was had from 3/4" S2S.  S2S is Surfaced 2 Sides

The Big Guns ( 15" planer, 8" jointer, 22-44 sander and cabinet saw) were used to mill the stock to 16 mm thick. 5/8"

No face jointing was needed as the stock was flat as a board  ;D should be.

 
Here's a look at one of the cabinets. These cabinets will flank a center unit that will have doors.

DrawerParts7.jpg
DrawerParts6.jpg


Check it out system holes created using the LR 32.  Note that the CL (center line) of the forward row of holes are located at 37 mm from the edge. remember that number ?
  The second or middle row of holes and the third or back row were located and marked using the drawer slide itself. This was done on the inside of the cabinet wall before it was assembled. And the holes were drilled using the LR 32.
  The drawer slides are level even before the cabinet is put together  ;D

   The Slides are mounted using the flat head pozi system screws. They fit nice and snug in the 5mm holes and finish out perfectly flush with the slide mounting holes.
   If I thought it needed more screws I could use a vix bit with a 5mm bit and add them anywhere.

  That puts the drawer runner leading edge right at Blum's spec - page 21 "Profile mounting specifications"

The height of the cabinet is a multiple of 32 mm. The height of each drawer face will also be a mutiple of 32 mm.

 
Drawer sizing and thickness.

  Since I'm using the VS 600 with the SZ 14 template the stock thickness range is between 16 mm (5/8") and 20 mm (25/32")
So I could have let the thickness at 3/4" and the same setup would be fine.

    But I don't like the heavy look of the thick drawers for this project. Want them to be light looking but strong. Also gives a little more space in the drawer box.  And adding a face would add to the bulky look with 3/4" stock.
 
  That puts these drawers at the minimum thickness range for the SZ 14 template - 16 mm.  This is 5/8". Thats the minimum thickness for the sides of the drawers but the front and backs can be thicker and be milled at the same as the sides if so desired.
    Since many like and want to be able to go with 1/2" stock I think it is one of the only down sides to the VS 600 system.
It's also a "fixed spaced system"
  The up side is that you can use one of the box joint templates FZ 6 for skinny stock 6 mm to 10 mm (1/4") to (3/8") or the FZ 10 it is for stock 10 mm to 28 mm (3/8" to 1 3/32") .

Two great resources for the VS 600

http://jerrywork.com/ see his manual on it
http://www.woodshopdemos.com/fes-33.htm  See John's write up

I'm going to reference Jerry's manual for the set up and use (hope that's OK Jerry)
I have it in a binder at the ready. Shown here on page 43 Jerry has drawer box heights in mm for each template. Using these height sizes will give you a balanced pin and tail look.

  You can make em any size you want but this is a great chart.

Update - You can use multiples of 22 mm for your drawer heights to get nice looking pins and tails with even proportions at the tops and bottoms of the parts..

VS600setup9.jpg


My box heights are 264 mm for the bottom, 176 for the center and 108 for the top. These are the box heights without the faces.
 
The stock was ripped on the table saw to the net heights then the board length were cross cut using the MFT and TS 55.

I'm using Blum's specs for the length and width along with Jerry's instructions on how to attain the exact sizing.

 
Setting up the VS 600 with the SZ 14 half blind template.
  Yea, it's all been covered before and here it is again. Because there may be some folks that might be intrested in the VS 600.

Here are the main controls, the adjustment points. There is a set of these at both ends of the beast.
This is what is adjusted the first time you dial in the fit.
Page 32 in Jerry's manual - He calls it One-Time Set-Up

So let's set it up.

VS600setup2.jpg


These are the indexing tab deals ( 2nd pic) , they slide left or right and they have the indexing stops for all the templates.

   Showing the SZ 14 inward and without a template ( the thing with the slots for the router to follow) It's all one unit and moves as such. The edge of front and back stock is pushed against the stop on the top flat and the clamped. The sides are positioned vertically and pushed against the stops that say SZ 14.

So with the knobs loose rotate the numbered indexing to the desired template SZ 14 on both ends facing inward.
Place the template into the slot on the main unit. 

VS600setup.jpg


Loosen the cam wheel Phillips head screw. There is an adjustable cam on both ends of the template. These control the Depth of the fit, too deep or too proud.  Start with the index + and - at center on both ends and tighten the screws. Make sure the cam is free to move so don't tighten the left and right template hold down knobs yet. Page 33 Jerry's manual.
  Move the indexing deals inward until they fit into the D shaped opening on both ends of the template. Leave em loose. Now push  the template in until it bottoms out with the undersides of the left and right cams evenly, then tighten the template hold down knobs.

  Now slide the indexing deals inward until the plastic arrow is against the flat inward side of the metal D shaped opening on both ends of the template. Tighten the nobbs they are done. No further adjustment is needed on those.

  This pic ( 3rd) shows the underside of the template and the stock placed in position.

  The cams can be seen along with the black phenolic bottom it's about 3/16" thick.
the template is flipped down and the flat bottom of the phenolic rests flat on the stock, the template is pushed back evenly and down then the locking handles are flipped down as well.
 
VS600setup5.jpg


A closer look at how the stock is positioned on the unit

VS600setup4.jpg


Overtime said:
I'm going to reference Jerry's manual for the set up and use (hope that's OK Jerry)
I have it in a binder at the ready. Shown here on page 43 Jerry has drawer box heights in mm for each template. Using these height sizes will give you a balanced pin and tail look.

  You can make em any size you want but this is a great chart.

The figures for the SZ-14 half-blind dovetails are incorrect, and I believe the same is true for the SZ-20 half blind DTs.  The drawer heights aren't multiples of 44mm, but 22mm, which gives the user more flexibility.

You can verify this from Jerry's manual itself:  check the photo on p. 20 at the bottom of the center column, where the metric ruler measures 11 mm from the edge to the center of the first tail.

By the way, I emailed Jerry privately with this info shortly after he first published the manual.  He replied that he would check into it.  Since then I've posted this info once or twice on this forum, for what it's worth.

One more thing--for those who want even more flexibility in drawer heights, you can always apply a false front.

Regards,

John
 
Thank's John for the corrected info.  Glad some one is reading and checking this stuff.
I remember something about that now. That explains why my 108 drawer is nearly perfect, almost ;D

  For set up you can use some scrap pieces of 3/4" mdf or any thing you have.
I used some pine that I milled to the same thickness as the maple.
  Practice boards can be about 10 to 20 inches. And as you rout to adjust you can cut off the sample pins and tails and start over.

Until you get something like this.

These boards are 16 mm thick (5/8") pine.
The fit is perfect but a little deep. In this pic it is about .5 mm deep, looks deeper but it's about 1/2 of a mm strong.

Note this pic shows the results or look when the "fronts and backs" are taken to the minimum thickness for this template. It leaves a skinny flat face. This would look better if there was more "meat" on the face. And that is very easy, You can make the front and back with thicker stock no problem - and machine them all at the same time on the same set up on the VS 600.

  This won't effect strength of the drawer and will look fine when the false front is added.

If it were a furniture drawer or inset front I would have made them thicker.

DrawerParts2.jpg


There should be room for glue so they should not have to be forced in too tightly during dry fit.
  I like to have them clamp up just the way it shows here so when dry I can sand the ends flush leaving a nice flat and clean look.
The extra mm is calculated in the sizing from the start.

The depth of the bit,  in this case part # 490992 dovetail bit, is what controls how sloppy or tight the fit is.
  This pic shows that the depth of the cutter is measured from the top surface of the wood,
The indexing slots sit above the stock because of the phenolic bottom under the template.

There is a copy ring that is mounted to the router base, it fits into the indexing slots. Also a centering mandrel to set up router all very easy.

VS600setup8.jpg


Start your test set up by setting the depth at 12 mm and go from there.
Have your parts clamped tightly and in place before routing. Make sure you lock down the template handles also.

Use the dust shroud deal with the vac.
Don't start the router with the bit near or touching the wood or metal. I bent a template pin because I had the bit near the wood when I started. Bent it back. All good.

Use a dry spray on the router base and template surface. Like Dri-Cote or Top-Cote
 
Lay out and marking of parts and position for routing.

DrawerParts1.jpg


Set your parts up in the way you want them oriented. The way they are here is how they will end up being glued.

Mark the inside of each with an arrow or mark to indicate upper edge along with back, front, side, side.

  When clamping them into the VS 600 ...
             The fronts and backs are always on the top laying flat
             The sides are always vertical
             The arrows or upper edge point outward
Previous pic shows them in the start position

             Hold the side flush with the unit and snug up the front or back  board flush with the side while pushing it against the black plastic stop. Tighten the clamp a little to grip the top bottom. Then work on the sides bring them up to level with the top bottom board while snugging it up to the side stop ( the one that has the SZ 14)

  When you have the boards in position and the clamp knobs are tight you can flip down the template ( yea you had it raised and held up and out of the way by using the lock down levers) release lock down levers and flatten template while pushing it then lock in place.

Position the router on the edge of the template and start. I start at the left and let the bit do the work while walking the router and copy ring into and around each index slot keeping the router level.
  When you get to the end go back the other way walking it again back where you started. Careful when stopping the router shut down and hold in position till the cutter stops. If you pull the router out of the slot while the bit is still spinning be sure it clears everything.

  Release and flip up the template and lock up.  Release only the top bottom clamp knobs - remove and switch them like rotating tires.
Reposition the top and bottom with your marks and arrows facing up and outward.  Flush them with the sides and clamp.

  Release the sides and do the same then clamp, flip the template down and lock - rout again.
Done

Using grip type gloves helps tighten the clamp knobs , make them good and tight.  Wish they had clamps like the Leigh FMT

 
More on sizing of the parts. How to calculate length of sides

We covered the height thing now we'll go over the length and width of them.

Using the Blum specs from page 21 of the Tandem brochure...
   "Calculating outside drawer width"  The formula shows for 16 mm thick side parts the outside width should be 10 mm or 3/8" less then the inside width of the cabinet. Easy.  ;D

  The fronts and backs can be cut exactly at the correct size.  I add 1mm strong to that as I like to sand them a tad.
All the fronts and backs were cut on the MFT using the stop.

Specs call for the overall length of the drawer box to be 18" (458mm)
We need to cut the side parts to a length that will bring the finished outside dimensions to 18". That's the box without the false front face.

  Some of each end of the sides are cut away when routing unlike the front and back. The front and back parts are cut into but their size (length) does not change.

Jerry's formula is on page 17 in his manual.

It goes like this -  you start with your desired overall length of drawer at 18" (458 mm).
   From there we need to subtract a bit.

So you take the thickness of your front piece of 16 mm - then subtract your bit depth of 13 mm and we get 3 mm.

Now do that again for the thickness of the back piece - it's 16 mm the bit depth was 13 mm so subtract 13 from 16 and we get another 3 mm.

3 mm and 3mm is a total of 6 mm, that's the magic number.  6mm

We need to subtract 6mm from the desired overall length of the drawer soooo
 
    458
  -     6
______
= 452 mm

  That's what we want to cut the sides at

If I did my math and measurements correct then the finished product will be at 458 mm or 18"

 
Hey Patrick,
  Real nice and thorough tutorial. Great pics. The timing is perfect. It is drawer making time here. Thanks.
 
  Thank's guys !
  John It's great to have your approval since you are the Pioneer of the best and most comprehensive web based Tool Reviews and How To's and of course helpers for woodworking.
 
Thanks for your kind words. To give you an idea of how much I liked what you have done, I printed it all out to take to shop tomorrow when Elena is here.
 
Let me know when you're done and I can put it in a PDF if you'd like, so it can be easily downloaded and printed. 
 
 Blum specs call for the bottom to be 1/2" (13mm) from the bottom edge of the drawer stock.
"drawer back preparation" page 21 blum

The drawers sit on the left and right runner rails and a tab at the back of each runner fits into a 6mm hole to be drilled into the back both left and right.
 Also a notch is cut on the bottom L and R of each drawer.

 I have used Jerry's method of putting the dado right through the back of the tails and that makes for fast and accurate work, but here I'm going to use a stopped dado because I'm using Blum's specs since it's the first time I'm using these drawer slides.

The stopped dado was created using a JessEm Router table.  Stop blocks were set and clamped on both ends of the fence. One set up for the fronts and backs then another for the sides.

The parts were held up at an angle against the fence then lowered onto the spinning bit, then slid - run to the stop. Then the bit is raised some and repeat until desired depth is achieved.
  Set up run all the sides, raise the bit run them again etc.

  In order to have no surprises when gluing up parts - I make the dado in just the front and back an extra mm wide so the bottom will fit in all around.
Also, assembling the bottom into the stopped dados with the dovetail joints, takes a little more care then just sliding in the bottom into the slots. Not a big deal. 

Minor event - broke a 1/4" x 1/4" shank  x 1" 2 blade straight flute bit. Depth of cut was about 1/8" strong,  in soft maple moving slow. It was the twin brother of the last one I killed last year. Porter Cable bit. Good thing the broken cutter tip did not end up in the motor housing of the PC in the table. It's my last PC router bit. Finished with a Woodcraft 5 dollar special  ;D
 
Thanks Steve !
  I would love to have page 21 of Blum's Tandem brochure up here so folks don't have to download the entire thing when I reference the specs.  But I just can't make it happen.
 
Back
Top