Library built-ins finally finished

WoodWhisperer

Member
Joined
Jun 25, 2013
Messages
175
[attachthumb=1]
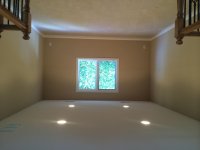
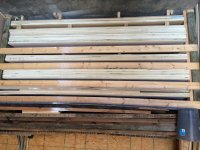
Started with pretty much a clean slate.

[attachthumb=2]
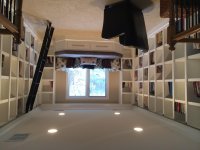
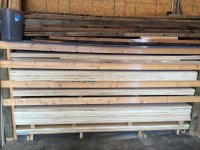
Filled up my plywood rack.  That was a few bucks in all that plywood!!

[attachthumb=3]
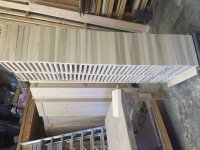
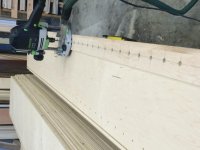
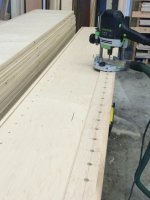
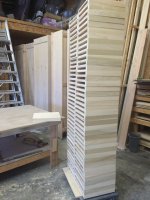
At this point I had all the plywood sized down and was starting to run all the dados and holes for the adjustable holes.  This is where the  1400 router went to work!
I made a jig to drill all the holes. I lost count but I think it was over 2000 holes!
Had something like 10 hours in just the holes.

[attachthumb=4]
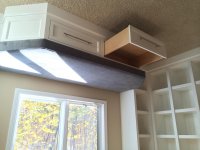
Had a couple(80) shelves to build.  Customer wouldn't the shelves the some thickness as the rails.  Made them with 1/2" plywood with a spacer in the middle to make them a full 2" thick.  Yes it sucked!!

[attachthumb=5]
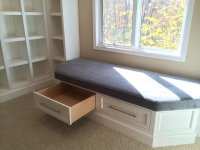
Biggest window seat I've ever built. 36" deep x 92" wide
More of a bed really.

[attachthumb=6]
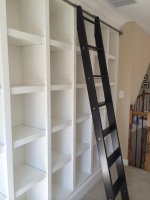
Customer decided to add a rolling ladder at the end.  First one for me.  Bought all the hardware as a kit and made the wood ladder.

[attachthumb=7]
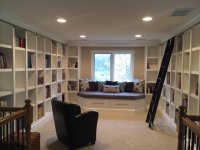
I think it all came together pretty good!  I built all the cabinets at our shop. Packed it all on a trailer to deliver it to the painter.  He sprayed everything which came out really slick. Then picked it up from his shop, back on the trailer.  Carried it all up to the 2nd floor.
That was the hardest part just getting the cabinets upstairs.
This was probably one of the largest cabinet jobs for me. It wasn't really complicated with everything being the same sizes but still a difficult task.

Thanks for looking
Sean
 

Attachments

  • image.jpg
    image.jpg
    166.3 KB · Views: 974
  • image.jpg
    image.jpg
    253.8 KB · Views: 1,649
  • image.jpg
    image.jpg
    156.2 KB · Views: 935
  • image.jpg
    image.jpg
    294.6 KB · Views: 982
  • image.jpg
    image.jpg
    286.8 KB · Views: 1,132
  • image.jpg
    image.jpg
    194.8 KB · Views: 963
  • image.jpg
    image.jpg
    355.7 KB · Views: 932
[attachimg=1]
[attachimg=2]
[attachimg=3]
[attachimg=4]
[attachimg=5]
[attachimg=6]
 

Attachments

  • image-1.jpg
    image-1.jpg
    397.9 KB · Views: 3,468
  • image-2.jpg
    image-2.jpg
    213.2 KB · Views: 3,454
  • image-3.jpg
    image-3.jpg
    313.6 KB · Views: 3,489
  • image-4.jpg
    image-4.jpg
    318.4 KB · Views: 3,462
  • image-5.jpg
    image-5.jpg
    171.4 KB · Views: 3,474
  • image-6.jpg
    image-6.jpg
    279 KB · Views: 3,543
now that I fixed all your photos...you owe me some answers....

After you made those 2 inch thick shelves...what did you do to them?  As in, you have that picture showing the hollow "shelf".  Did you add a piece of wood in front of it?  edge band? 
 
GOT8SPD said:
now that I fixed all your photos...you owe me some answers....

After you made those 2 inch thick shelves...what did you do to them?  As in, you have that picture showing the hollow "shelf".  Did you add a piece of wood in front of it?  edge band?

Those don't look hollow but 3/4 ply with a nose. You may be looking at how they are stacked on top of each other.
 
Beautiful.  Thanks for sharing your work with us.  I had never thought to do library shelves that short and thick, but it really works.  What are the exact dimensions of the shelves?  Also, it's hard to tell, but did you attach a single face frame that ties all of the individual cases together?  If so, are your top and bottom rails just very long pieces?
 
Grasshopper said:
Amazing work!!!

It looks like they were just rotated so that the hollow part is facing the vertical shelf pin boards.

Was the jig done on a drill press?
 
GOT8SPD said:
now that I fixed all your photos...you owe me some answers....

After you made those 2 inch thick shelves...what did you do to them?  As in, you have that picture showing the hollow "shelf".  Did you add a piece of wood in front of it?  edge band?

Thanks for the fix!!
I used 1/2" plywood top and bottom. Made a strip for the front and back that was 1" thick and then add a solid piece of 2" wide wood to the front. There was a lot of pieces to them and took forever to build. I almost wish now I would have used a wide edge banding.
 
lawhoo said:
Beautiful.  Thanks for sharing your work with us.  I had never thought to do library shelves that short and thick, but it really works.  What are the exact dimensions of the shelves?  Also, it's hard to tell, but did you attach a single face frame that ties all of the individual cases together?  If so, are your top and bottom rails just very long pieces?

Thanks!
I built a total of 5 cabinets per side. 4 of which make up 2 square cubes. The 5th one is a single cube. So every other cabinet had a face frame that  overlaps the next cabinet. The a jointing cabinet only had a top and bottom stile attached.  The cabinet by the window seat is another  single cube. I probably measure the room dimensions a hundred times.
 
Extremely impressive!!  I do have a question, may just be the photo, but with the monster sitting bench, can the ladder go all the way into the corner?
 
Nice one really nice job .an LR32 kit would have paid for its self on that job
 
VW mick said:
Nice one really nice job .an LR32 kit would have paid for its self on that job

I thought about that also. But, look at his jig. Simple. Easy to store. Cheap…

Reminds me I need to send my LR32 baseplate in for replacement.
 
Wooden Skye said:
Extremely impressive!!  I do have a question, may just be the photo, but with the monster sitting bench, can the ladder go all the way into the corner?

I ran the rail for the ladder all the way to both ends but the ladder doesn't fit in the corner. The customer added the ladder after the cabinets were built or I could have done it a little different.
 
VW mick said:
Nice one really nice job .an LR32 kit would have paid for its self on that job

I had to make everything 14 3/4" cubed. So I made the spacing work out so there was 14 3/4" in between the shelves. The LR32 probably wouldn't have worked. Used the drill press to make the jig and the 1400 router with a 1/4" spiral  bit.
 
Back
Top