Lock Miter Tips and Tricks

Grasshopper

Member
Joined
Oct 6, 2014
Messages
595
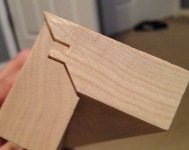
I have been attempting to master the lock-miter joint on my CMS-VL router table and I was fortunate enough to find the Wood Whisperer's thread where he built some really nice newel posts using lock miter joints.  Check it out below-

http://festoolownersgroup.com/member-projects/new-stairway-overhaul-(before-after)/msg373211/#msg373211

In an effort to not completely derail that thread, I thought it would make sense to have a dedicated thread to discuss tips and tricks to setting up a lock miter joint on the router table.

On the thread mentioned above there were many good suggestions for setting up the lock-miter. 

Please chime in with your workflow with this frustrating joint (it is at least very frustrating to me), those with the CMS I'm particularly interested in hearing from.

 
To kick things off, I am including some of the tips that were shared in the other post:

I'd love to see workflows featuring the CMS, especially ways to cut the vertical pieces in multiple passes (without screwing up your setup).  I'm not exactly sure how you could do a stop block with the CMS fence.

Tim Raleigh said:
Paul Marcel did a nice video on using the Valfor Tools GrooveCenter and 2-Axis Depth Gauge to set up a lock miter bit.

https://www.youtube.com/watch?feature=player_embedded&v=R6sfUrQK7Mw

Tim

Jim Kirkpatrick said:
Nice work on the posts!  I'm a huge proponent of the lock miter bit.  I use it on all my kitchen cabinet/vanity drawers.  You don't need to plunk down any hard-earned on fancy gauges.  I did a tutorial on a drawer build on sawmill creek using 2 pieces of scrap it's on post #3:  Lock Miter Tutorial and our own Peter Parfitt made a rather excellend Youtube showing the setup in more depth.


Sparktrician said:
For anyone wanting to use the lock miter bit, you might want to check out Infinity Tool's LMM-002 Lock Miter Master Jig for aligning the bit to the fence and to the workpiece.  It's also mentioned in an article in Fine Homebuilding.  There's also a good video on setting up the bit.  It won't eliminate fine tuning, but it will save a ton of time setting up the bit.  YMMV...
 
The last time I checked out the lock miter bits, though some while back, you could also get the matching set up guide blocks.  While you can ease into the correct settings, I wouldn't bother without the guides.  For the small price you pay, you won't waste as much wood or your time.....  Of course, once you have the correct depths/fence settings, you can make your own guide blocks.....
 
Do you know If CMT has a guide block set? (Or if there are compatible guide blocks for CMT bits).

setup just inching along is a huge pain.

I'm also struggling to find the best way to run the vertical piece along the CMS fence.

Baremeg55 said:
The last time I checked out the lock miter bits, though some while back, you could also get the matching set up guide blocks.  While you can ease into the correct settings, I wouldn't bother without the guides.  For the small price you pay, you won't waste as much wood or your time.....  Of course, once you have the correct depths/fence settings, you can make your own guide blocks.....
This is the method that I also use, & for all the thickness that I use.
 
Grasshopper said:
Do you know If CMT has a guide block set? (Or if there are compatible guide blocks for CMT bits).

setup just inching along is a huge pain.

I'm also struggling to find the best way to run the vertical piece along the CMS fence.

Baremeg55 said:
The last time I checked out the lock miter bits, though some while back, you could also get the matching set up guide blocks.  While you can ease into the correct settings, I wouldn't bother without the guides.  For the small price you pay, you won't waste as much wood or your time.....  Of course, once you have the correct depths/fence settings, you can make your own guide blocks.....

Rockler used to a lock miter bit with a setup block. Experience with Rockler bits is inconsistent, but I've found that, if you aren't going to use a particular bit more than for one or just a few projects, their bits can be a good buy. If you're going to use on numerous projects, I'd say that Rockler bits aren't the way to go. Sometimes they have sales on bits that make them even more attractive as an option for single projects or only sporadic use.
 
Baremeg55 said:
The last time I checked out the lock miter bits, though some while back, you could also get the matching set up guide blocks.  While you can ease into the correct settings, I wouldn't bother without the guides.  For the small price you pay, you won't waste as much wood or your time.....  Of course, once you have the correct depths/fence settings, you can make your own guide blocks.....

It's a piece of cake to make your own setup blocks.  There are numerous places to buy UHMW plastic strips, 3/4" x 4" x 48".  Once made, they hold up very well, unlike MDF. 

 
Grasshopper said:
Do you know If CMT has a guide block set? (Or if there are compatible guide blocks for CMT bits).

setup just inching along is a huge pain.

I'm also struggling to find the best way to run the vertical piece along the CMS fence.

...just had a quick browse through the CMT main catalogue. It doesn't seem they got at set up block.

Kind regards
Henrik
 
Thanks for the input thus far!  Man, setup is a pain.  I am still trying to adjust for the fence depth.  Back a mm, forward a mm.  I feel bad for the scrap pile that I have accumulated setting this up.

This tutorial was helpful because it has a few pictures that indicate when the cutter is too high or low on the router base side , and whether or not too much or too little cutter is exposed for the fence side.

http://stuswoodworks.com/2009/04/setting-up-a-locking-miter-bit/
 
Here is a link to a setup jig that Infinity Tools started selling a year or so ago. I have no experience with it, but it allegedly works for the thickness woods they indicate on their site. There are 2 jigs. You can buy either depending on what you need or you can buy the set of 2. As far as I can tell they are supposed to work with any lock miter bit of the size listed in their specs. (Sorry the link didn't appear as an actual link but you can copy into your browser.)

http://www.infinitytools.com/Router-Bit-Set-Up-Jigs/products/1330/

If someone buys and uses it, I'd like to hear how well it works. As described, it looks like it would take the guesswork out of the setup process and get it very close, if not right on, the first time.
 
I will have to try that.  The part that is proving to not be a piece of cake (operator error of course), is setting up the bit well enough the first time to then be able to make a setup block.

Sheesh this is very frustrating the first time.  Way more annoying than I thought it would be (45 degree miters with dominos for joinery is looking pretty tempting about now  :)

I received a PM from another user who said he was reluctant to remove the bit after finally setting it up and joked that he'd almost need to buy a new router table and router, keeping the first one setup as the dedicated lock miter station.  I now totally know what he means.

Sparktrician said:
It's a piece of cake to make your own setup blocks.  There are numerous places to buy UHMW plastic strips, 3/4" x 4" x 48".  Once made, they hold up very well, unlike MDF.
 
grbmds said:
Here is a link to a setup jig that Infinity Tools started selling a year or so ago. I have no experience with it, but it allegedly works for the thickness woods they indicate on their site. There are 2 jigs. You can buy either depending on what you need or you can buy the set of 2. As far as I can tell they are supposed to work with any lock miter bit of the size listed in their specs. (Sorry the link didn't appear as an actual link but you can copy into your browser.)

http://www.infinitytools.com/Router-Bit-Set-Up-Jigs/products/1330/

If someone buys and uses it, I'd like to hear how well it works. As described, it looks like it would take the guesswork out of the setup process and get it very close, if not right on, the first time.

That's the one I mentioned here

 
Setup blocks that are made or purchased are really just to ball park your initial setup.  3/4" Plywood as everyone knows, is not 3/4" thick, it's slightly thinner.  So a template made with 3/4" stock will not work with 3/4" plywood.  You will need to make several different templates for different thicknesses of stock.  And even then, I've found that plywood can vary sheet to sheet so when using a 2nd sheet of ply of the same grade and species, you may need to check the bit height.

Setting the bit height for the first time is pretty straightforward.  Having a nice router lift in your table and a digital readout makes life a little easier and a whole lot faster.  In fact, I don't know how you can proceed without them.  You can start my eyeballing the center of the bit on your work piece and with 2 scrap pieces, mill them lying flat on your table like in the picture.  Flip one over and join them together as shown:
[attachimg=1]

After the bit height is set, the fence adjustment is next and is quite easy.  With a scrap test piece of stock, run it flat on the table and the fence is set correctly when the bit stops reducing the length of your test piece.  Once the bit height and fence distance is correct, mill another piece of stock lying flat and save for future setups.
[attachimg=2]

I think this is one of the greatest and easiest joints ever for making drawers!
[attachimg=3]
 

Attachments

  • Lock Miter_00.jpg
    Lock Miter_00.jpg
    214.2 KB · Views: 8,923
  • Lock miter template.jpg
    Lock miter template.jpg
    7.7 KB · Views: 8,391
  • Lock mitered drawer.jpg
    Lock mitered drawer.jpg
    56.7 KB · Views: 9,103
Sparktrician said:
grbmds said:
Here is a link to a setup jig that Infinity Tools started selling a year or so ago. I have no experience with it, but it allegedly works for the thickness woods they indicate on their site. There are 2 jigs. You can buy either depending on what you need or you can buy the set of 2. As far as I can tell they are supposed to work with any lock miter bit of the size listed in their specs. (Sorry the link didn't appear as an actual link but you can copy into your browser.)

http://www.infinitytools.com/Router-Bit-Set-Up-Jigs/products/1330/

If someone buys and uses it, I'd like to hear how well it works. As described, it looks like it would take the guesswork out of the setup process and get it very close, if not right on, the first time.

That's the one I mentioned here.

So, what are the pros/cons of the red metal jigs vs. the white plastic jigs?
 
So, what are the pros/cons of the red metal jigs vs. the white plastic jigs?

The red metal jigs allow you to adjust quickly to the center of any thickness wood the bit supports.

The blocks are good for a standard size. Say ¾" or 1"

I have the Infinity baby bit and really like it. Has a great cutting edge and with the red jig, you can setup in just a few minutes.

Cheers. Bryan.
 
Jim,

Your images and tutorial are fantastic!  The photo of the completed joint gives me hope.

I am about to pull my hair out trying to get the bit height just right.  I have the CMS-VL table, so no digital readout on the lift.  I see how that could be quite handy now. 

Back to kill some more poplar 1x in an effort to set this thing up.

Jim Kirkpatrick said:
Setup blocks that are made or purchased are really just to ball park your initial setup.  3/4" Plywood as everyone knows, is not 3/4" thick, it's slightly thinner.  So a template made with 3/4" stock will not work with 3/4" plywood.  You will need to make several different templates for different thicknesses of stock.  And even then, I've found that plywood can vary sheet to sheet so when using a 2nd sheet of ply of the same grade and species, you may need to check the bit height.

Setting the bit height for the first time is pretty straightforward.  Having a nice router lift in your table and a digital readout makes life a little easier and a whole lot faster.  In fact, I don't know how you can proceed without them.  You can start my eyeballing the center of the bit on your work piece and with 2 scrap pieces, mill them lying flat on your table like in the picture.  Flip one over and join them together as shown:
[attachimg=1]

After the bit height is set, the fence adjustment is next and is quite easy.  With a scrap test piece of stock, run it flat on the table and the fence is set correctly when the bit stops reducing the length of your test piece.  Once the bit height and fence distance is correct, mill another piece of stock lying flat and save for future setups.
[attachimg=2]

I think this is one of the greatest and easiest joints ever for making drawers!
[attachimg=3]
 
OK, after spending hours getting the lock miter bit setup properly, I finally with glee made a setup block for future projects.  Before my hopes were dashed to pieces of course.

See photo of "acceptable" test piece that can be a setup block:
[attachimg=1]

Now I ripped a couple long test pieces (around 40" long or so) and wanted to see the lock miter in all its glory, and I really have no idea what went wrong:

You can see the end of the joint is way off
[attachimg=2]

Throughout the board, there are tons of valleys and chatter.  I assume operator error for sure.  The vertical piece (the one against the fence) took a ton of digs and looks terrible.

I used the CMS-VL, and cinched down the feather boards, and used a push stick.  The feather boards were pretty tight if that makes a difference.  I was pretty close to throwing the bit in the trash, but a cooler head prevailed and said I should "ask the FOG". 

See the chatter:

[attachimg=3]

[attachimg=4]

I realize that I'm new to the router table business and this is likely operator error, which is probably why I am baffled by the outcome.  Your insight is very appreciated. 
 

Attachments

  • IMG_7312.JPG
    IMG_7312.JPG
    243.3 KB · Views: 12,133
  • IMG_7315.JPG
    IMG_7315.JPG
    339.2 KB · Views: 41,620
  • IMG_7319.JPG
    IMG_7319.JPG
    684.2 KB · Views: 8,957
  • IMG_7318.JPG
    IMG_7318.JPG
    694.9 KB · Views: 8,596
In my experience, lock miter bits in a router table are best suited for small boxes and other relatively short joinery.

For long lengths, you really need a shaper with a power feeder.
 
I don't think the bit is to blame - so don't throw it away! More likely the CMS isn't up to it, or your stock isn't true?
Is the fence set correctly? Is the outfeed half of the fence in the right position? Your 3rd and 4th pic look like the result of the two fence halves being lined up, instead of them being offset from each other, causing the board to 'drop into' the cutter.
 
Back
Top