You are using an out of date browser. It may not display this or other websites correctly.
You should upgrade or use an alternative browser.
You should upgrade or use an alternative browser.
Lock Miter Tips and Tricks
- Thread starter Grasshopper
- Start date
Sparktrician said:hrrb said:The ones you do in 'upright' position can be a bit tricky if you by accident tilt the stock.
I'm still trying to figure out a methodology for keeping the upright pieces truly perpendicular to the table. Anyone got any good ideas?
I have used a Milescraft double tall feather board
Sparktrician
Member
jbasen said:Sparktrician said:hrrb said:The ones you do in 'upright' position can be a bit tricky if you by accident tilt the stock.
I'm still trying to figure out a methodology for keeping the upright pieces truly perpendicular to the table. Anyone got any good ideas?
I have used a Milescraft double tall feather board
The issue isn't keeping the stock against the fence, it's keeping narrow stock from tipping right-to-left that's the challenge. I'm thinking that a sacrificial push block the same thickness as the material to be routed, that actually rides on the table might be a potential solution.
Sparktrician
Member
tjbnwi said:Tall fence.
Tom
I'm already using a sacrificial tall fence clamped to the CMS' fence, Tom. It's the right-left tipping that concerns me.
Your setup looks better than before but you need a featherboard right over the bit.
The extra featherboards help minimize your influence on the board as it is presented to the bit. That's why I use as many as I can.
They do not completely eliminate it though so I would also recommend using as much infeed and outfeed support as you can muster.
Make sure you are locking the adjustment for the router. It does make a difference.
As to the tear out, I think it is due to you feeding the stock too fast for the speed setting of the router. You may need to slow your feed rate to a crawl even if it produces a little burning.
The Infinity lock miter set up jig should work with your CMT bit.
http://www.infinitytools.com/2-Pc-Lock-Miter-Master-Jig-Set-For-3_8-1-1_8-Stock-Setup/productinfo/00-LMM/
Here's an article by Gary Katz on lock miters. He uses a power feeder on his router table.
http://www.garymkatz.com/trimtechniques/lock_miters.html
And if you haven't figured it out already...while some people make lock miters look easy, they really are a PITA!
tjbnwi said:Tall fence.
Tom
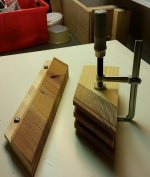
Yup! Tall fence...and stackable featherboards.
You can either buy them or make your own.
I made these using my bandsaw and some scrap wood.
Put some shims in between and glue or screw together. (These are just clamped together so I could show what I mean)
[attachimg=1]
Kind regards
Henrik
Attachments
Sparktrician said:tjbnwi said:Tall fence.
Tom
I'm already using a sacrificial tall fence clamped to the CMS' fence, Tom. It's the right-left tipping that concerns me.
Ah yes...now I get it. I'm a bit dull today [embarassed]
A square sacrificial push block must be the answer.
Kind regards
Henrik
Grasshopper
Member
- Joined
- Oct 6, 2014
- Messages
- 595
Thanks a ton for your feedback. Good point on the feather board right over the bit.
You are right that lock miters are a PITA. I had no idea")
As for speed of the bit, CMT bits between 35mm and 60mm show a recommended 16,000 RPM max. I have my OF 1400 set between 3 & 4 speed (as I understand speed setting 3 is 14,800 RPM, and speed setting 4 is 17,200, so I felt splitting the difference was appropriate). As far as feed speed, I am crawling, but I suppose I could slow down too.
You are right that lock miters are a PITA. I had no idea
As for speed of the bit, CMT bits between 35mm and 60mm show a recommended 16,000 RPM max. I have my OF 1400 set between 3 & 4 speed (as I understand speed setting 3 is 14,800 RPM, and speed setting 4 is 17,200, so I felt splitting the difference was appropriate). As far as feed speed, I am crawling, but I suppose I could slow down too.
deepcreek said:Your setup looks better than before but you need a featherboard right over the bit.
The extra featherboards help minimize your influence on the board as it is presented to the bit. That's why I use as many as I can.
They do not completely eliminate it though so I would also recommend using as much infeed and outfeed support as you can muster.
Make sure you are locking the adjustment for the router. It does make a difference.
As to the tear out, I think it is due to you feeding the stock too fast for the speed setting of the router. You may need to slow your feed rate to a crawl even if it produces a little burning.
The Infinity lock miter set up jig should work with your CMT bit.
http://www.infinitytools.com/2-Pc-Lock-Miter-Master-Jig-Set-For-3_8-1-1_8-Stock-Setup/productinfo/00-LMM/
Here's an article by Gary Katz on lock miters. He uses a power feeder on his router table.
http://www.garymkatz.com/trimtechniques/lock_miters.html
And if you haven't figured it out already...while some people make lock miters look easy, they really are a PITA!
I know you wanted to use the lock miter joint but, given you are painting the finished product, wouldn't there be easier joints to use? I understand your need to master this joint, for sure. If the wood isn't exposed, I would assume there are other ways to get this done which are much easier than if the columns wouldn't be painted.
Grasshopper
Member
- Joined
- Oct 6, 2014
- Messages
- 595
Agreed!
Perhaps the lock miter will be on my bucket list. As an amateur, I just have to admit when a process is too unwieldy for me.
Butt joints seem like the way to go indeed. Now to figure out how to rip a 1x2 down to 1" wide for the short sides on the TS55.
Perhaps the lock miter will be on my bucket list. As an amateur, I just have to admit when a process is too unwieldy for me.
Butt joints seem like the way to go indeed. Now to figure out how to rip a 1x2 down to 1" wide for the short sides on the TS55.
grbmds said:I know you wanted to use the lock miter joint but, given you are painting the finished product, wouldn't there be easier joints to use? I understand your need to master this joint, for sure. If the wood isn't exposed, I would assume there are other ways to get this done which are much easier than if the columns wouldn't be painted.
Grasshopper said:Now to figure out how to rip a 1x2 down to 1" wide for the short sides on the TS55.
Tape it to a wider board and make your rip fully supported.
I do appreciate Festool's track saws (I own both) but there are times that a good table saw is the right tool for the job.
Grasshopper
Member
- Joined
- Oct 6, 2014
- Messages
- 595
Good tip!
My local lumberyard said their take care of me on their table saw.
Off to buy some stock!
My local lumberyard said their take care of me on their table saw.
Off to buy some stock!
deepcreek said:Grasshopper said:Now to figure out how to rip a 1x2 down to 1" wide for the short sides on the TS55.
Tape it to a wider board and make your rip fully supported.
I do appreciate Festool's track saws (I own both) but there are times that a good table saw is the right tool for the job.
Grasshopper
Member
- Joined
- Oct 6, 2014
- Messages
- 595
Agreed. But $15 well spent.
grbmds said:A lot cheaper than buying a new saw, but not nearly as exciting.
TallKnight
Member
- Joined
- Aug 10, 2017
- Messages
- 1
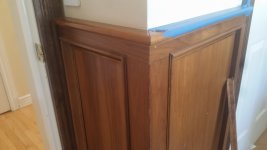
This has been an awesome post about setting up 45 locking miter bit. I am currently working on a cedar chest project for my daughter. I plan on using this joint for the box. I have an issue though because the stock I am using for the front and side pieces is larger iin thickness than the 3/4 plywood I plan to use for the back piece. I am planning on using the same basic design as the panneling I did in my office. Here is a picture so you can understand what I am talking about.
Im sure what ill have to do is adjust the depth on the cut for the back piece.

Im sure what ill have to do is adjust the depth on the cut for the back piece.
Attachments
tjbnwi
Member
- Joined
- May 12, 2008
- Messages
- 7,349
These jigs take all the grief out of setting up lock miter bits. I can't recommend them enough.
https://www.infinitytools.com/lock-miter-master-jigs
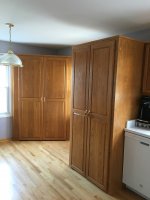
I set up the bit to make this cut using the Infinity jig. One and done. Used the jig to set the bit in the CMS to routed the mating stile.
Assembled cabinet. View attachment 1
Tom
https://www.infinitytools.com/lock-miter-master-jigs
I set up the bit to make this cut using the Infinity jig. One and done. Used the jig to set the bit in the CMS to routed the mating stile.
Assembled cabinet. View attachment 1
Tom
Attachments
ear3
Member
When you say index the front and the back [member=4105]tjbnwi[/member] , what exactly do you mean? Is it just precutting the front and the back to minimize the sort of tear-out and ripping one gets at the end and the beginning of the cut?
I still have yet to use my lock mitre bit. I just got a project for which it would be perfect. A 16x16x40 pedestal that has to have all mitred edges. You're method of cutting on the flat would seem to be called for when running the vertical on 16" boards. Unfortunately, the pedestal has to be made out of solid mahogany, so I don't think I want to have my first try be on $300+ worth of wood. So I think I'll just use straight mitres reinforced in a couple of places with dominoes. Provided all the cuts are square, the top should simply be able to nest in place and be affixed with glue.
I still have yet to use my lock mitre bit. I just got a project for which it would be perfect. A 16x16x40 pedestal that has to have all mitred edges. You're method of cutting on the flat would seem to be called for when running the vertical on 16" boards. Unfortunately, the pedestal has to be made out of solid mahogany, so I don't think I want to have my first try be on $300+ worth of wood. So I think I'll just use straight mitres reinforced in a couple of places with dominoes. Provided all the cuts are square, the top should simply be able to nest in place and be affixed with glue.
tjbnwi
Member
- Joined
- May 12, 2008
- Messages
- 7,349
[member=37411]ear3[/member],
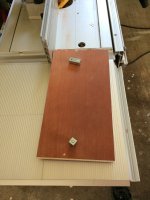
My comment about indexing was referring to making a cut at each end carefully so I could set the rail the proper distance from the edge of the plywood. With the knife edge the bit produces it is very easy to distort the edge with to much side pressure. The router guided by the rail in addition to the fence removed that risk from the equation.
I suggest 2 sided tape or ATG to secure a "guide block" to the pieces run when using this bit. The blocks are set even with the edge of the work piece and are full length or longer. As you run the piece the block runs along the fence protecting the knife edge created by the cut.
Tom
ear3
Member
Thanks.
tjbnwi said:[member=37411]ear3[/member],
My comment about indexing was referring to making a cut at each end carefully so I could set the rail the proper distance from the edge of the plywood. With the knife edge the bit produces it is very easy to distort the edge with to much side pressure. The router guided by the rail in addition to the fence removed that risk from the equation.
I suggest 2 sided tape or ATG to secure a "guide block" to the pieces run when using this bit. The blocks are set even with the edge of the work piece and are full length or longer. As you run the piece the block runs along the fence protecting the knife edge created by the cut.
Tom
Similar threads
- Replies
- 9
- Views
- 3K
- Replies
- 1
- Views
- 820
- Replies
- 14
- Views
- 4K
- Replies
- 5
- Views
- 9K