I have found once you understand where the center of a Lock Miter Bit is, it is pretty easy to setup. You do need a proper tool to measure - I use a Wixey WR200 Digital Height Gauge which comes in handy for other things
View attachment 1
View attachment 2
View attachment 3
I should mention there are two parts to setting up a lock miter bit
Set the height of the bit
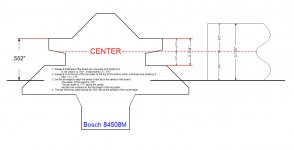
So with my Bosch 84508M Lock Miter Bit, I know that the center is .177" below the top edge of the top cutter. I want the center of the cutter to be centered on the workpiece, so I measure the thickness of the board I am using and divide by two. .75" / 2 = .375". So I take the .375" and add it to the .177" and I know that I need to set the top edge of the top cutter to .552" above the router table.
To test - run two boards flat (horizontal) through the bit, flip one over and mate them together. The top surfaces should be flat and level. If not, fine tune your height adjustment.
Set the fence
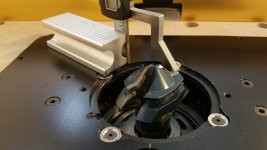
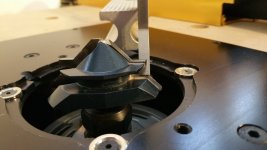
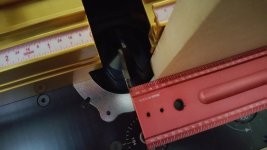
Once the bit height is set, place one of the boards against the fence (vertically) and with a straight edge, adjust the fence so that the bit is almost touching the straight edge. You want a sharp point, but if the fence is set too far forward, you will get a flat spot on your edge, and if it is too far back, you will be cutting off material which will shorten the length of the piece you are working on
View attachment 4
Lastly is technique. You need to make sure the boards are properly held down or pressed firmly up against the fence.
Edited to Add another example:
Here is a couple pieces of 3/4" MDO. The actual thickness is a little shy of 3/4" (.722)
So I take half of my thickness of the board (.361") and add it to half of my router bit measurement (.177") and get .538" which is how high the top edge of the top cutter gets set above the router table and then I use the same board with a straight edge to set the fence position as noted above. Didn't even have to run any test cuts - looks right on after the first run
View attachment 5
View attachment 1
View attachment 2
View attachment 3
I should mention there are two parts to setting up a lock miter bit
Set the height of the bit
So with my Bosch 84508M Lock Miter Bit, I know that the center is .177" below the top edge of the top cutter. I want the center of the cutter to be centered on the workpiece, so I measure the thickness of the board I am using and divide by two. .75" / 2 = .375". So I take the .375" and add it to the .177" and I know that I need to set the top edge of the top cutter to .552" above the router table.
To test - run two boards flat (horizontal) through the bit, flip one over and mate them together. The top surfaces should be flat and level. If not, fine tune your height adjustment.
Set the fence
Once the bit height is set, place one of the boards against the fence (vertically) and with a straight edge, adjust the fence so that the bit is almost touching the straight edge. You want a sharp point, but if the fence is set too far forward, you will get a flat spot on your edge, and if it is too far back, you will be cutting off material which will shorten the length of the piece you are working on
View attachment 4
Lastly is technique. You need to make sure the boards are properly held down or pressed firmly up against the fence.
Edited to Add another example:
Here is a couple pieces of 3/4" MDO. The actual thickness is a little shy of 3/4" (.722)
So I take half of my thickness of the board (.361") and add it to half of my router bit measurement (.177") and get .538" which is how high the top edge of the top cutter gets set above the router table and then I use the same board with a straight edge to set the fence position as noted above. Didn't even have to run any test cuts - looks right on after the first run
View attachment 5