Long Walnut shelves

ear3

Member
Joined
Jul 24, 2014
Messages
4,341
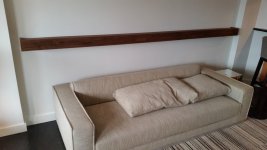
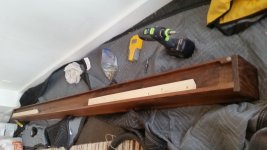
Earlier this week I finally installed the long walnut shelves I've been building.  The design was straightforward, based upon a unit the client had at another place of residence.

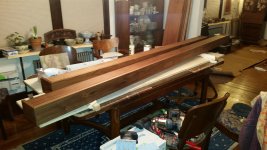
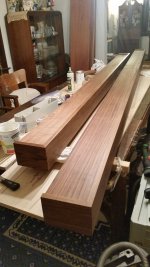
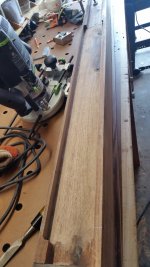
The challenge was working with boards of that length, as the shelves were spec-ed at 100" and 126"

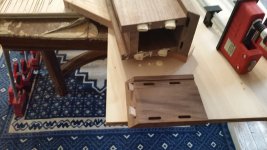
I used dominoes for all the joinery, and added a channel in the front and side boards for the top to fit into:

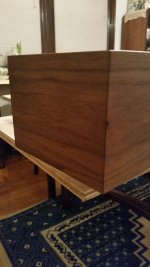
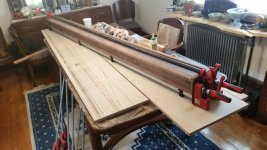
Assembly had to be done in three stages.  First the top, back, and bottom, with a 3/4" recess in the back to fit the cleat by which it would hang.  Then the front.  And then finally added the sides, which were fit together using a mitre joint.  Finished it off with two coats of Osmo.

View attachment 1

View attachment 2

View attachment 3


Attachments

  • 20160123_185001.jpg
    20160123_185001.jpg
    2.2 MB · Views: 398
  • 20160123_185148.jpg
    20160123_185148.jpg
    1.9 MB · Views: 352
  • 20160123_185241.jpg
    20160123_185241.jpg
    2 MB · Views: 354
Beautiful work Edward! Those are seriously long. It looks like you managed to get the grain to run together over the joints. Great attention to detail.
 
Originally I was supposed to install them on Saturday, and I had contracted an assistant to help out with the installation, which involved walking one of the shelves up 16 flights of stairs, since it was too long for the elevator.  Unfortunately we were told 20 minutes before we arrived that the building super wouldn't allow weekend deliveries/work, so I had to reschedule till Tuesday.  Turned out the guy I hired wasn't available that day, so I ended up doing the whole thing myself.  Glad I got the CT wing a few months ago, otherwise attaching the cleat to the wall would have been a real chore.  Even with the extra hand, it took some time to get the wall cleat shimmed out to compensate for the waviness of the wall.  To gain some more material for the cleat, I had routed out the back of the shelf recess, leaving 1/2" of material on the top, and only 1/4 on the bottom.

View attachment 3

The wall cleat ran the full length of the wall, while those on the shelf were about 30" on either end:

View attachment 1

Here is one of the shelves after installation:

View attachment 2
 

Attachments

  • 20160209_120647.jpg
    20160209_120647.jpg
    3.4 MB · Views: 291
  • 20160209_151115.jpg
    20160209_151115.jpg
    2.2 MB · Views: 370
  • 20160125_131654.jpg
    20160125_131654.jpg
    2.1 MB · Views: 285
Been having some weird problems with posting the message, and it not allowing me to post certain pictures.  So I just wanted to add separately a small detail on the mitre joint for the ends, which also shows the dado:


Attachments

  • 20160119_102044.jpg
    20160119_102044.jpg
    3.3 MB · Views: 397
Very nice job on a "simple" shelf with a lot of hidden challenges.  Looks great!
 
Looks great Edward...I especially like the mitred details.

Sometimes these simple projects turn out to be not so simple.  [eek]
 
Thanks guys, and especially for all the answered questions along the way.

Wood was sourced at Boards and Beams in Fairfield, N. Their prices, variety and overall friendlness make it worth the trip from new york city.
 
Edward A Reno III said:
Thanks guys, and especially for all the answered questions along the way.

Wood was sourced at Boards and Beams in Fairfield, N. Their prices, variety and overall friendlness make it worth the trip from new york city.
Agreed on that!  I made my first trip to Boards and Beams last month.  It's like a woodworker's candyland!
They take their stuff serious there!  Bought a bunch of soft maple  for a Roubo bench build.
I was pleasantly suprised that they charge a flat deliver fee, because otherwise, there's no way I could get the 12-footers home!!  [big grin]
 
Edward A Reno III said:
Been having some weird problems with posting the message, and it not allowing me to post certain pictures.  So I just wanted to add separately a small detail on the mitre joint for the ends, which also shows the dado:
Just curious about the Dominos at the end.  I'm assuming they are angled back to allow for assembly to be easier? Since you had to get the four dominos to come together at the same time as the mitre.  How did you get the angles perfect?  Is there a homemade jig you used or something simpler about the domino's operation that I'm not thinking of?
 
The fit and finish on these is precise and pleasing to the eye.  Your complex work on the ends with the miter, dado and domino joints all came together to make a simple shelf special. 

Maybe I missed it, but did you fasten the shelves to the wall after you set them on the cleats?  If so, how?

Thank you for this and all the other times you've posted progress pictures of you projects!

Mike A.
 
[member=33086]RobNJ[/member] With strong taps from the rubber mallet ;D  I made the mortises on the top and bottom a bit wider by both plunging on the widest setting and doing a second plunge a couple of milimeters off the center line.  I also gave the dominoes several passes by hand over a sanding block to give the joint a little more slack for assembly, and, as you noticed, angled them in when I was fitting everything together.  It might be difficult to see, but, in addition, I had to shave off some of the corner of the top board to give clearance for the domino in the mitre, which would have otherwise been blocked  because the board was sunk 1/8" in the dado.  Still, I think I probably overbuilt the ends, especially considering they are not going to be bearing any of the weight.  One domino each on the top and bottom would have been sufficient.  I was originally considering just doing a pocket hole screw or two through the back to complement the dominoes in the mitre joint, but I ruled this out because I wanted to stick to glue joinery.  On the shorter shelf, it also helped to have the long Bessey Revo clamps to get everything aligned.  For the longer one, I jury-rigged something with a bunch of smaller clamps -- which made aligning everything a bit more hairy.

[member=30413]mike_aa[/member] I attached a run of the cleat on each end of the shelves, as pictured below.  The shelf simply rests on the cleat and is held in place by its own weight.  I put some vinyl bumpers on the bottom corners to push it out ever so slightly from the wall, which also made the leveling perfect.  The shelves are between 40 to 60 lbs. (which is actually less than I thought they would be), so they are heavy enough to stay put, but not so heavy as to risk tearing the cleat out of the wall.  The walls were plaster rather than drywall (older building), so the anchors are firmly in place.

RobNJ said:
Edward A Reno III said:
Been having some weird problems with posting the message, and it not allowing me to post certain pictures.  So I just wanted to add separately a small detail on the mitre joint for the ends, which also shows the dado:
Just curious about the Dominos at the end.  I'm assuming they are angled back to allow for assembly to be easier? Since you had to get the four dominos to come together at the same time as the mitre.  How did you get the angles perfect?  Is there a homemade jig you used or something simpler about the domino's operation that I'm not thinking of?
 

Attachments

  • 20160119_104049.jpg
    20160119_104049.jpg
    3.6 MB · Views: 258
  • 20160209_123523.jpg
    20160209_123523.jpg
    3.1 MB · Views: 288
Back
Top