So I'm putting together a single closet for my new kid's room and there no way I could justify an LR32 kit. I got a holey rail when I bought my track saw so I've been trying to come up with a good way to reliably make these holes. I'm sure there are plenty online but many of them are complicated and I needed something simple from a timing perspective.
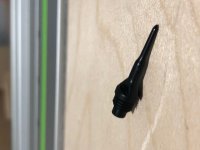
Now, just recently I got a pack of my favorite new shop tool...1/4" Dart Tips! These Tufflex II 1/4" are awesome to create quick drying boards for painting, plugging holes when spraying laquer or anything else around the shop! Best thing is that it's $5.58 for a pack of 100!!! The headline might have been clickbait because you need to buy 100 pack...but you'll use these things everywhere. I realized they had a flat side to each at the thick, sturdy base and got an idea. The flat part of the dart first PERFECTLY into the Holy Rail holes. It's even not-circular as you'd expect from those holes. A simple, quick and easy 6cent rail connector.
View attachment 3
I'm sure you could use these to make some of the edge alignment pieces and stuff...but in the meantime, I just use a rail dog screwed to the bottom of the track to reference the back. I can now make perfectly evenly spaced and level cuts on both sides!
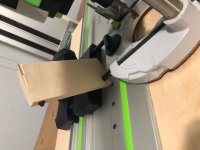
1) Get spare piece of 1/2" plywood. Mine measures 2"x4"...though side means NOTHING. The 1/2" birch I used is almost exactly the width of the holy rail hole channel.
2) 8mm hole in side bottom corner of of the piece of wood.
View attachment 1
3) Drill a 1/4" hole in the bottom of the wood on the opposite side of your 8mm hole
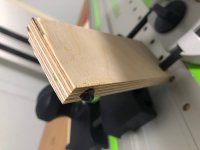
4) Cut down the tip of the dart to the flat base
5) Glue the dart bottom into the 1/4" hole making sure that the flat part is parallel to the edge touching the board
View attachment 2
6) Slide onto the guide stop rails
7) Slide a Guide Dog or something you can screw to the bottom channel of the track as a reference point. This needs to be tight so the reference stays the same for the holes on the other side of the board.
7) Slide Router on and start using per the video!
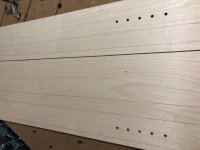
Test Result:
View attachment 4
I'm sure people have done this before...but I was pretty proud of myself") This certainly doesn't solve many of the problems the LR32 system does...but it's at least cheaper than most and can give you a solid result. Thoughts? ENJOY!
This certainly doesn't solve many of the problems the LR32 system does...but it's at least cheaper than most and can give you a solid result. Thoughts? ENJOY!
- Jared
Now, just recently I got a pack of my favorite new shop tool...1/4" Dart Tips! These Tufflex II 1/4" are awesome to create quick drying boards for painting, plugging holes when spraying laquer or anything else around the shop! Best thing is that it's $5.58 for a pack of 100!!! The headline might have been clickbait because you need to buy 100 pack...but you'll use these things everywhere. I realized they had a flat side to each at the thick, sturdy base and got an idea. The flat part of the dart first PERFECTLY into the Holy Rail holes. It's even not-circular as you'd expect from those holes. A simple, quick and easy 6cent rail connector.
View attachment 3
I'm sure you could use these to make some of the edge alignment pieces and stuff...but in the meantime, I just use a rail dog screwed to the bottom of the track to reference the back. I can now make perfectly evenly spaced and level cuts on both sides!
1) Get spare piece of 1/2" plywood. Mine measures 2"x4"...though side means NOTHING. The 1/2" birch I used is almost exactly the width of the holy rail hole channel.
2) 8mm hole in side bottom corner of of the piece of wood.
View attachment 1
3) Drill a 1/4" hole in the bottom of the wood on the opposite side of your 8mm hole
4) Cut down the tip of the dart to the flat base
5) Glue the dart bottom into the 1/4" hole making sure that the flat part is parallel to the edge touching the board
View attachment 2
6) Slide onto the guide stop rails
7) Slide a Guide Dog or something you can screw to the bottom channel of the track as a reference point. This needs to be tight so the reference stays the same for the holes on the other side of the board.
7) Slide Router on and start using per the video!
Test Result:
View attachment 4
I'm sure people have done this before...but I was pretty proud of myself
This certainly doesn't solve many of the problems the LR32 system does...but it's at least cheaper than most and can give you a solid result. Thoughts? ENJOY!- Jared