Stevenski
Member
Having taken a lot from this group and others like it, I thought I could at least in part try to contribute something so here’s my solution for safely storing the PGS equipment until the next use.
I recently purchased the Parf `Guide System II to make my first ever MFT style track saw cutting station and work top trestle bench for my small garage workshop.
What an amazing piece of kit.
Let me start by saying that while I completely understand - and even admire those people who feel that the price isn’t worth it and go down the DIY route to make a grid of 20mm holes in a piece of MDF, I can only say that they are missing out on the pleasure and satisfaction that also comes from working with beautifully designed, engineered and manufactured kit.
The precision of the grid and the quality of the holes I achieved on my first attempt shocked me. It made me look a much better hobbyist than I really am") If someone showed me the worktop and told me it had been cut by CNC, I would easily believe it.
If someone showed me the worktop and told me it had been cut by CNC, I would easily believe it.
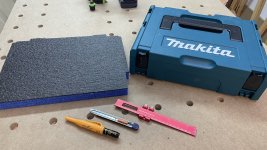
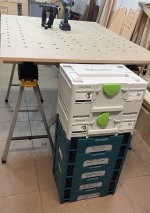
The Axminster systainer is very expensive at I guess around 100GBP. Here’s my solution that cost me the equivalent of only 25 GBP. Although everything was bought here in Poland, I am sure that the same things are available everywhere.
The Makpac type 1 systainer cost me 80 Polish zloty (17 GBP) and the Shadow Foam / Lean Foam pre-cut to fit the Makpac cost me 45zl for two sheets (9 GBP)
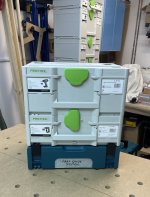
The Makpac can be attached to the underside of a Systainer 3 to allow stacking with Festool systainer if you want.
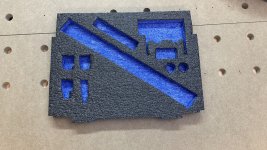
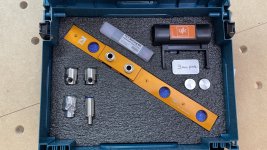
The process is stupid simple really. Decide on your layout. Mark outlines on the foam. Cut into the foam with a fresh blade. Peel out the foam to the depth you require.
I have used this approach a few times now and found it to be a rather economical approach to creating a sturdy and neat storage system of customised systainers.
Tips:
1. Remember to cut smaller (inside the lines) and shallower at first and increase if you need to. This will help you get tighter fit which will hold parts better. The foam will squash to allow you to insert your piece but you can’t put any back in of you remove too much")
2. Be economical and don't use all the space just because you can. You may want to add more to the box down the road. eg in my Parf Guide box I have left some space for spare dogs or some revision dogs.
I hope this helps someone, somewhere, sometime….
I recently purchased the Parf `Guide System II to make my first ever MFT style track saw cutting station and work top trestle bench for my small garage workshop.
What an amazing piece of kit.
Let me start by saying that while I completely understand - and even admire those people who feel that the price isn’t worth it and go down the DIY route to make a grid of 20mm holes in a piece of MDF, I can only say that they are missing out on the pleasure and satisfaction that also comes from working with beautifully designed, engineered and manufactured kit.
The precision of the grid and the quality of the holes I achieved on my first attempt shocked me. It made me look a much better hobbyist than I really am
If someone showed me the worktop and told me it had been cut by CNC, I would easily believe it.The Axminster systainer is very expensive at I guess around 100GBP. Here’s my solution that cost me the equivalent of only 25 GBP. Although everything was bought here in Poland, I am sure that the same things are available everywhere.
The Makpac type 1 systainer cost me 80 Polish zloty (17 GBP) and the Shadow Foam / Lean Foam pre-cut to fit the Makpac cost me 45zl for two sheets (9 GBP)
The Makpac can be attached to the underside of a Systainer 3 to allow stacking with Festool systainer if you want.
The process is stupid simple really. Decide on your layout. Mark outlines on the foam. Cut into the foam with a fresh blade. Peel out the foam to the depth you require.
I have used this approach a few times now and found it to be a rather economical approach to creating a sturdy and neat storage system of customised systainers.
Tips:
1. Remember to cut smaller (inside the lines) and shallower at first and increase if you need to. This will help you get tighter fit which will hold parts better. The foam will squash to allow you to insert your piece but you can’t put any back in of you remove too much
2. Be economical and don't use all the space just because you can. You may want to add more to the box down the road. eg in my Parf Guide box I have left some space for spare dogs or some revision dogs.
I hope this helps someone, somewhere, sometime….