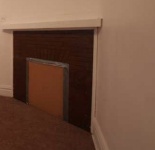
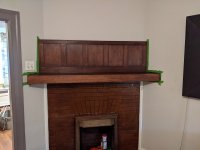
I've been working on making over the mantel in my living room. The existing mantel is a decidedly un-sexy painted shelf, essentially.
Here is a photo of it from when I first bought my house:
View attachment 1
I assure you all that the walls have been since painted and the cardboard removed.")
The approach I wanted to try in this instance was to do the modification without demoing what is already in place. The reasoning for this is that I have been disrupting the house for extended periods of time for nearly 5 years now. Since I work full time, projects take a while for me to finish. Since I am easily distracted, projects will sometimes pause in the middle for a month or two while I attend to something else my brain has prioritized. So, my strategy in this instance was to do an overlay on the mantel shelf using veneers and then to build an overmantel using frame and panel construction. The style is kind of an arts and crafts/craftsman style.
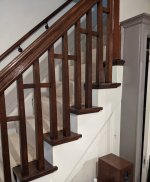
For materials, I wanted to use rift/quartersawn red oak. This is will match up with the stairs, which are only about 10' away from this. I prioritized riftsawn figure for most of the wide parts and limited the quartersawn to the frame on the overmantel. While there is some mild flecking in the panels, the grain is mostly straight.
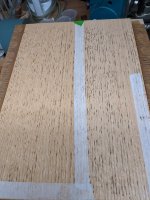
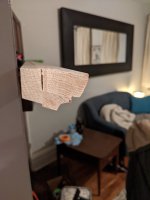
The first priority was to take some red oak veneer and lay it up on 1/4" mdf. This went relatively smoothly. I haven't been getting great seams directly off the veneer saw lately ( I think I need to spend more time sharpening it) so I shot the edges using my low angle jack plane. These may be some of the best joints I've ever obtained. I then taped the joints using standard veneer tape.
View attachment 2
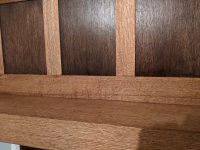
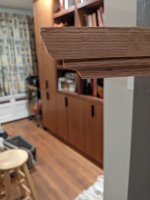
And here's the panel after removing the tape:
View attachment 3
Of course, it's about the easiest conditions for hiding the joint, with all the comb-like figure. However, red oak can tear a bit during cuts, so I do think the shooting board was a good idea.
The other thing you may notice is that there is significant bleed through of the glue through the pores. You probably also notice the glue is dark brown. This is by design. For glue, I used the better bond glue from Veneer Supplies. I went with a dark glue because I expected a good amount of bleed through and plan on filling the pores with a dark stain later on. I was concerned that if I used a white glue that some pores would end up getting blocked and it would be too difficult to remove the glue from those.
A nice thing I learned during my prep work is that the better bond glue can be removed from the surface pretty easily by way of a maroon scotchbrite pad and some water. I didn't observe any negative impacts to the bond even after flooding the surface pretty well, although I did not let it sit for a long time before wiping off.
The next thing I did was work on getting my finishing schedule worked out. The veneer and the solid wood are quite different in their color, despite being of the same species. The veneer was almost straw colored while the solid wood had a pinkish tinge. My strategy was to use a base coat of dye to help bring things closer together and also give the wood a little age. I ended up going with this mix:
1oz water, 20drops transtint medium brown, 1 drop transtint honey amber, 1 drop transtint orange. I don't have any photos of what this looks like yet.
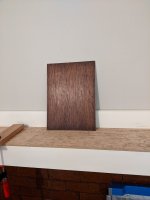
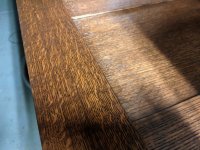
Over this, I applied shellac and then a glaze of General Finishes Java gel stain, wiped on in circles and wiped off with the grain shortly after. Another coat of shellac seals this in.
View attachment 4
At this point, I didn't really document my steps for cutting out the overlay. Of some interest is that the front portion is 1/2" thick MDF and that I have glued 1/4" solid edging to the substrate so that I can shape the edge a little bit.
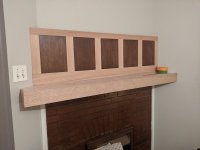
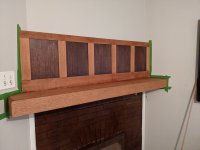
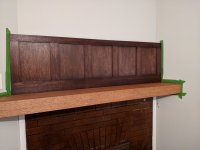
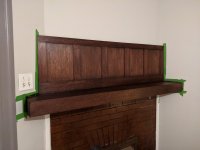
As of this weekend, I've prefinished the panels, assembled the frame, and attached the overlay pieces:
View attachment 5
This weekend I'm going to hopefully begin putting the dyes and stains on the overlay portion. The overmantel is only leaning on the wall at the moment. There is a hollow in the wall on the left that I may decide to float out. On the other hand, I could caulk it and the only one who will care and notice will be me.
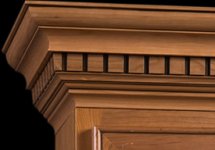
One item I'm still undecided about is whether to add any trim to the top of the overmantel. I considered doing a 1/2 round molding and perhaps a cove at the top. Part of the issue in this case is sourcing - finding appropriately sized cove in red oak around here has not been a success. I'm not tooled up for making my own 2" tall cove. I could veneer some pine cove, but I've never veneered a molding before and it could end up being quite the undertaking. I'm open to suggestions here.
Here is a photo of it from when I first bought my house:
View attachment 1
I assure you all that the walls have been since painted and the cardboard removed.
The approach I wanted to try in this instance was to do the modification without demoing what is already in place. The reasoning for this is that I have been disrupting the house for extended periods of time for nearly 5 years now. Since I work full time, projects take a while for me to finish. Since I am easily distracted, projects will sometimes pause in the middle for a month or two while I attend to something else my brain has prioritized. So, my strategy in this instance was to do an overlay on the mantel shelf using veneers and then to build an overmantel using frame and panel construction. The style is kind of an arts and crafts/craftsman style.
For materials, I wanted to use rift/quartersawn red oak. This is will match up with the stairs, which are only about 10' away from this. I prioritized riftsawn figure for most of the wide parts and limited the quartersawn to the frame on the overmantel. While there is some mild flecking in the panels, the grain is mostly straight.
The first priority was to take some red oak veneer and lay it up on 1/4" mdf. This went relatively smoothly. I haven't been getting great seams directly off the veneer saw lately ( I think I need to spend more time sharpening it) so I shot the edges using my low angle jack plane. These may be some of the best joints I've ever obtained.
I then taped the joints using standard veneer tape.View attachment 2
And here's the panel after removing the tape:
View attachment 3
Of course, it's about the easiest conditions for hiding the joint, with all the comb-like figure. However, red oak can tear a bit during cuts, so I do think the shooting board was a good idea.
The other thing you may notice is that there is significant bleed through of the glue through the pores. You probably also notice the glue is dark brown. This is by design. For glue, I used the better bond glue from Veneer Supplies. I went with a dark glue because I expected a good amount of bleed through and plan on filling the pores with a dark stain later on. I was concerned that if I used a white glue that some pores would end up getting blocked and it would be too difficult to remove the glue from those.
A nice thing I learned during my prep work is that the better bond glue can be removed from the surface pretty easily by way of a maroon scotchbrite pad and some water. I didn't observe any negative impacts to the bond even after flooding the surface pretty well, although I did not let it sit for a long time before wiping off.
The next thing I did was work on getting my finishing schedule worked out. The veneer and the solid wood are quite different in their color, despite being of the same species. The veneer was almost straw colored while the solid wood had a pinkish tinge. My strategy was to use a base coat of dye to help bring things closer together and also give the wood a little age. I ended up going with this mix:
1oz water, 20drops transtint medium brown, 1 drop transtint honey amber, 1 drop transtint orange. I don't have any photos of what this looks like yet.
Over this, I applied shellac and then a glaze of General Finishes Java gel stain, wiped on in circles and wiped off with the grain shortly after. Another coat of shellac seals this in.
View attachment 4
At this point, I didn't really document my steps for cutting out the overlay. Of some interest is that the front portion is 1/2" thick MDF and that I have glued 1/4" solid edging to the substrate so that I can shape the edge a little bit.
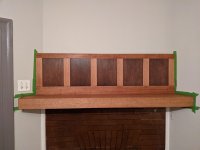
As of this weekend, I've prefinished the panels, assembled the frame, and attached the overlay pieces:
View attachment 5
This weekend I'm going to hopefully begin putting the dyes and stains on the overlay portion. The overmantel is only leaning on the wall at the moment. There is a hollow in the wall on the left that I may decide to float out. On the other hand, I could caulk it and the only one who will care and notice will be me.
One item I'm still undecided about is whether to add any trim to the top of the overmantel. I considered doing a 1/2 round molding and perhaps a cove at the top. Part of the issue in this case is sourcing - finding appropriately sized cove in red oak around here has not been a success. I'm not tooled up for making my own 2" tall cove. I could veneer some pine cove, but I've never veneered a molding before and it could end up being quite the undertaking. I'm open to suggestions here.