MFT dogs to secure the stock back fence?

sprior

Member
Joined
Feb 15, 2012
Messages
460
The new Woodpeckers MFT square got me thinking again that I really don't need the back fence of my MFT to be anything but square and preferably aligned with the dog holes, so the miter gauge hanging out the back isn't necessary.

I know about the Qwas Fence Dogs, but the product page for them doesn't make it sound like they were ever finalized.  Are there other people who still use the stock back fence on the MFT, but keep in place with a dog solution instead of the stock miter gauge?
 
I used parf dogs and 80/20 inside corner brackets to mount the fence to the dogs.  Worked well.
 
huskercrue said:
I used parf dogs and 80/20 inside corner brackets to mount the fence to the dogs.  Worked well.

[member=60763]huskercrue[/member] - Interesting ... Any pics or links to the corner brackets ... Thanks   
 
"Are there other people who still use the stock back fence on the MFT, but keep in place with a dog solution instead of the stock miter gauge?"

Nope, I use dogs and rail dogs exclusively. A lot of good products out there that compliment the MFT well.
 
I use two 495541 MFT/3 fence clamps (both in the back v-groove, one at the corner and one near the rail), works nicely.
 
I sold my MFT and built my own so I can't take any pics, but my current setup is basically the same.  All you need to do is drill out one of the holes in the corner bracket to 8 mm and insert the parf dog from the bottom of the table and attach the corner bracket using an 8 mm screw.  Then, attach the fence to the other hole in the corner bracket.  I believe these are the brackets that I used but you may want to measure the hole location on the bracket and line it up with the one on your fence to make sure they are compatible. 
https://8020.net/shop/25-4119.html
 
I have had these for a while but have no idea where i got them, or if they are available any longer. I know that FOG user EROK made something similar for his personal use.
[attachimg=1]

[attachimg=2]

[attachimg=3]

[attachimg=4]

[attachimg=5]
 

Attachments

  • 1.JPG
    1.JPG
    196.6 KB · Views: 5,706
  • 2.JPG
    2.JPG
    180.4 KB · Views: 5,895
  • 3.JPG
    3.JPG
    116.3 KB · Views: 5,657
  • 4.JPG
    4.JPG
    113.5 KB · Views: 5,773
  • 5.JPG
    5.JPG
    138 KB · Views: 6,177
View attachment 3
sprior said:
...  Are there other people who still use the stock back fence on the MFT, but keep in place with a dog solution instead of the stock miter gauge?

Using the stock fence extrusion can be as simple as:

View attachment 1

In that configuration, the fence is held in place and would be difficult to knock out of position. Standing upright, however, is a little more precarious.

Having a sturdy fence on the MFT has always seemed to be a necessity to me. Around a decade ago I came up with this method to attach my fence to the MFT via the dog holes:

View attachment 2

This fence can be removed and replaced as quickly as can be. And goes back to the same location every time. I like it.
 

Attachments

  • MFTfenceQuickClamp.jpg
    MFTfenceQuickClamp.jpg
    2.1 MB · Views: 6,022
  • MFTfenceCamClamp.jpg
    MFTfenceCamClamp.jpg
    2.1 MB · Views: 1,758
this is what I use. Its bomb proof, I can bump it pull the fence out out it back in doesnt change anything unless I move either the rail or the angle stops.I also have 10 flag stops so i can use the fence as a story pole


Attachments

  • IMG_1834.JPG
    IMG_1834.JPG
    851.5 KB · Views: 1,767
I've been goofing around in my favorite CAD tool for a couple of hours and came up with this design which could be 3D printed.  The two pieces should fit without slop in the MFT holes and the gap between them would provide travel to tighten them.  a M6 hex bolt would fit down through the top piece and a matching nut would be expoxied in the bottom piece which would also act as the tightening knob.  A second M6 bolt and nut would fasten the fence to this dog.

This just a first draft, will have to print one and try it out.
 

Attachments

  • fence dog v11.png
    fence dog v11.png
    1.1 MB · Views: 802
Just printed the top and it looks like it'll work pretty well.  I've already made some minor tweaks to the design like rotating the top nut hole so it leaves a thicker side wall.  I think I'll also increase how much the top piece extends into the hole and reduce the bottom by that amount, but overall I think this should work well.  [attachimg=1]
 

Attachments

  • 2018-01-10 23.13.52.jpg
    2018-01-10 23.13.52.jpg
    6.2 MB · Views: 7,286
Looks good - Great Idea. Does the gap within the 20mm hole cause any problems? Thanks
 
eBay seller toolimprovements maker of the "slop-stop" for the MFT guide rail used to periodically offer "Lock Fence Bench Dogs". I have not seemed them offered in a while. You might try contacting him via eBay to ask if he would make some more.
 
Unfortunately eBay seller toolimprovements is no longer making them...  I'm interested in [member=14226]sprior[/member] latest design ... Thanks
 
Hi. I have several sets of tool improvements fence dogs....no sorry you can't buy any from me...lol....His name is Jon and is a member on fog...I have some other stuff he made as well, very nice guy but yes kinda closed down to do other stuff.
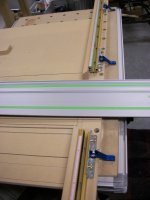
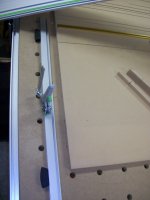
I use his fence dogs on the original mft/3 fence and his slop stop as I was having issues with the protractor staying square...you increase your crosscut capacity as well, and keep the festool fence which you already have allows you to have multiple fence stops, I think I have 5...they are or were not that expensive to buy from lee valley....it's a good solution and I have had no squaring issues since I set my table up this way....I also have many of Qwas products, and they are the dogs that I use all the time, and fit the best of all the dogs I've purchased. He too is a member here, and was one of the first if not the first to understand how the layout of the holes on mft could be used with dogs...I see his site is still up, and if you want to keep your original fence I'm thinking his fence dogs will be very accurate and you will be pleased with them...also like others have said, you could try Jon, but he's been out of business for quite a while....Qwas seems to be selling his stuff thru Bob Marino in US, and Ultimate tool Supply in Canada...I've bought stuff from both dealers, and they are very good. Good luck, I don't think you'll be unhappy getting rid of the protractor, and well folks have found other uses for the protractor on the side of the table for making cuts under the size of the rail...I've tried it and it works...do a search on fog and you'll see what I mean.
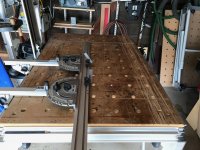
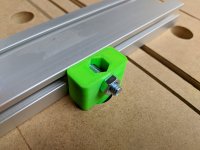
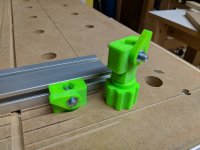
Then again, what you have made looks pretty cool...lol
Greg
 
When I started this thread the thought of designing and 3D printing my own hadn't yet occurred to me, but here we are.  I have published the files to Thingiverse here so anyone with a 3D printer can make a set, though I've licensed the design for noncommercial use - that means if you want to sell them you need to talk to me first.  I'm open for Parf, Qwas, Woodpeckers to make me an offer I can't refuse  [big grin].  The dogs fit quite snugly so there's no slop and they don't move around at all when tightened.  I printed them with an unusually high infill (85%) so they're effectively solid plastic.  You could probably break them, but you're going to have to work at it.  The only additional hardware that's needed is a pair of M6x25 hex bolts and nuts for each clamp and you'll want a pair of clamps.  A drop of epoxy to fasten the head of the vertical bolt in the top section and the nut in the bottom section would make them less fiddly to install.  For now this design is done, I'm happy with it.

[attachimg=1]
 

Attachments

  • 2018-01-11 23.59.10.jpg
    2018-01-11 23.59.10.jpg
    6.3 MB · Views: 6,993
Here’s the solution I used to maximize my cutting capability on my MFT3.  Recommended my Festool on one of their instagram tips.  If you want to simplify your setup you can buy a second clamp and ditch the angle assembly. -


Sent from my iPhone using Tapatalk Pro
 
[member=14226]sprior[/member] , can you provide any details of your print setup, and what resolution
did you print these at and the material (looks like nylon to me).

I am interested in getting a 3D printer and I don't want to take this thread off
topic, but would like to know a little more about what was involved in printing
these.
 
Those details are actually listed in the Thingiverse page except that it's plain old PLA plastic which is what I start with and then switch to some other plastic only when necessary.  If this print breaks someday I'll print it in either PETG or nylon (I have both), but I think it'll be fine in PLA.
 
sprior said:
Are there other people who still use the stock back fence on the MFT, but keep in place with a dog solution instead of the stock miter gauge?

I still use the fence and assembly and have found that it works well for me for the purpose of final square crosscutting. I also own some dogs which I use for various tasks on the MFT. I would recommend using one or the other. Either square the fence to the table with the miter assembly in place or use some dog system to square and make cuts.
 
Back
Top