MFT Systainer Cabinet Build

Bugsysiegals

Member
Joined
Mar 19, 2016
Messages
908
Hello everyone, I'm building some shop cabinets and need your advice on a few points.

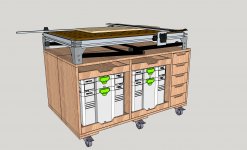
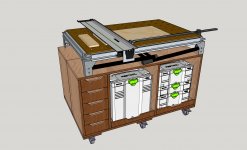
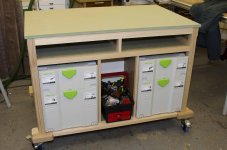
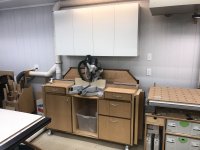
The cabinets will store my Festool systainers and support my MFT table allowing it to be used as an out-feed table for my Table Saw, Jointer, Planer, Band Saw, etc.

I’ll be using 3/4" plywood w/Maple veneer for the carcass (1 side is prefinished and I’ll be edge banding), Rockler 3” total-lock swivel casters, and I’ve not decided yet on drawers (probably ½” sides and bottoms) or drawer slides/glides (probably full extension slides with quickscrews).

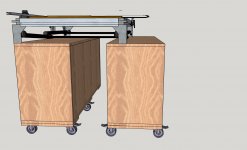
The cabinets will be supporting about 100 lbs. of Festool systainers, 60 lb. MFT table, and whatever wood I’m cutting.  To ensure it can support this weight adequately, how should I proceed with the following …

1) Joinery – I considered using rabbits (top/bottom) and dado’s (dividers) but figured this would weaken the cabinets weight capacity and domino’s would be better for this reason, do you agree?

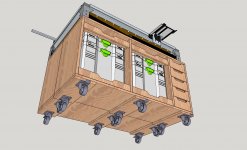
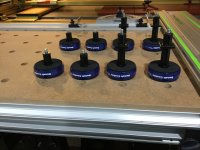
2) Caster Support – I’ve seen mobile cabinet builds which use an extra layer of plywood between the cabinet base and casters, does this provide extra strength or is this unnecessary? 

3) Casters – Would you add casters to the center of the cabinet for additional support and to prevent sag or is this unnecessary?

I’ve attached a few rough draft photos for reference.  FYI - I was originally considering face frames with Walnut contrast but opted to go frameless for more drawer space and not sure I like the Brown contrast any longer, thoughts?


Attachments

  • MFT Cabinet - 2017-11-29.jpg
    MFT Cabinet - 2017-11-29.jpg
    616.6 KB · Views: 4,116
  • MFT Cabinet 1:2 Shelves - 2017-26-10 v2.jpg
    MFT Cabinet 1:2 Shelves - 2017-26-10 v2.jpg
    732.6 KB · Views: 4,441
  • MFT Cabinet 1:2 Shelves - 2017-26-10 v3.jpg
    MFT Cabinet 1:2 Shelves - 2017-26-10 v3.jpg
    632.9 KB · Views: 2,934
1) Dominos should do the trick nicely
2) Caster supports (when not glued on, but screwed) have the upside that you can replace them with ones of slightly different thickness, if needed
3) Integrating a vertical wall (along the long side) at the middle should remove chance of sag way cheaper than additional casters, also it would turn the thing into a torsion box

Additionally: should you build it as two mirrored pieces (as your drawing suggests) give them individual back walls (which should remove any sag problems) and use through caster supports at the bottom (screwed into the bottoms of the two shelves) to hold them together (with possibly some unglued dominos in the back of the side walls for alignment and some cabinat connectors holding the back walls together) and add just 4 casters (one at each corner).
Should you then want to repurpose the two shelves later you could simply unscrew the caster supports (and cabinet connectors) and add supports that span only one cabinet (and adjust height of the whole thing, if needed), so this MFT cabinet could turn into support shelves for kapex wings (as one example).
 
I built this about a year ago.  It's made of MDO and cherry with casters only at the corners.  For the carcase bottom I used two layers of MDO.  It's held together with Dominos and screws, glue.  Has full extension drawer slides and it's quite heavily loaded.  I have not experienced any sagging (yet).  If it does sag I can add center casters. But so far, so good.  Good luck with your project.

Cheers,
Barney
 

Attachments

  • IMG_20170218_183059935.jpg
    IMG_20170218_183059935.jpg
    657 KB · Views: 2,209
My version uses a full-length center spine so there's no sagging whatsoever.  Even fully loaded, there's no flattening of the caster wheels either.  Next time I do one, I'll eliminate the center drawers, but use end drawers on one end instead (short depth, but full-width) to store MFS profiles, etc.  It appears that the drawers you've designed are accessible from either side.  If so, you'll not be able to use a central stiffening spine and a set of center casters might be beneficial. 

I used dominoes to do the assembly.  There's no weakening perceptible five years on. 

Another thing I'd mention is that if you're planning on using drawer glides, line-bore the side panels for the glides before you assemble the cabinet.  Get the specs on the glides you intend to use before assembly and space your bored lines according to the spec so that the glides will not present challenges later. 
 
Gregor said:
1) Dominos should do the trick nicely
2) Caster supports (when not glued on, but screwed) have the upside that you can replace them with ones of slightly different thickness, if needed
3) Integrating a vertical wall (along the long side) at the middle should remove chance of sag way cheaper than additional casters, also it would turn the thing into a torsion box

Additionally: should you build it as two mirrored pieces (as your drawing suggests) give them individual back walls (which should remove any sag problems) and use through caster supports at the bottom (screwed into the bottoms of the two shelves) to hold them together (with possibly some unglued dominos in the back of the side walls for alignment and some cabinat connectors holding the back walls together) and add just 4 casters (one at each corner).
Should you then want to repurpose the two shelves later you could simply unscrew the caster supports (and cabinet connectors) and add supports that span only one cabinet (and adjust height of the whole thing, if needed), so this MFT cabinet could turn into support shelves for kapex wings (as one example).

I think you're onto something here. Design it to be quick release somehow and you could repurpose for a small shop setting (like I have). One option would be to set the two shelves to have the same height as the MFT/3 free standing on its legs. Then when needed you could relatively quickly turn the shelves into infeed/outfeed support for long cuts on the MFT/3. Lots of possibilities with that design. Only really big downside would be having the two shelf backs would limit your storage capacity but if you can still fit a systainer in each side and have the entire cabinet flush to the MFT/3 edges then not a problem.
 
Gregor said:
1) Dominos should do the trick nicely
2) Caster supports (when not glued on, but screwed) have the upside that you can replace them with ones of slightly different thickness, if needed
3) Integrating a vertical wall (along the long side) at the middle should remove chance of sag way cheaper than additional casters, also it would turn the thing into a torsion box

I like the idea of being able to adjust the height with the caster supports but need a much quicker way of lowering/raising the table as I'd like to raise the MFT so everything else in the shop can become the outfeed for the MFT.  My thoughts were to build some removable corner supports with rubber foot pads in 2 different height configurations (perhaps 4-6" PVC for better stability).  It's not the most elegant looking solution but would allow me to quickly have the MFT lower/higher than everything else and I think it would remain stable, thoughts?

So it's clear, these are 2 separate cabinets, each with their own 3/4" back.  I plan to build a workbench top, up against the wall, with triangular supports underneath or support legs so these cabinets can roll underneath it when not in use to free up floor space.  I originally designed this as a single cabinet but a 32" workbench top seemed very deep, at least for my basement shop.  A 24" worktop seemed more appropriate and 15.25" cabinets underneath leave some leg room if I want to sit at the worktop which seemed nice.

That said, did you mean a vertical divider between the 2 cabinets or in the middle of each cabinet at the top where the drawers are or below the systainers?
 
As Sparktrician said it way more eloquently:
Sparktrician said:
a full-length center spine so there's no sagging whatsoever.
Basically a full size sheet as a shared back in case it whould be one part, should you make two that go back-to-back you would already have that when their backs are stiff enough (same thickness as the other verticals) and rigidly connected to the other walls and top/bottom.

For easy height adjustment: either take a look at the MFSC Workbench (here on the forum) or setup your shop so everything is the same height. I don't see a way to easily (and quickly) change the height while at the same time building it as a shelve/drawer rack.
 
Gregor said:
As Sparktrician said it way more eloquently:
Sparktrician said:
a full-length center spine so there's no sagging whatsoever.
Basically a full size sheet as a shared back in case it whould be one part, should you make two that go back-to-back you would already have that when their backs are stiff enough (same thickness as the other verticals) and rigidly connected to the other walls and top/bottom.

For easy height adjustment: either take a look at the MFSC Workbench (here on the forum) or setup your shop so everything is the same height. I don't see a way to easily (and quickly) change the height while at the same time building it as a shelve/drawer rack.

Ok, understood.  Each cabinet does have it's own 3/4" plywood back.

When I speak of changing the height, I don't mean the cabinet height, I mean the height of the MFT table.  As-is with no spacers, the MFT will be an inch or less lower than the rest of my shop equipment.

For example, my workbench top and MFT will be slightly shorter than the Table Saw so they can be support for TS, the BenchDog Router TS Wing, jointer, planer, etc.  Alternatively, I'd like support for the MFT and it seems easy enough to put spacers underneath it which lift it up higher than everything else so the workbench top or TS can provide MFT support. 

It seems if I made some sort of larger cylindrical support pieces, perhaps something like 6" PVC, with flat bottoms and rubber grip on both sides (like what's on the bottom of Festool guide rails which seem to grip very well), or even a bench dog/dowel on top, I should be able to lift up each MFT corner and slide them underneath to quickly raise it's height (not underneath the metal corners but further under so it's under the MFT top).  They would sit near the corners and with that amount of width, I imagine the MFT would be stable if not being used as a workbench to hammer and chisel things which is where I'd resort to a more solid workbench top.  Make sense?
 

Attachments

  • MFT Cabinet - 2017-12-01.jpg
    MFT Cabinet - 2017-12-01.jpg
    568.7 KB · Views: 1,579
Hi [member=60777]Bugsysiegals[/member]

You show 6 castors in your drawing. A group of just 4 castors will make the unit easier to move around. Castors need to align themselves with the direction of travel (the direction that you are pushing) and rotate to achieve this. The problem is that they rotate independently and in doing so can act against each other and make it more difficult to push at the start - hence 4 will be easier than 6.

If the castors are to be effective then they need to not only have brakes on the wheels but also shaft locks so that they cannot spin about the vertical shaft.

I do not know your rationale for putting a $500 MFT3 on top of the cabinet when you could do just a dash more woodwork to make a complete solution with your own top. That way the brilliant MFT3 can still be available as an additional working surface and whilst it is at a job site or in the back of the van will not compromise your setup in the workshop.

I have a mobile work bench which has a framed construction. This makes the whole thing very strong and able to be used for hand planing, hammering and other violent tasks. The double lock of the industrial quality castors makes all of this possible.

View attachment 1

View attachment 2

I have produced a video series of my efforts and offer the plans to anyone free of charge but need an email address to send them out.
http://www.youtube.com/playlist?list=PLFPMbAq-UQi4i0UMIGUDazHPncnp1eUgx

Peter
 

Attachments

  • Mobile Bench 1.JPG
    Mobile Bench 1.JPG
    598.6 KB · Views: 1,653
  • Mobile Bench 2.JPG
    Mobile Bench 2.JPG
    135.3 KB · Views: 860
Peter Parfitt said:
Hi [member=60777]Bugsysiegals[/member]

You show 6 castors in your drawing. A group of just 4 castors will make the unit easier to move around. Castors need to align themselves with the direction of travel (the direction that you are pushing) and rotate to achieve this. The problem is that they rotate independently and in doing so can act against each other and make it more difficult to push at the start - hence 4 will be easier than 6.

If the castors are to be effective then they need to not only have brakes on the wheels but also shaft locks so that they cannot spin about the vertical shaft.

Thanks for the advice, I’ll go with 4 casters instead! Hopefully the cabinet backs are strong enough splines to support all the weight. The total locks have both brake and swivel lock.

Peter Parfitt said:
I do not know your rationale for putting a $500 MFT3 on top of the cabinet when you could do just a dash more woodwork to make a complete solution with your own top. That way the brilliant MFT3 can still be available as an additional working surface and whilst it is at a job site or in the back of the van will not compromise your setup in the workshop.

I have a mobile work bench which has a framed construction. This makes the whole thing very strong and able to be used for hand planing, hammering and other violent tasks. The double lock of the industrial quality castors makes all of this possible.

I bought over 15k in tools two years ago, life got busy, and this will be the first time I’m finally going to get to use any of my shop tools!  My point is, I’m not traveling all over doing projects at the moment and was just looking for a way to lower the MFT without cutting the legs (it sits an inch higher than my TS), store the systainers near the MFT for easy access, make it all mobile, be able to tuck everything out of the way if needed (12' x 22' woodshop), and see if I really want to take on building my own kitchen cabinets, the reason I bought all this equipment in the first place.

I plan to make my workbench top like the one in the video below (my friend owns a woodshop with CNC so I can get perfect holes) but do like where you’re going with this idea.

System Workshop

Since the MFT is taller than the Table Saw, the TS can support the wood from the MFT ... and a mobile cabinet like yours could be built slightly lower than the TS to be the outfeed for it!  As far as using the Festool track saw is concerned, I wouldn’t be able to cross cut on a 24” cabinet top up against the wall ... do you cross cut on your mobile cabinet?  Do you cut into the MDF like the MFT?  How do you change the top after cutting it all up? 

BTW, I’d watched one of your Festool Tool reviews in the past and really enjoyed it. I’d not realized you had such a large library of videos available. I’m looking forward to reviewing them as I build additional cabinetry in the shop and around the house. Thanks for sharing Peter!

Bugsy
 
Bugsysiegals said:
Since the MFT is taller than the Table Saw, the TS can support the wood from the MFT ... and a mobile cabinet like yours could be built slightly lower than the TS to be the outfeed for it!  As far as using the Festool track saw is concerned, I wouldn’t be able to cross cut on a 24” cabinet top up against the wall ... do you cross cut on your mobile cabinet?  Do you cut into the MDF like the MFT?  How do you change the top after cutting it all up? 

BTW, I’d watched one of your Festool Tool reviews in the past and really enjoyed it. I’d not realized you had such a large library of videos available. I’m looking forward to reviewing them as I build additional cabinetry in the shop and around the house. Thanks for sharing Peter!

Bugsy

Hi Bugsy

Yes, I cross cut on both my mobile bench and my MFT3 and I cut into the MDF tops without any worry. When they get beaten up I just replace them. A new MFT top costs me $6 and the holes are CNC accurate. Not long ago I replaced the top on my mobile bench and I don't think that I have cut into it yet.

I also have a slab of MDF, about 3 ft by 5 ft which just sits on top of my CNC cabinet. That is my track saw cutting station and again the holes are CNC accurate and it cost just $8. When I need to use the CNC I just slip the MDF cutting station off, lift the lid and off I go.

In the last 3 years I have created 3 new track saw cutting stations, 2 new tops for my mobile bench and just 1 replacement MFT3 top. The total cost was just for the 3 sheets of Medite MR MDF. It takes about 50 minutes to create the 77 holes for a new MFT3 top and 15 minutes to do either the track saw cutting station or mobile bench top as I do not put quite so many holes in them.

My 20 mm holes are absolutely perfect for the Parf Dogs from Lee Valley and also for the new Parf Super Dogs from Axminster as I use a special cutter designed for the job.

The holes are cut using the UJK Parf Guide System which you can read about in the second highest read thread in the Sales and Dealer area:
http://festoolownersgroup.com/festool-sales-dealer-area/ujk-parf-guide-system-videos/

I hope that I have answered your questions.

Peter
 
Thanks Peter,

I like the tool you designed. It seems easier to use, for laying out the holes, than the woodpecker one time tool for doing MFT holes. Perhaps the jig could be enhanced in the future to use a router for drilling all the holes to speed up the process.

Are there any other layouts of the MFT holes which allow more angles to be achieved or did Festool design this optimally?
 
You can get a natural 45 degrees by using a diagonal set of holes. There are 30 degree and 60 degree options which I will explain in a video in the not too distant future.

Peter
 
Thanks Peter.

I came across a workbench top by David Stanton on YouTube today, link below. He uses your jig to make a pretty nice MFT-like mobile workbench top which seems pretty sturdy and to do everything I’d like.

His table uses Bench Cookies to raise the table up in the air and I happen to have 8 of them already!  They have adapter legs In 2 different lengths which would allow me to quickly switch between it being higher/lower than the other equipment as I was originally looking for while leaving the MFT to remain as it’s own table as you suggested.  It seems this would be a better solution than making the top of the table have a workbench top which cannot change heights, thoughts?

Dave Stanton - MFT Style Bench
 

Attachments

  • DA595EE0-ADA9-4379-9BF0-E6629BFB74C9.jpeg
    DA595EE0-ADA9-4379-9BF0-E6629BFB74C9.jpeg
    2.4 MB · Views: 849
Dave has done a good job with his bench top bench and he has several other videos where he ads capability.

He has designed it so that it can be placed on a kitchen table or, as he shows it, on a surface in his workshop. If it is to be a permanent fixture in a workshop I would design it and the unit it sits on as one entity.

Peter
 
I found the bench below which seems pretty cool.

This would allow me to use clamps or dogs in the tracks (excellent for vertical pieces so you don’t need the side MFT skirts like Dave made), easily reuse this stuff and expand in the future if needed, lock additional cabinets together quite easily, create outfeed supports quite easily, and perhaps more useful things I’ve not thought of yet.

Would a design like this be much weaker than solid wood? 

Dream Bench
 
As I think more about the 80/20, I think I could take the empty space between the 80/20 and divider panels and add MFT style MDF to the sides and back. I’m not sure how it would be used exactly and if any benefit besides clamps I’m the t-track but has some potential?
 
I made this miter saw cabinet two years ago and have had no issue with sagging either. I doubled the 3/4" bottom and used 3/4" for the back to make it very strong.
 

Attachments

  • IMG_5695.JPG
    IMG_5695.JPG
    1.8 MB · Views: 1,198
Stanleywc said:
I made this miter saw cabinet two years ago and have had no issue with sagging either. I doubled the 3/4" bottom and used 3/4" for the back to make it very strong.

Very nice!!!  [smile]
 
Back
Top