MFT3 : clamping and top hole pattern

Joined
Apr 18, 2019
Messages
3
Hello
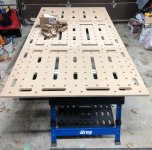
I am designing my own pseudo MFT3 table.
This table is rather large : 2.40m x 1.20m (or 1.40m) ; I use aluminium profiles (80/20 or like) for the structure, and the parf guide system from UJK to create the top holes pattern.
The 96mm spacing between holes is perfect for geometrical aspects : parf superdogs to hold the guide rail, fence dogs + incra incremental flipfence to position the piece to cut at 90° or 45°, everything is fine, as I could experiment on my current old _authentic_ MFT1080 table.
The main issue is clamping : when cutting small pieces and when routing (rail guided) clamping is anavoidable if you want to be accurate.
Lateral clamping offers an important range, but tends to move the piece, so vertical (surface) clamping seems the only way to go. I use Festool FSZ 120 and FS-HZ 160, with 80mm throat depth.
So you position the rail (no problem with dogs), the piece of wood so that the router has the right trajectory, and now let's clamp the piece. Bing ! the edge is just on a hole : impossible to put the clamp in this hole, and adjacent holes are too far for the 80mm of Festool clamps. this situation happens for me more than often, and is really frustrating ...
The solutions I thought about :
  - clamps with at least 110mm throat depth : the only models I found have a rail too big for the 20mm holes.
  -  lengthen the fix jaw of Festool clamps and make the two parts separable : not ideal as the mobile jaw will stay the same length so the clamp will position at an angle, possibly screwing the hole.
  - use "long throw" clamps with a dog (the Kreg Bench Clamp I own reaches 110mm) but it's a sure way to screw the holes, unless you use also a plate with a knob under the table (clamping becomes really tedious, mostly with a large table).
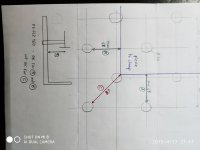
  - augment the density of holes : if I add a second set of holes, interspersed and staggered in the 96mm original grid, the distance between adjacent holes becomes 68mm, compatible with Festool clamps throat depth ; the new parf guide system (Mk II) allows this, but my fear is this could weaken the top (difficult to know when you are not a specialist in materials resistance...).

Here what are my thoughts, if you have ideas or advice I will be glad to hear them. Sorry for the length of the post, I'm even more verbose in English than in my native language !!!
Alain
 
Welcome Alain,
to the FOG with your first post. Expect to find help and creative ideas much of the time. As a manufacturer, TSO is always keeping an ear open for unmet needs. We don't have an immediate suggestion but will follow your post and see that develops.

Hans
 
First thing that comes to mind is to clamp the rail instead of the material and use Festool 488030 Clamping Elements to control lateral movement.
 
Remember the movie “Raiders of the Lost Arc”?
When the hero encounters a formidable opponent dressed in black sporting a large symitar...the solution was, put a hole in it.

You don’t need an additional comprehensive pattern of holes, just the one you need.
 
[member=70422]alain.coste.3@orange.fr[/member]

I recently designed (borrowing ideas from several others) a MFT slab pattern. I used it recently and it works great for clamping. I can easily fit Quick-Grip and my Bessey parallel-jaw clamps in the slots. The pic attached shows the three tables I have. Only issue with the slots is that I keep loosing my pencils.
 

Attachments

  • MFT TOPS.jpg
    MFT TOPS.jpg
    630.3 KB · Views: 2,961
[member=70422]alain.coste.3@orange.fr[/member]

Peut être vacuum table clamps? They have become pretty cheap and easy in the US. Not sure about France.
 
Alain, thanks for posting this, it is a frequent challenge for me too. Definitely a Festool design deficiency.  The reach needs to be >= to the diagonal of 4 adjacent holes (sq root of 2 X 96mm = 135.76mm plus extra 20mm (20mm dia. hole)) to ensure coverage.
 
Hello
Thanks to all who answered me. I go on my thinking, and your remarks help me.

[member=20971]elfick[/member] : as I said, lateral clamping systems that I know (Festool and others) tend to move slightly the piece when you clamp it. The rail position is fixed by dogs (or possibly by the guide rail support on the MFT), and you want to position the piece relative to the rail, without moving it at all. But I am thinking of a dog equipped with an adjustable horizontal rod, with no elasticity : with at least four of those you could clamp a piece exactly in place (as when using wedges, but more comfortably).

[member=2098]Michael[/member] : you are right : one hole is enough (well, say two, as two clamps are better). I like the idea of a moving hole which you can place everywhere you want on the table ; no more need to drill this complicated pattern of holes ! Perhaps a long time later in a galaxy far, far away....

[member=250]mike[/member] : What a beautiful top ! Your pic reassures me on the solidity of a top with many recesses. My pattern is rather different, but I don't think it will create more recess than yours. Good point for my idea (In fact my pattern is exactly what can be seen at the extreme left and right middle of your tops). For your pencils I sympathise : with only the holes in the standard MFT I am still moaning on these nuts, washers and other small screws which fall through !

[member=4796]Sean[/member] : I had thought of vacuum ; actually I own the Festool Vac System (old version with the pump in a systainer). It works fine on my bench for sanding, planing ... but the problem is its integration with the MFT : not a la Festool (with the rotating plate), I want to clamp the piece in place ON the table, generally under the rail (for rooting essentially). I did a crude experiment : unplug the hose from the clamping unit, put an o-ring (18mm diam) at the end of the hose, and press it against a board (mdf, plywood, agglo). I was pleasantly surprised at the restraining force, given the small area. Naturally the board can be easily pulled up, but I think that perhaps four of these could suffice to prevent a board already partially maintained by the rail to move laterally when routing or sawing, and it's enough for me, I don't need the strength of the original clamping unit, which is really impressive. So I was thinking of some dogs, with a vertical center hole and a groove + o-ring at their top. These dogs are connected to the pump under the table, and their top is flush with the top (details to improve). Note that does not contradict my idea of doubling the hole pattern as the "sucking dogs" must be close for a small piece.

[member=44778]Straightlines[/member] : Happy to see I am not alone to complain about clamping ... Your 155mm is really conservative, as with this you can even clamp from the diagonal,which is the ideal. But in this imperfect word I think that clamping from "lateral" holes could already be satisfying, requiring _only_ 116mm (96+20), largely out of reach of the clamps I know of. But with my pattern FS-HZ 160 clamps can work (see attached pic). So I probably will choose this pattern for my table top. At least I will drill all the 3mm holes (with the parf guide system) and perhaps start with the standard (96mm) pattern at 20mm, then enlarge the "auxilliary" pattern to 20mm on the part of the top where I do routing, and see ... Once the 3mm holes are drilled it's very easy to go to 20mm on demand.
Alain


Attachments

  • IMG_20190419_214719.jpg
    IMG_20190419_214719.jpg
    5.2 MB · Views: 434
alain.coste.3@orange.fr said:
Hello
Thanks to all who answered me. I go on my thinking, and your remarks help me.

[member=4796]Sean[/member] : I had thought of vacuum ; actually I own the Festool Vac System (old version with the pump in a systainer). It works fine on my bench for sanding, planing ... but the problem is its integration with the MFT : not a la Festool (with the rotating plate), I want to clamp the piece in place ON the table, generally under the rail (for rooting essentially). I did a crude experiment : unplug the hose from the clamping unit, put an o-ring (18mm diam) at the end of the hose, and press it against a board (mdf, plywood, agglo). I was pleasantly surprised at the restraining force, given the small area. Naturally the board can be easily pulled up, but I think that perhaps four of these could suffice to prevent a board already partially maintained by the rail to move laterally when routing or sawing, and it's enough for me, I don't need the strength of the original clamping unit, which is really impressive. So I was thinking of some dogs, with a vertical center hole and a groove + o-ring at their top. These dogs are connected to the pump under the table, and their top is flush with the top (details to improve). Note that does not contradict my idea of doubling the hole pattern as the "sucking dogs" must be close for a small piece.
Integrating a vacuum table functionality should neither be that difficult nor expensive, just drill some small holes through the table and have an airtight cavity on the bottom of them through which you can suck the air out.
This might give you some ideas:
 
Great discussion.

I think you should take a look at how clamping is done in the metal machining world. Here ‘toe clamps’ and ‘strap clamps’ are widely used. You could make a simple strap clamp out of a piece of hard wood. Could change the design to tighten from the bottom as well or make it cam based. Hope that helps.

Edit, forgot to mention that the picture is missing to show the clamping nut.
 

Attachments

  • BEEAB602-8974-43E7-9414-79E15F611E84.jpeg
    BEEAB602-8974-43E7-9414-79E15F611E84.jpeg
    1 MB · Views: 365
Back
Top