More fun with 80/20...??

Woodn't It Be Neat said:
The bracket looks like an 80/20 3 way corner bracket part number 14113 on page 309 of their catalogue.

Kevin

That is exactly it. I did have to doctor it up to get room for the Festool clamps to slide into the slot:

[attachthumb=#]

Used a Portaband mounted in the SWAG Offroad table. Very handy tool.

RMW
 

Attachments

  • ScreenClip [1].png
    ScreenClip [1].png
    464.8 KB · Views: 7,502
Richard,

Do the plywood side panels fit into the slots of the extrusions or are they fastened in a different way?
 
Richard, that swag table looks great.  If there was a taller maxi, you could store your portaband, table, and still have room for parts.  Does the table use some sort of wingnut to hold the legs on?
 
promark747 said:
Richard,

Do the plywood side panels fit into the slots of the extrusions or are they fastened in a different way?

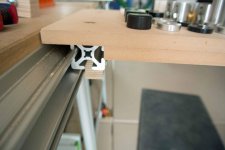
The slot in the extrusion is 5/16", I just rabbeted the side panels. For the top I used rabbeted strips and screwed up into the top panel from below, it sits about 1/2"above the 80/20.

[attachthumb=#]

[attachthumb=#]

RMW
 

Attachments

  • ScreenClip [2].png
    ScreenClip [2].png
    449.1 KB · Views: 9,161
  • ScreenClip [3].png
    ScreenClip [3].png
    844.1 KB · Views: 4,753
sgt_rjp said:
Richard, that swag table looks great.  If there was a taller maxi, you could store your portaband, table, and still have room for parts.   Does the table use some sort of wingnut to hold the legs on?

Legs are bolted on.

Check out their videos for more info, the newest version lets the newer saw just slip in. Older versions fit different saws, mine uses their throat plate to replace the stock one but then the saw slips in/out of the table for handheld use.

It gets used a lot.

RMW
 
Once again, I have tuned in a bit late.  Somehow, this thread slipped past my view.

When i got to the green egg portion of the discussion, I got to laughing.  The part about using concrete in the bottom brought back an on the job experience from nearly 50 years ago. (49 to be a bit more precise) One more chance for me to bore the ---- (insert your own words) out of y-all.

I had a contract to do the masonry on a development of some quite large houses.  The project was being constructed over some reclaimed marsh (wetlands) and we had some problems to solve concerning possible future settlement.  Instead of digging footings, we went in with a couple of dozers and pushed out a few feet of soft ground (peat) until we hit solid base.  we then brought in about 3 to 4 feet of bank run gravel, compacting with a large roller as we went.  Instead of wide footings, we put forms around the perimeter of the structure to be, layed out mesh and rods.  The rods were on about 12" centers in both directions and wired together with the mesh tied over that.  We poured the complete floor about 12" thick with extra reinforcement wherever a foundation wall was going above. 

A couple of the houses were being constructed during a very cold winter and we had to keep the gravel base protected until the concrete had been poured.  Once the concrete was poured, we still had to protect the surface.  We covered with hay and tarps over nite, uncovering only the area we would be working on by day.  The foundations were concrete blocks (that, and all other unit type masonry were my part) and we needed to heat water and sand for the mortar.  We had been off the project for about a week while the slabs were being poured and supposedly covered by the concrete contractor.  I had sand, cement and lime delivered before the slab had been poured.  My materials were well protected, but we had to bring in water in some 50 gallon drums. I gave my crew directions to set up some blocks next to the sand pile so we could build a fire under a drum.  With warm water, we did not need to heat the sand other than reflective heat from heating the water.  I left it up to my guys to take care of the setup while i went to a meeting with one of my other builders. 

When i arrived at the job, the first sight was of a water drum elevated over a roaring fire out on the very middle of the concrete slab.  The slab had not been covered with anything but some tarps.  No hay or insulating material any kind.  The crew was busy with shovels and wheelbarrows moving the sand out onto the slab as close to the fire as possible.  I jumped out of the truck yelling to get that fire out of there.  Now, normally, i am just a quiet guy  ::), but sometimes one has to get a little excited.  It wakes people up when you yell a little  [scared] [wink].

"What are you yelling about?" somebody asked. 

Just about the moment i was about to explain what could happen to cold concrete with a very hot fire burning away on it's surface, there was a loud blast as the entire 50 gal drum flew about ten feet in the air turning upside down and dumping its entire contents onto the fire.  "That's why I was yelling!"

Luckilly, no body was standing close to the fire, as there were some rather large chunks of concrete lying in a circle about 4 to 5 feet out from where the fire had been.  Luckilly, the heat had not penetrated down far enough to affect the rod and wire reinforcement.  The architect looked it over and with a little jack hammer and sawing work, we were able to put a neat patch in place. 

About the responder a page or so back who recommended concrete and wire for a base under the fire, I, for one, don't think so.  A picture a little later on showed a pulverized stone pad that shows very graphically what can happen.  Of course, that was probably not as exciting as my water drum flying sky high with enough water to extinguish a huge bonfire once it reached its full altitude and turned upside down.  There was a lot of sizzling for a few minutes.  Nobody was hurt and the expense turned out to be minimal.  And, we all got a good laugh  >>> sometime after I cooled off.

Tinker
 
Please excuse me, first time posting photos.

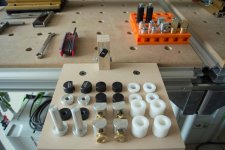
As requested by multitudes, photos of MFT Dog House + similar devices

Dog House: Additional, seldom used puppies in orange container to right rear.
Jig standing in middle-back of dog house locks 1515 to MFT.

[attachimg=#]

Dog House on 1515 on MFT. Note "lock" underneath 1515.

[attachimg=#]

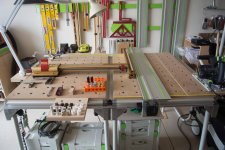
Dog House + lamp stand to left and another to rear + battery charging station to rear + saw platform to right  All on 1515.
[attachimg=#]

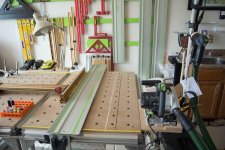
Another view of saw platform.
[attachimg=#]
 

Attachments

  • FOG 1.jpg
    FOG 1.jpg
    258.4 KB · Views: 12,045
  • FOG 2.jpg
    FOG 2.jpg
    184.8 KB · Views: 10,605
  • FOG 3.jpg
    FOG 3.jpg
    308.7 KB · Views: 13,461
  • FOG 4.jpg
    FOG 4.jpg
    366 KB · Views: 8,782
Dave Lame said:
Please excuse me, first time posting photos.

As requested by multitudes, photos of MFT Dog House + similar devices

Dog House: Additional, seldom used puppies in orange container to right rear.
Jig standing in middle-back of dog house locks 1515 to MFT.

[attachimg=#]

Dog House on 1515 on MFT. Note "lock" underneath 1515.

[attachimg=#]

Dog House + lamp stand to left and another to rear + battery charging station to rear + saw platform to right  All on 1515.
[attachimg=#]

Another view of saw platform.

[attachimg=#]

Nice set up I like that ,what are the dogs with the gold coloured screw on the side for ?
 
Those dogs are from well know breeder John of Tool Improvements fame.  What you see is a 1/4-20 knurled and plated wing nut. The other side of the dog has a flat face with a vertical slot so a fence or jig can be bolted to the dog, through the slot, at various heights.
 
Dave Lame said:
Those dogs are from well know breeder John of Tool Improvements fame.  What you see is a 1/4-20 knurled and plated wing nut. The other side of the dog has a flat face with a vertical slot so a fence or jig can be bolted to the dog, through the slot, at various heights.

And I think you are fortunate to have several sets, John kinda retired and sailed off into the sunset, as least as far as dog-breeding is concerned.

A "Dog House" - now I get it!  [doh]

On another note, all I can say is "Wow". You seem to have most every 20mm dog known to man, with the possible exception of the Parf's.  [not worthy] Getting any use from the Rip Dogs?

Thanks for posting the photos, you made good use of the 80/20 hanging on the MFT, much better than I have. I'm going to copy your TS55 shelf, mine got drug off the MFT yet again last week by the hose. Luckily no damage so far but it is only a matter of time.

Also, your shop is waaaaayyy too clean/bright/organized.... I'm jealous.

RMW
 
RMW,

My, your naivete is astonishing. When I last counted there were at least 16 breeds (purebreds) plus at least two half breed varities of dogs in use by foggers. My position as not-so-special assistant to the 3rd Deputy Undersecretary of the FKCoA (Festool Kennel Club of America) requires me to maintain a significant, but incomplete, collection of breeds.  As you may already know, the FKCoA was founded to honor our one true leader, the right honorable Grand Master Breeder, QWAS. Unfortunately Master QWAS seems to have gone over to the non-dark side with the recent announcement of dogs in a multiplicity of vivid colors. 

Yes, I do use your Rip Dogs when when I need to make longer cuts over about 40 inches. Very useful then.  When even longer cuts are needed I happily use your parallel guides on MFT extensions copied from you. (against the wall in the far rear of the photo).

Best part of my shop: Step out garage door to the North for a view of the Bookcliff Mountains, the Grand Valley, and the Grand Mesa. Step out the other door to the South for a view of the red rocks of the Colorado National Monument.

 
Dave Lame said:
RMW,

My, your naivete is astonishing. When I last counted there were at least 16 breeds (purebreds) plus at least two half breed varities of dogs in use by foggers. My position as not-so-special assistant to the 3rd Deputy Undersecretary of the FKCoA (Festool Kennel Club of America) requires me to maintain a significant, but incomplete, collection of breeds.  As you may already know, the FKCoA was founded to honor our one true leader, the right honorable Grand Master Breeder, QWAS. Unfortunately Master QWAS seems to have gone over to the non-dark side with the recent announcement of dogs in a multiplicity of vivid colors.   

Yes, I do use your Rip Dogs when when I need to make longer cuts over about 40 inches. Very useful then.  When even longer cuts are needed I happily use your parallel guides on MFT extensions copied from you. (against the wall in the far rear of the photo).

Best part of my shop: Step out garage door to the North for a view of the Bookcliff Mountains, the Grand Valley, and the Grand Mesa. Step out the other door to the South for a view of the red rocks of the Colorado National Monument.

"Naivete"... I'm blushing...

The Bookcliff Mountains et al places you around Grand Junction? Gorgeous country. I chased a girl (caught her, I'm happy to say) from Nevada to NJ via PA, so I am living somewhere I never expected to find myself and missing the high desert. At least we have a great beach, something about 10,000 shoobies realized as they have just descended upon us for the long weekend.

Everyone enjoy the holiday weekend, and remember those who sacrificed.

RMW
 
Dave Lame said:
Please excuse me, first time posting photos.

As requested by multitudes, photos of MFT Dog House + similar devices

Dog House: Additional, seldom used puppies in orange container to right rear.
Jig standing in middle-back of dog house locks 1515 to MFT.

[attachimg=#]

Dog House on 1515 on MFT. Note "lock" underneath 1515.

[attachimg=#]

Dog House + lamp stand to left and another to rear + battery charging station to rear + saw platform to right   All on 1515.
[attachimg=#]

Another view of saw platform.
[attachimg=#]

Dave a quick question. Could you elaborate what kind of base you use underneath the incra unit to attach to the MFT/3 ?
 
Richard/RMW said:
Was just fiddling around in the shop tonight and I stumbled across this.

jyqyqa6a.jpg


yzamy5uj.jpg


This is just the 1515 ULS profile. It sits nearly perfectly level and just a tad under 1/2" below the MFT surface. I cobbled this together in a couple minutes & the 80/20 extensions with MDF are within 1mm of being dead level with the top.

uby3ame7.jpg

would the 10 profile fit as well?  i'm so happy i just stumbled upon this thread as i'm outfitting an incra positioner and router table, with designs on attaching my contractor table saw to the MFT to maximize the precision of the positioner.  of course money is an option, but when you are fitting expensive parts together, it hardly seems logical to scrimp on the joinery!?

uzujy7ub.jpg


pura3ene.jpg


dyve6uqe.jpg


Not something I would put a lot of weight on without legs to support it but a dead simple way to make extensions for the MFT/3.

RMW
 
Got a deal on a DeWalt sawhorse/saw stand ($89 @ Lowes & also on Amazon Prime) and mated it up with the 80/20 extension arms I use so much. Turned out to be a great work support for quickie jobs, like cutting some brick outside to keep the nasty dust out of the shop.

[attachthumb=#]

[attachthumb=#]

Best part is it sets up in 60 seconds, and is totally portable. I have the longer DeWalt miter saw stand also, next time I break down plywood I am going to try it with 4-6 of the 80/20 extensions.

RMW 
 

Attachments

  • ScreenClip [6].png
    ScreenClip [6].png
    886.1 KB · Views: 4,514
  • ScreenClip [7].png
    ScreenClip [7].png
    801.8 KB · Views: 7,972
Richard/RMW said:
Got a deal on a DeWalt sawhorse/saw stand ($89 @ Lowes & also on Amazon Prime) and mated it up with the 80/20 extension arms I use so much. Turned out to be a great work support for quickie jobs, like cutting some brick outside to keep the nasty dust out of the shop.

[attachthumb=#]

[attachthumb=#]

Best part is it sets up in 60 seconds, and is totally portable. I have the longer DeWalt miter saw stand also, next time I break down plywood I am going to try it with 4-6 of the 80/20 extensions.

RMW 

What series/size extrusion are you using?  Is it 1515?
 
Scorpion said:
Richard/RMW said:
Got a deal on a DeWalt sawhorse/saw stand ($89 @ Lowes & also on Amazon Prime) and mated it up with the 80/20 extension arms I use so much. Turned out to be a great work support for quickie jobs, like cutting some brick outside to keep the nasty dust out of the shop.

[attachthumb=#]

[attachthumb=#]

Best part is it sets up in 60 seconds, and is totally portable. I have the longer DeWalt miter saw stand also, next time I break down plywood I am going to try it with 4-6 of the 80/20 extensions.

RMW 

What series/size extrusion are you using?  Is it 1515?

Yes. 1515 and 4040 fit the Festool clamps with room to spare. They will just fit into the 3030 but you have to file/grind a smidgen off each clamp first. 1515 ULS is the best fit/lightest option.

RMW
 
Back
Top