More fun with 80/20...??

rmwarren

Member
Joined
Jul 11, 2010
Messages
3,063
I wanted to start a thread to share ideas on jig/fixtures made with 80/20 to work with Festool, hoping others will chime in with their ideas. Here goes:

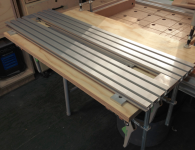
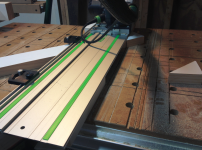
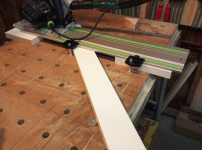
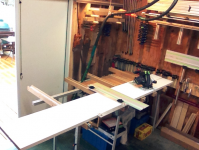
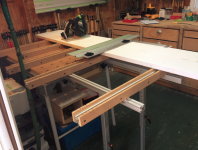
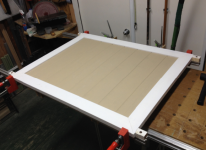
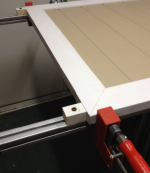
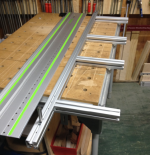
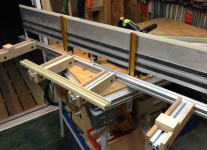
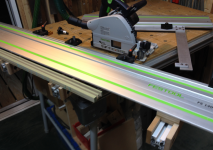
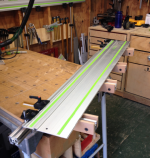
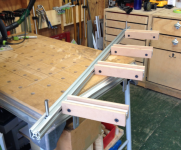
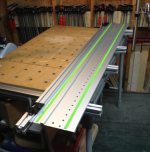
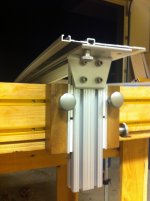
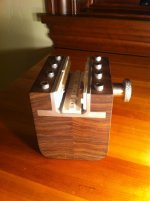
This is the latest jig, it is designed to secure a FS guide rail for cutting mostly narrow stock. I have done something similar in the past on my MFT but it involved continuous set up/break down of the 80/20 extensions as previously discussed on the FOG.

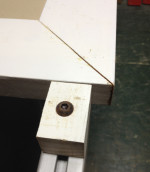
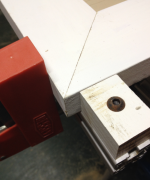
The downside of that approach was that I had to keep setting up/breaking down stuff secured to the MFT. The ideal setup was something used with or w/o the MFT to cut, in this case, narrow stock. What I came up with was a simple frame to (1) secure the FS rail, and (2) hold the stock while it was being cut. The pins just secure the rails with the Rip Dogs guide clips (no alignment), and the stock being cut rests on the MDF.

[attachthumb=#]

[attachthumb=#]

[attachthumb=#]

[attachthumb=#]

[attachthumb=#]

[attachthumb=#]

[attachthumb=#]

[attachthumb=#]

[attachthumb=#]

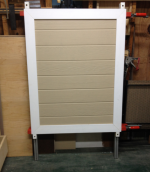
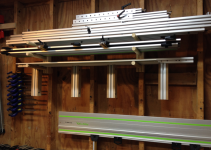
When not in use it hangs on the wall. Above it are my FS rails and the pieces of the 80/20 cutting table.

What are you doing with 80/20 in your shop?

RMW
 

Attachments

  • 1.png
    1.png
    676.3 KB · Views: 21,320
  • 9.png
    9.png
    1.4 MB · Views: 7,562
  • 8.png
    8.png
    1.3 MB · Views: 9,429
  • 7.png
    7.png
    1.3 MB · Views: 4,511
  • 6.png
    6.png
    1.4 MB · Views: 5,038
  • 5.png
    5.png
    732.1 KB · Views: 6,057
  • 4.png
    4.png
    654.2 KB · Views: 6,533
  • 3.png
    3.png
    1.1 MB · Views: 7,543
  • 2.png
    2.png
    636.3 KB · Views: 11,063
A re-post, but the 80/20 linear bearings are really useful and within tolerance for woodworking. 80/20 mills really easily, this walnut puts more strain on my machines than any 80/20 gear. My next 80/20 project will be a sliding outrigger for my unisaw. For now it's being for jigss and subframes for my workbench. Looking forward to your next project Richard.

PS: can someone tell me if my photos all show up sideways? I do my
FOGing on my IPhone and they view sideways for me. Anyone?
 

Attachments

  • image.jpg
    image.jpg
    311.8 KB · Views: 10,048
  • image.jpg
    image.jpg
    280.4 KB · Views: 6,125
I am curious if anyone has used 8020 in a similar way the the MFS is used.
 
Nice applications all. One of these days I am going to make a slider for my router table using 8020 and their bearings. It should be easy to include an outrigger that folds in and out of the way when not needed.

The problem with 8020 in place of the MFS is that slots are needed on the edge and you can only get that in thicker cross sections, meaning you are too high off your work.
 
amt said:
I am curious if anyone has used 8020 in a similar way the the MFS is used.

As Greg stated, the available 80/20 profiles with slots in the edge are too thick, I think the smallest is 25mm/1". You can find 20mm profiles elsewhere.

The best profiles I have found for routing are both from WoodPeckers. The larger profile is 0.70" thick and has the t-slot on the edge, the smaller profile is 0.50" thick but has no slot on the edge. In both cases I has the grind a hair off the edges of the Festool clamps before they would slide into the slots.

[attachthumb=#]

[attachthumb=#]

[attachthumb=#]

[attachthumb=#]

RMW
 

Attachments

  • ScreenClip [3].png
    ScreenClip [3].png
    1 MB · Views: 6,704
  • ScreenClip [2].png
    ScreenClip [2].png
    917 KB · Views: 5,160
  • ScreenClip [1].png
    ScreenClip [1].png
    1.2 MB · Views: 4,892
  • ScreenClip.png
    ScreenClip.png
    897.8 KB · Views: 6,565
That woodpecker super track looks promising.  I wonder if something could be made (or already exists?) to connect 4 tracks together, each 90 degrees off another, like the MFS.  I suppose a special nut and bolt would be needed.
 
Richard/RMW said:
amt said:
I am curious if anyone has used 8020 in a similar way the the MFS is used.

As Greg stated, the available 80/20 profiles with slots in the edge are too thick, I think the smallest is 25mm/1". You can find 20mm profiles elsewhere.

The best profiles I have found for routing are both from WoodPeckers. The larger profile is 0.70" thick and has the t-slot on the edge, the smaller profile is 0.50" thick but has no slot on the edge. In both cases I has the grind a hair off the edges of the Festool clamps before they would slide into the slots.

RMW

You can get thin and wide profiles from Techno Inc.:
http://www.techno-isel.com/LMC/Extrusions/

and from Bosch-Rexroth:
http://www.boschrexroth-us.com/country_units/america/united_states/sub_websites/brus_dcl/Products/Aluminum_Structural_Framing/a_catalog/mge_catalog_download/index.jsp
Look at Profiles catalog.

Overall Bosch-Rexroth framing system is superior to 80/20 in terms of versatility and variety of components. Their linear motion goes from dry friction all the way to ball bearing on hardened steel shaft. There are components specific to workstations, workbenches and ergonomics.
 
With the anchor bolt fasteners, sounds like a similar method of joining at 90 degrees could be achieved.  Who knows, just maybe not at the precision of the MFS.  Wondering if I could find a anchor fastener to match the Woodpeckers Super Track.
 
In regards to the MFS application: look into Hafele Maxifix connectors I think they could be used quite easily to butt joint the extrusions (website says 19mm, they can go thinner if need be) with more user friendliness than the MFS. They use 35mm hinge mortising bits to install. So long you can nail the depth the idea should work.
www.hafele.com/us/products/maxifix-connector-bolt-hafele.asp
 
Svar - I really like some of those thinner profiles @ techno-isel.com, they look useful. I am too heavily invested in 80/20 1515 profile to switch to the Bosch, and 80/20 is easily available here on eBay.

Here is another setup used to extend the MFT for longer cuts. My little shop is 11'9" inside (@ widest) so there is no room for a permanent bench larger than the MFT. The work-around is this extension that attaches with 2 knobs/t-bolts. Height is adjustable so the extension arms (w/MDF) can be lowered to the same height as the MFT top.

Shown is cross-cutting 96" material:

[attachthumb=#]

[attachthumb=#]

There is plenty of room to work between the MFT and the built in drawers, however you can just squeak by 8' material to get in/out the door.

After cross-cutting the arms are removed from the MFT, clearing it for other operations like mitering with the Rip Dogs, while leaving the extension on the MFT to use for routing/sanding/painting.

[attachthumb=#]

[attachthumb=#]

[attachthumb=#]

When done the extensions knock down in 10 minutes and go back to their place on the wall, taking up very little storage area.

RMW
 

Attachments

  • 5.png
    5.png
    1.1 MB · Views: 2,370
  • 4.png
    4.png
    1.2 MB · Views: 2,704
  • 3.png
    3.png
    1.1 MB · Views: 2,694
  • 2.png
    2.png
    620.9 KB · Views: 3,017
  • 1.png
    1.png
    1.1 MB · Views: 4,500
I have my own definition of Serendipity - "the act of doing something dumb and discovering something good from it".

After I had all 4 miter corners dominoed & glued and reached for clamps the realization dawned that the panel was longer than any of my clamps. Oops. Good thing the glue sets slow and there were lots of pieces of 80/20 sitting around.

[attachthumb=#]

[attachthumb=#]

[attachthumb=#]

[attachthumb=#]

[attachthumb=#]

I hastily cut/drilled a few blocks of wood & attached them to the 80/20 about 1/8" closer to each other than the length of the long side rail. Used the clamps on the long sides to pull the mitered corners together, which forced the short sides outward against the blocks and closed the miters nicely. The second photo shows the open miter and the third photo shows it after being clamped and closed.

Lucked out again.

RMW


Attachments

  • Clamp1.png
    Clamp1.png
    460.2 KB · Views: 2,408
  • Clamp2.png
    Clamp2.png
    444.3 KB · Views: 2,045
  • Clamp3.png
    Clamp3.png
    539.6 KB · Views: 1,822
  • Clamp4.png
    Clamp4.png
    428.3 KB · Views: 2,470
  • Clamp5.png
    Clamp5.png
    488.4 KB · Views: 2,102
is that " 10 " series 8020 ??

where or what part # is those bolts ? or are those hardware store bought ?
I have some 8020 #10  1 x 3 rails & some 1 x 1 rails coming but I'm not clear on the hardware to use 
any suggestions would be great
 
Bolts for t tracks can be anything. Those ones look like 80/20 gear but they could be anything. The important info for bolts is the selected length should be that of the material to be bolted plus 1/4" (20 series) to 1/8" (10 series) longer for the slot nut.
 
Slappy said:
is that " 10 " series 8020 ??

where or what part # is those bolts ? or are those hardware store bought ?
I have some 8020 #10  1 x 3 rails & some 1 x 1 rails coming but I'm not clear on the hardware to use 
any suggestions would be great

Slappy, those are 1515 (1.5") profiles. To give you a sense of scale the frame being clamped is 1.25" by 3.5" material just over 46" long. The cap screws are M8 probably 40mm long with tee nuts.

10 series uses M6 or 1/4" fasteners. 15 series is best with M8 or 5/16".

I have another panel to clamp up, this time I am going to use some wedges to let me adjust the clamping pressure. Will report back afterwards.

RMW
 
Richard/RMW said:
I have my own definition of Serendipity - "the act of doing something dumb and discovering something good from it".

After I had all 4 miter corners dominoed & glued and reached for clamps the realization dawned that the panel was longer than any of my clamps. Oops. Good thing the glue sets slow and there were lots of pieces of 80/20 sitting around.

[attachthumb=#]

I hastily cut/drilled a few blocks of wood & attached them to the 80/20 about 1/8" closer to each other than the length of the long side rail. Used the clamps on the long sides to pull the mitered corners together, which forced the short sides outward against the blocks and closed the miters nicely. The second photo shows the open miter and the third photo shows it after being clamped and closed.

Lucked out again.

RMW

I like the Bessey band clamps but I plan to get or make some .Blokkz

Blokkz-Universal-Clamping-Block-Applications.jpg
 
Michael Kellough said:
Richard/RMW said:
I have my own definition of Serendipity - "the act of doing something dumb and discovering something good from it".

After I had all 4 miter corners dominoed & glued and reached for clamps the realization dawned that the panel was longer than any of my clamps. Oops. Good thing the glue sets slow and there were lots of pieces of 80/20 sitting around.

[attachthumb=#]

I hastily cut/drilled a few blocks of wood & attached them to the 80/20 about 1/8" closer to each other than the length of the long side rail. Used the clamps on the long sides to pull the mitered corners together, which forced the short sides outward against the blocks and closed the miters nicely. The second photo shows the open miter and the third photo shows it after being clamped and closed.

Lucked out again.

RMW

I like the Bessey band clamps but I plan to get or make some .Blokkz

Blokkz-Universal-Clamping-Block-Applications.jpg

Michael, I have been thinking about the Blokkz also but they probably would not have worked in this case, I think the panel would prevent clamping them to the rails.

RMW
 
Richard/RMW said:
Slappy said:
is that " 10 " series 8020 ??

where or what part # is those bolts ? or are those hardware store bought ?
I have some 8020 #10  1 x 3 rails & some 1 x 1 rails coming but I'm not clear on the hardware to use 
any suggestions would be great

Slappy, those are 1515 (1.5") profiles. To give you a sense of scale the frame being clamped is 1.25" by 3.5" material just over 46" long. The cap screws are M8 probably 40mm long with tee nuts.

10 series uses M6 or 1/4" fasteners. 15 series is best with M8 or 5/16".

I have another panel to clamp up, this time I am going to use some wedges to let me adjust the clamping pressure. Will report back afterwards.

RMW

Is there any way to use a bolt head , maybe a carriage bolt in the slot & have the bolt body extend out & then tighten with a nut OR a Knob ?? 
 
Back
Top