You are using an out of date browser. It may not display this or other websites correctly.
You should upgrade or use an alternative browser.
You should upgrade or use an alternative browser.
Mortising Jig for Festool OF1400 *Router Modification*
- Thread starter Pete Pedisich
- Start date
Pete Pedisich
Member
- Joined
- Jan 22, 2007
- Messages
- 198
Stoolman said:How can you mess with perfection? :-*
Easy...it's far from perfect. ;D
Seriously, even though it worked well, I still want a Domino.
I'm always looking for better methods of doing things like securing of the workpeice, repeatability aids, things like that.
Pete Pedisich
Member
- Joined
- Jan 22, 2007
- Messages
- 198
Last edited:
Ken Nagrod
Member
- Joined
- Jul 15, 2010
- Messages
- 3,431
Page Not Found error, Pete.
Pete Pedisich
Member
- Joined
- Jan 22, 2007
- Messages
- 198
Ken Nagrod said:Page Not Found error, Pete.
Thanks, I fixed it, should be working now.
- Joined
- Jan 22, 2007
- Messages
- 8,426
In Picasa, open the photo album. Click the Actions menu and choose Album Properties. At the bottom of the window, make sure you have it set as viewable with a link or public, if it's set to "Only You" that's the problem. Next, on the right of the screen you'll see an option that says "Link to this album". Click that and it'll give you the link to use. Hope that helps.
Shane
Shane
Pete Pedisich
Member
- Joined
- Jan 22, 2007
- Messages
- 198
Dan and Shane, thanks I did have it on 'anyone with link', but I had cut-n-pasted the url from the IE bar at the top, I now went by Shanes instructions and hopefully it works! [embarassed]
Thanks Shane!
Thanks Shane!
nickao
Member
- Joined
- Feb 24, 2008
- Messages
- 4,617
Yes it works now:
https://picasaweb.google.com/102981...authkey=Gv1sRgCLvhhbGoi8fIlQE&feat=directlink
It looks really nice!
https://picasaweb.google.com/102981...authkey=Gv1sRgCLvhhbGoi8fIlQE&feat=directlink
It looks really nice!
John Stevens
Member
- Joined
- Jan 16, 2007
- Messages
- 815
Pete, as someone who's made three mortising-tenoning-dovetailing jigs for use with the OF1010 and the fine adjuster, my hat is off to you. What a fantastic jig, thanks for sharing it here.
Regards,
John
Regards,
John
Nice work Pete! 8020 offers a free CD with ideas for using their extruded products (for others thinking about making jigs). http://8020.net/
(I guess it's actually a DVD)
(I guess it's actually a DVD)
Pete Pedisich
Member
- Joined
- Jan 22, 2007
- Messages
- 198
RonWen said:Nice work Pete! 8020 offers a free CD with ideas for using their extruded products (for others thinking about making jigs). http://8020.net/
(I guess it's actually a DVD)
RonWen,
Thanks...I have been using 8020 at work for about 15 years, so I tend to use it a little too much!
-Pete
Pete Pedisich said:RonWen said:Nice work Pete! 8020 offers a free CD with ideas for using their extruded products (for others thinking about making jigs). http://8020.net/
(I guess it's actually a DVD)
RonWen,
Thanks...I have been using 8020 at work for about 15 years, so I tend to use it a little too much!
-Pete
I could see that you know your way around their products, my intent was for others who aren't familiar with 8020. Keep up the great work!
Pete Pedisich
Member
- Joined
- Jan 22, 2007
- Messages
- 198
Came across this SketchUp file I made back then, it's not complete, but the basics are there if anyone is interested.
It's not great, as I'm an AutoCAD user, so my SketchUp skills are limited.
Still interested in photos if anyone has made their own version of this concept, would love to see improvements or changes I'd like to add to mine.
-Pete
It's not great, as I'm an AutoCAD user, so my SketchUp skills are limited.
Still interested in photos if anyone has made their own version of this concept, would love to see improvements or changes I'd like to add to mine.
-Pete
Pete Pedisich
Member
- Joined
- Jan 22, 2007
- Messages
- 198
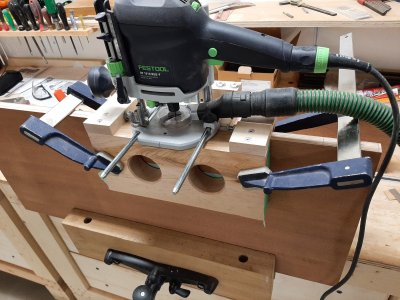
OK, please don't get upset by the yellow router in the pic [embarassed]
I am paring down my power tools, and sold my OF1400 because it has much better resale then this DW618.
The reason for showing this modification on FOG, despite the yellow tool, is to show an alternative method for a router "carrier" as opposed to using the edge guide. This method is still applicable to folks with an OF1400.
The Festool edge guide was built very strongly, superior to the DeWalt edge guide, so I kind of had to do it this way for the DW router.
There is no flex in this method, the router travels laterally without drifting at all.
So some people might prefer this to using the edge guide, even a great one like the Festool guide.
-Pete
Pete Pedisich
Member
- Joined
- Jan 22, 2007
- Messages
- 198
Just checking back in and saw the image gallery links were broken - fixed now... hopefully they work if anyone is interested - it is rather old (although I still use the jig - it works!)
luvmytoolz
Member
That's a terrific design, I like it!
Steve1
Member
Just wondering if anyone has built their own version of this jig?, I'd be interested in an improvements or changes.
Pete
Very nicely done.
I built something similar.
Your jig may have been an inspiration, but frankly, I built it a while back and don't recall.
Yours, actually, I think is a "fixture". A fixture is stationary and you take the workpiece to the fixture. A "jig" is mobile and you take the jig to the workpiece.
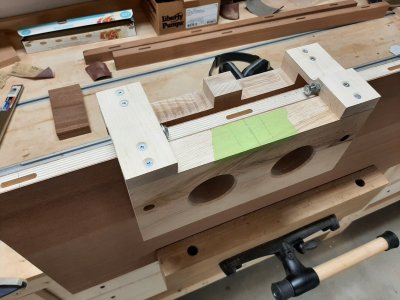
Mine is small and portable jig, but works on the same principle. So I would position it on the workpiece and then clamp it in place. Intended for loose tenons. There is an edge guide at the back that might be hard to see, also home-made. Adjusting to the center of workpiece would be done by adjusting the edge guide.
Made of hard maple. Surface on front and back to keep router flat and square to workpiece edge.
Yours is better suited for small workpieces, mine perhaps better suited for larger workpieces.
Attachments
Pete Pedisich
Member
- Joined
- Jan 22, 2007
- Messages
- 198
That is brilliant. Great ideas in there... love it.Very nicely done.
I built something similar.
Your jig may have been an inspiration, but frankly, I built it a while back and don't recall.
Yours, actually, I think is a "fixture". A fixture is stationary and you take the workpiece to the fixture. A "jig" is mobile and you take the jig to the workpiece.
Mine is small and portable jig, but works on the same principle. So I would position it on the workpiece and then clamp it in place. Intended for loose tenons. There is an edge guide at the back that might be hard to see, also home-made. Adjusting to the center of workpiece would be done by adjusting the edge guide.
Made of hard maple. Surface on front and back to keep router flat and square to workpiece edge.
Yours is better suited for small workpieces, mine perhaps better suited for larger workpieces.
Similar threads
- Replies
- 38
- Views
- 4K
- Replies
- 3
- Views
- 772
- Replies
- 28
- Views
- 2K
- Replies
- 5
- Views
- 4K