Multi angled beveled edges with the domino

wo_mack

Member
Joined
Nov 27, 2019
Messages
20
I’m making a box for a display table that is a 100/80 degree trapezoid. Was hoping to use the domino but I’ve been racking my brain how to make it work accurately. Does anyone have any insights into this? I starched some photos of it Helps makes more sense.
 

Attachments

  • 96E03253-5EC1-4BA2-9A1D-5BD35A161FD5.jpeg
    96E03253-5EC1-4BA2-9A1D-5BD35A161FD5.jpeg
    61.4 KB · Views: 410
Note: that line I drew in the edge of the plywood was just to illustrate the direction the domino has to go when joined
 
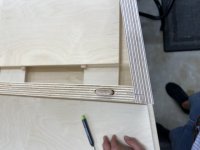
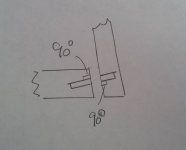
Maybe someone has a better method worked out, but when I've had to do this in the past, I just guesstimated, practicing on scrap until it lined up.  The problem is obviously that you can't reference off the same edge since you can't set the fence to do acute angles.  So one will be done on the inside edge, and the other on the outside.  But it is possible to get it right.  I would do one set of sides first, then work out the fence height for the corresponding joints on the other pair of parallel boards.  There's a line on the side of the Domino showing the center of the plunge, which can get you approximately close on the initial set up, and then you can tweak it from there.

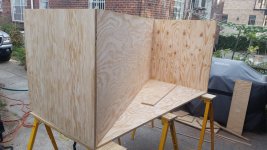
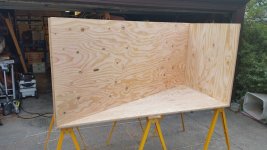
Last time I had to do this was on a Donald Judd inspired desk made out of plywood, where the dominoes run vertically up the joint between the angled cross piece and the sides.  Clamping it was kind of pain, but it worked.

[attachimg=1]

[attachimg=2]
 

Attachments

  • Judd desk.jpg
    Judd desk.jpg
    238 KB · Views: 536
  • Judd desk 2.jpg
    Judd desk 2.jpg
    208.5 KB · Views: 503
Mortise at a right angle on both mating pieces. Disregard their angle of intersection.
 

Attachments

  • 20200625_171836.jpg
    20200625_171836.jpg
    93.2 KB · Views: 364
Nice. Thanks for the drawing. I guess the part I question is how to reference the domino to cut those correctly as I can use the line on the visual guide on all of them
 
To lay out the placement lines, start with the second line as shown in the image. Skip the first one as you can use the paddle to cut both mortises on the mating pieces.

Once all the lines are drawn, proceed as below:

1) Set the machine to the narrow setting, and cut the first mortise on both pieces using the paddle for alignment purposes

2) Cut the mortises on the endgrain with the narrow setting

3) Change the setting to wide (the middle position)

4) Cut the mortises on the facegrain with the wide setting.

The narrow-wide setting will ensure an easy assembly while the first pair of mortises cut using the paddle with the narrow setting will ensure a proper alignment. If it's out of alignment, then you need to calibrate the paddles.
 

Attachments

  • IMG_9435.jpg
    IMG_9435.jpg
    467.2 KB · Views: 338
Back
Top