my domino hates me!

MrMac

Member
Joined
May 5, 2010
Messages
163
well not completely. At work yesterday I had to make a 3 sided column, 2 1/2" x 7" x 1 1/2" out of 3/4" MDF. So I cut the material on the Table saw, then cut my slots for the domino's (#5's)
I assembled a side, and the miters didn't work :( the points of the miters were held open by about an 1/8". Darn! not sure what happened there. Upon checking I discovered that my miters were NOT at 45 degrees. I foolishly trusted the 45 deg. stop on our (expetive deleted) table saw. Turns out that it was stopping at 42.3 deg! aaarrrrghh! ok all fixed now.
I got to thinking though, if I was able to use the first batch of MDF, is there a proceedure that I could use to match the miter? other than labourously measuring each one. (one was 42.3 the other was nearly 45 deg. I hate that table saw!!!) gotta be a quick way to do this. What am I missing?
 
Can you run the board back on the table saw at 45* ?  If the original cut was at about 42 then you would need to cut more for a 45.
Am i right?
 
I wish that I could use my TS55, but due to the site conditions, it's not a viable option. I did cut new material, and used my wixey digital angle gauge to make sure that the table saw blade was indeed at 45 degrees. (could be sawdust on the theads?)

I think I have the solution now, I was watching a video by Paul-Marcel and in one segment he sets the fence to match the miter! Doh! so obvious  [embarassed] I am going to try it in my garage. Thanks all!
 
So your table saw hates you.  [unsure]

Just wondering why the TS55  won't work at the site but the table saw will, ...... space?

Seth
 
As long as your domino cut at 45 then rerunning the boards through the TS will work. If you matched the domino fence to the workpiece then fixig will be tougher. You could also domino the joint as a butt joint then cut the miters. Paul Marcel has a video on that as well.
 
MrMac said:
well not completely. At work yesterday I had to make a 3 sided column, 2 1/2" x 7" x 1 1/2" out of 3/4" MDF. So I cut the material on the Table saw, then cut my slots for the domino's (#5's)
I assembled a side, and the miters didn't work :( the points of the miters were held open by about an 1/8". Darn! not sure what happened there. Upon checking I discovered that my miters were NOT at 45 degrees. I foolishly trusted the 45 deg. stop on our (expetive deleted) table saw. Turns out that it was stopping at 42.3 deg! aaarrrrghh! ok all fixed now.
I got to thinking though, if I was able to use the first batch of MDF, is there a proceedure that I could use to match the miter? other than labourously measuring each one. (one was 42.3 the other was nearly 45 deg. I hate that table saw!!!) gotta be a quick way to do this. What am I missing?

Look in your "Last Resort" bag for a tube of caulk.  Maybe 2.
 
SRSemenza said:
So your table saw hates you.  [unsure]

Just wondering why the TS55  won't work at the site but the table saw will, ...... space?

Seth

the very hi chance of damage. Not a very large house (6k over 3 floors) and 21 carpenters plus various trades. No real safe place to put the 9' track safely. The company table saw is set up in what will eventually be the dining room. On thursday the metal clad guy's were walking on the table saw and the 8' outfeed table :( I am constantly amazed at how lazy some trades are - oh were you using that cord? um ya! you unplugged my jigsaw and plugged in your (yada yada) this happens constantly. It's part of the gig, so I am quite careful with which personal tools I take on site. My domino is in a non-descript black bag, and it travels with me out the door every day. I'd love to take my kapex in! but from what I see it'd be trashed within a week. Unfortunate, but it's a reality. Meantime I do the best I can :) and the money's good too :D
 
The best way to make your Domino happy is to get it a big brother. There's nothing like sharing the big mortice burden with someone that truly understands ...
 
Kevin Stricker said:
As long as your domino cut at 45 then rerunning the boards through the TS will work. If you matched the domino fence to the workpiece then fixig will be tougher. You could also domino the joint as a butt joint then cut the miters. Paul Marcel has a video on that as well.

Ok, I am looking for that video :)
 
Kev said:
The best way to make your Domino happy is to get it a big brother. There's nothing like sharing the big mortice burden with someone that truly understands ...

I know mines been lonely so it needs a big brother.
 
I have Google it a few time but I don't find any licensed Domino therapists.

I think you need to accept the fact that you do have issues and just need to grab it and show it who is in control.    [wink] [bite tongue] [doh]

Cheers,
Steve
 
MrMac said:
Kevin Stricker said:
As long as your domino cut at 45 then rerunning the boards through the TS will work. If you matched the domino fence to the workpiece then fixig will be tougher. You could also domino the joint as a butt joint then cut the miters. Paul Marcel has a video on that as well.

Ok, I am looking for that video :)

Here's the link to the blog entry for the Domino crib sheet that talks about bevel angles.  The butt joint variant is at the end of the bevel joint discussion.  Others in that crib sheet series are listed up top of the entry in a table of contents.

That video shows an angle setup block I used for my Angle Madness project.  I got way overloaded with my day-job that I'm only today editing the footage (of 5 weeks ago...) of using that block to dry-fit the 8-faceted drawer tiers.  They came out great.  That video should be up by tomorrow as part of the Angle Madness project build series.  It includes a few ideas of what to do when the mortise angle isn't exact; in my case, only the MDF sample on camera had a hairline gap in the back.  Others were prrrrfect.  For the two units I'm building, it takes 123 Dominos to dry fit the curly Maple shells.
 
PaulMarcel said:
MrMac said:
Kevin Stricker said:
As long as your domino cut at 45 then rerunning the boards through the TS will work. If you matched the domino fence to the workpiece then fixig will be tougher. You could also domino the joint as a butt joint then cut the miters. Paul Marcel has a video on that as well.

Ok, I am looking for that video :)

Here's the link to the blog entry for the Domino crib sheet that talks about bevel angles.  The butt joint variant is at the end of the bevel joint discussion.  Others in that crib sheet series are listed up top of the entry in a table of contents.

That video shows an angle setup block I used for my Angle Madness project.  I got way overloaded with my day-job that I'm only today editing the footage (of 5 weeks ago...) of using that block to dry-fit the 8-faceted drawer tiers.  They came out great.  That video should be up by tomorrow as part of the Angle Madness project build series.  It includes a few ideas of what to do when the mortise angle isn't exact; in my case, only the MDF sample on camera had a hairline gap in the back.  Others were prrrrfect.  For the two units I'm building, it takes 123 Dominos to dry fit the curly Maple shells.

found it :) thanks!
 
I don't get it :( I tried cutting the domino mortise hi, low, in the middle. Set it to cut really deep, the domino didn't really like that. (#5's) the side where you cut into the flat of the board? when you cut your miter, the slot almost completely dissappears. I then cut them close to the face of the board, still no joy. the mortise's are not deep enough.
I am missing something in this technique.

On the up-side, it's Canada day and I'm spending it in my garage making sawdust :D :D :D :D wish work was this fun :) LOL

edit: ok I just re-watched the video, and that's the method that I used. (one of them, I tried several) I domino'd  both pieces, then cut the miters. no joy. I'm gonna try again today.
 
Not deep enough?  In other words  if you are using 5mm Dominos the machine is not plunging all the way to 15mm deep mortises?  If that is the case check to make sure the bit  is not broken off at the tip. This can happen and the thing will keep right on cutting mortises. The 5mm bit is more susceptible than the others. It doesn't take much missing from the tip to make the mortise  too shallow.

Seth
 
MrMac said:
I don't get it :( I tried cutting the domino mortise hi, low, in the middle. Set it to cut really deep, the domino didn't really like that. (#5's) the side where you cut into the flat of the board? when you cut your miter, the slot almost completely dissappears. I then cut them close to the face of the board, still no joy. the mortise's are not deep enough.
I am missing something in this technique.

On the up-side, it's Canada day and I'm spending it in my garage making sawdust :D :D :D :D wish work was this fun :) LOL

edit: ok I just re-watched the video, and that's the method that I used. (one of them, I tried several) I domino'd  both pieces, then cut the miters. no joy. I'm gonna try again today.

That method won't work with the Domino DF500 in 3/4" material unless you shorten the tenons. When you plunge into the face of the one board, you can only plunge to 15 mm. Otherwise you will go all the way through the wood at the 20mm depth. For the other piece, you have to plunge at full depth of 28mm. The sum of these two depths is 43mm. However, when you cut your miters, this combined depth gets reduced by 19mm (the thickness of the workpieces) and results in only a 24mm combined depth. The 5x30 Domino tenon is 28mm long. so it will always be longer than your combined plunge depths.

By the way, I am sure one or two people are scratching their head about the "19mm" shortening of the combined depth (or what ever the actual thickness of the workpieces are). That length will be the same regardless where in the miter you place your mortises. If the mortises are close to the inside corner, then the mortise in the face-grain won't be cut off very much, but the mortise in the end-grain will be shortened a lot. If it's in the middle of the miter, both get shortened equally, and so-on. The result of cutting the two miters will always shorten the combined plunge depths by the thickness of the workpiece, regardless where the mortises are placed across the miter.

It's not really a method I would ever use, even with the DF700. That's because the mortise in the face grain is short, and also potentially weakens the part of the workpiece between the mortise and the miter-point. By using a 45 degree plunge, the mortises will be deeper inside the workpiece--not just by length, but farther away from the point of the miter (outside corner). Additionally, instead of having the tenons both 45 degrees to the grain of the workpieces, the weakest of the two tenons will also be the piece where the tenon is totally mating to end grain. It's not a very strong method, and weaker than the standard 45 degree mortise.

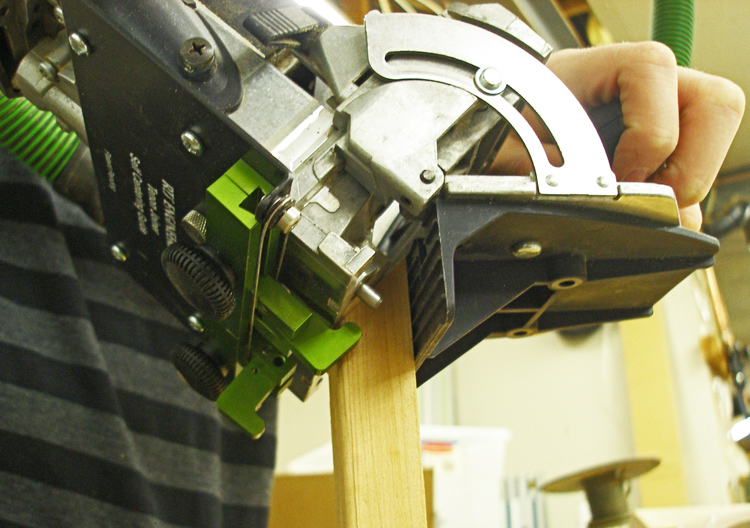
I've showed this before on the forum. If you're having difficulty aligning your Domino to the inside face (blunt corner) of your miter, you can modify your support bracket to register the fence from the outside face. In most cases this is preferred because you usually don't care if your inside corners are perfectly aligned, but you do normally care that the outside corners are perfectly aligned. It also allows you to adjust your height so the mortise can be very, very close to the inside corner of the joint. This allows you to maximize your mortise depth.

135degFence-lo.jpg


Ahhh, Found it. I knew I had another picture somewhere. In this picture Tanner (my son) is actually using the modified Support Bracket along with my SCG-10 guide to precisely position mortises in a small frame the surrounds a granite slab for a couple of tables we made. Here you can see the new screws I added to the support bracket that align with the triangle-holes in the Domino fence. You need to drill holes in the support bracket, but you don't have to modify your Domino. The support bracket mounts to the Domino fence with a couple screws and nuts. If you wanted to make it easier, you could drill and tap 2 threaded holes in the Domino fence, but most people don't want to modify their tool.

Edit: Oh, if you do decide to drill and tap your fence to use the existing thumbscrews of the Support Bracket, you do not need a metric tap. The cool thing about those thumbscrews is that the threads are identical regardless whether they are metric or imperial. You can use a 10-32 tap!!! If you are still feeling unsure about this, just grab a 10-32 nut and put it on the thumbscrew, or grab a 10-32 screw and screw it into the holes on your Domino base. That's not just speculation. I had to research it extensively when I designed my SCG-10 and MGS-20 guides to fit your Domino machines.

MiterPlunge.jpg


Additional Edit: Another good reason for using the triangle-holes instead of drilling and tapping new holes is because the Support Bracket needs to be adjusted for different fence angles. They allow the support bracket to be moved up and down a little, unless you use this at only 45 degrees. Jepson made a similar fence attachment a decade ago for their biscuit joiner, but notice how there is a gap where the point of the workpiece intersects the two parts of the fence.
p.s., Peter and Shane, I do own this picture and I physically made this cutaway machine in my workshop. No copyright problem here.

CutawayJoiner.jpg
 
Back
Top