Grasshopper
Member
- Joined
- Oct 6, 2014
- Messages
- 595
Background:
Wife says: "buy all the tools you want, as long as you can make my house look nice"
I say: Awesome ;D and before I know it, an order is placed for: TS55, Kapex, Carvex, RO150, Domino (DF500) set, MFK 700, CMS-VL Router table. I also found an MFT/3, MFS700, two festool drills at a garage sale, and the OF1400 router on Craigslist.
With my pile of tools building, and many en route…the wife is looking to cash in ;D
So for my first project, I plan to build a new kitchen island (I already tore out the old one, so the clock is ticking).
I am new to this world, so your experience is very appreciated.
Most of the plans/tutorials I can find for cabinet construction are not for an exposed back and side like an island. I've pulled what I can together, and am posting my first iteration.
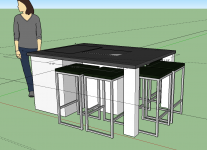
Ultimately, I plan to build the unit out of two cabinet boxes (a 48" cabinet and a 24" cabinet forming a "T". Yes, i realize the inside cabinet will be tough to access, this is OK as it will be long term storage). The idea is to seat 6 people within this limited footprint and our gas range sits in the 48" cabinet. The granite slab will be 50"x70" with the overhang supported by 3x3 pillars with possibly some aprons for support. This will all be painted white, so caulk will be my friend)
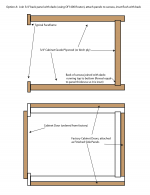
Here is the sketch:
[attachimg=1]
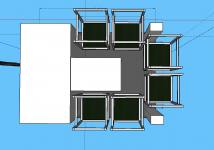
View of the island from the side other side:
[attachimg=2]
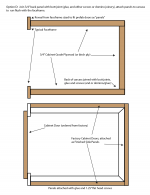
View from bottom (to show cabinet boxes forming a "T"):
[attachimg=3]
My questions are: what is the best way to join the back corners as they will be exposed? I plan to build the carcasses out of 3/4" cabinet grade plywood (sides and back). I will assemble the face frames with either pocket screws or using the domino (attaching to the carcass with the domino). I plan to attach side and back panels from the same company who will be doing new doors for the rest of my kitchen (I will actually order extra doors to be sized accordingly, and attach to the plywood box as decorative panels.)
I am unsure how to attach the panels (I suppose I could glue, Domino, and clamp).
Please add your feedback and help me "fill in the blanks".
Below are some options that I have thought of. Drawings are not to scale and are from the Top Down perspective. I don't show any stretchers, just the plywood carcass, face frame, and doors/panels for simplicity sake. Also, I am showing one box, but all exposed outside corners would be treated the same way (and I'd just attach the two cabinets together to for the "T" shape).
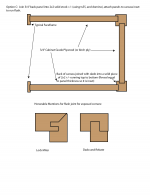
Option A:
Join the back and side 3/4" Ply with a dado running top to bottom along the inside back of the side panels. Reveal would allow for panels to sit inset along the back, and to the edges along the sides. Any area that isn't perfectly flush to be sanded, filled, and painted for a flush transition.
[attachimg=4]
Option B:
Join the back and side 3/4" Ply with a 45 degree miter (cutting sheet goods with the ts55), and using the Domino, glue and clamps for a tight mitered corner. Add panels to outside either flush to ends or sitting proud of the corners (having the outside corners step down from the panels if that makes sense…not in the picture)
[attachimg=5]
Option C:
Join the back and side 3/4" Ply with a +/- 2x2 of stock that runs like a small pillar. I'd dado in the plywood and attach using Domino, clamps and glue. On the outside corner, it would look like a corner stile that continued on sides and back. The plywood would sit inside the dado. I could then attach side panels to be flush almost inset from the face frame reveal and 2x2's (exact size tbd), or panels could sit proud of the 2x2 and face frame.
Honorable mentions for achieving a flush outside corner with the sheet goods would be a lock miter, or a dado and rebate.
[attachimg=6]
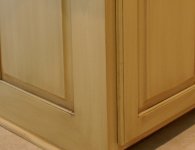
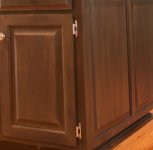
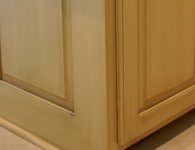
I am not really sure what door style we are going with yet, but I am trying to plan the carcass build asap. Below is a snippet that I found online showing an outside corner that is somehow joined very smoothly.
[attachimg=7]
Not exactly sure the best way to proceed
Your input is appreciated!
Wife says: "buy all the tools you want, as long as you can make my house look nice"
I say: Awesome ;D and before I know it, an order is placed for: TS55, Kapex, Carvex, RO150, Domino (DF500) set, MFK 700, CMS-VL Router table. I also found an MFT/3, MFS700, two festool drills at a garage sale, and the OF1400 router on Craigslist.
With my pile of tools building, and many en route…the wife is looking to cash in ;D
So for my first project, I plan to build a new kitchen island (I already tore out the old one, so the clock is ticking).
I am new to this world, so your experience is very appreciated.
Most of the plans/tutorials I can find for cabinet construction are not for an exposed back and side like an island. I've pulled what I can together, and am posting my first iteration.
Ultimately, I plan to build the unit out of two cabinet boxes (a 48" cabinet and a 24" cabinet forming a "T". Yes, i realize the inside cabinet will be tough to access, this is OK as it will be long term storage). The idea is to seat 6 people within this limited footprint and our gas range sits in the 48" cabinet. The granite slab will be 50"x70" with the overhang supported by 3x3 pillars with possibly some aprons for support. This will all be painted white, so caulk will be my friend)
Here is the sketch:
[attachimg=1]
View of the island from the side other side:
[attachimg=2]
View from bottom (to show cabinet boxes forming a "T"):
[attachimg=3]
My questions are: what is the best way to join the back corners as they will be exposed? I plan to build the carcasses out of 3/4" cabinet grade plywood (sides and back). I will assemble the face frames with either pocket screws or using the domino (attaching to the carcass with the domino). I plan to attach side and back panels from the same company who will be doing new doors for the rest of my kitchen (I will actually order extra doors to be sized accordingly, and attach to the plywood box as decorative panels.)
I am unsure how to attach the panels (I suppose I could glue, Domino, and clamp).
Please add your feedback and help me "fill in the blanks".
Below are some options that I have thought of. Drawings are not to scale and are from the Top Down perspective. I don't show any stretchers, just the plywood carcass, face frame, and doors/panels for simplicity sake. Also, I am showing one box, but all exposed outside corners would be treated the same way (and I'd just attach the two cabinets together to for the "T" shape).
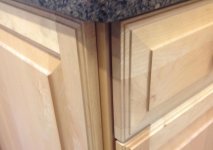
Option A:
Join the back and side 3/4" Ply with a dado running top to bottom along the inside back of the side panels. Reveal would allow for panels to sit inset along the back, and to the edges along the sides. Any area that isn't perfectly flush to be sanded, filled, and painted for a flush transition.
[attachimg=4]
Option B:
Join the back and side 3/4" Ply with a 45 degree miter (cutting sheet goods with the ts55), and using the Domino, glue and clamps for a tight mitered corner. Add panels to outside either flush to ends or sitting proud of the corners (having the outside corners step down from the panels if that makes sense…not in the picture)
[attachimg=5]
Option C:
Join the back and side 3/4" Ply with a +/- 2x2 of stock that runs like a small pillar. I'd dado in the plywood and attach using Domino, clamps and glue. On the outside corner, it would look like a corner stile that continued on sides and back. The plywood would sit inside the dado. I could then attach side panels to be flush almost inset from the face frame reveal and 2x2's (exact size tbd), or panels could sit proud of the 2x2 and face frame.
Honorable mentions for achieving a flush outside corner with the sheet goods would be a lock miter, or a dado and rebate.
[attachimg=6]
I am not really sure what door style we are going with yet, but I am trying to plan the carcass build asap. Below is a snippet that I found online showing an outside corner that is somehow joined very smoothly.
[attachimg=7]
Not exactly sure the best way to proceed
Your input is appreciated!
Attachments
-
 Screen Shot 2014-10-27 at 2.58.41 PM.png88.5 KB · Views: 2,190
 -
 Screen Shot 2014-10-27 at 3.26.07 PM.png339.3 KB · Views: 2,210
 -
 Top down cabinets-03.png41.4 KB · Views: 2,416
 -
 Top down cabinets-02.png44.7 KB · Views: 2,664
 -
 Top down cabinets-01.png45 KB · Views: 2,757
 -
 Screen Shot 2014-10-27 at 2.59.06 PM.png124.4 KB · Views: 2,127
 -
 Screen Shot 2014-10-27 at 2.59.18 PM.png81.6 KB · Views: 1,959