New 12'X19' shop

Joelm

Member
Joined
Feb 25, 2019
Messages
218
I thought I'd share my new shop progress to get some ideas for a small 1 car garage woodshop.

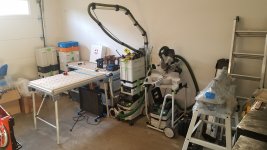
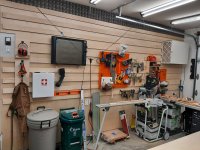
To start, I had a 1 car garage shop in my previous house. I had only started woodworking about 2 years before moving so it was never set up as a shop, mostly just cobbled together pegboards and makeshift shelves. I had to share it with the electrical equipment for the house, solar panels and Tesla Powerwalls. We also stored ramdom junk in it. So no mater what I did it always felt cramped.
View attachment 1
View attachment 2

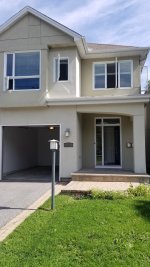
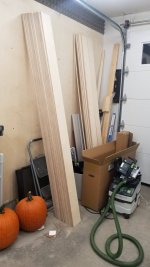
We moved to a new house/country this summer and it also had a 1 car garage. However we were able to get rid of a lot of junk and the new house has a ton more storage thanks to a large basement. So, the garage is all mine! We thought I'd have to park the car in the garage in the winter so I had to make sure everything would fit against a wall. That requirement changed after a recall on my car came out with a recommendation NOT to park it inside. So the only other items I have to share space with is a garbage and compost bin and a 3 wheel cargo bike. I'm hoping to make a bike shed in the backyard this summer and get the bike out of there.

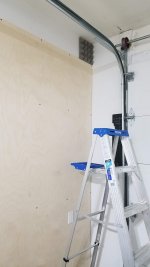
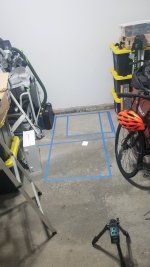
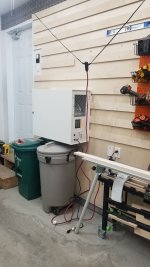
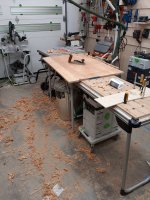
The new shop size is a smallish 12'X19' space. Rough concrete floors, new garage door with windows and insulated/finished walls.

View attachment 3
View attachment 4

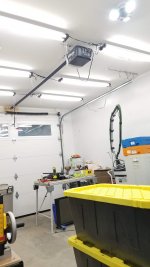
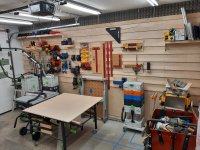
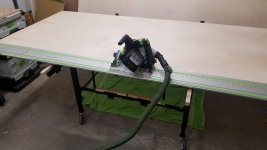
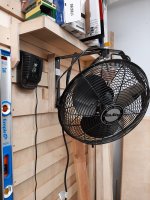
The very first thing I did was buy 8 shop LED lights and mount them to the ceiling. This is a huge difference right away.

View attachment 5

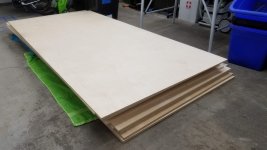
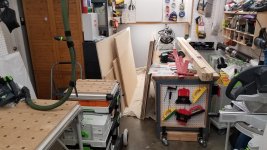
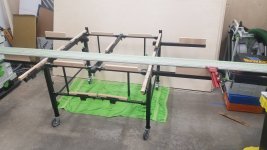
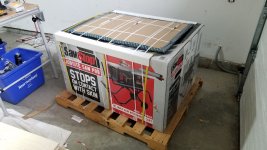
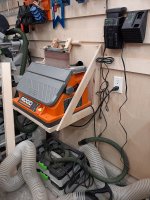
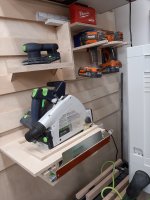
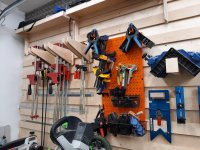
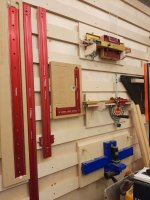
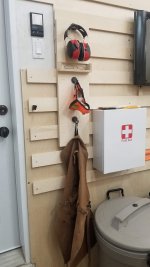
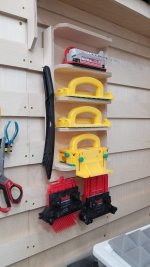
Since my last shop had so much clutter that I felt stuck with, I decided I wanted to try out some french cleats. As we are in a pandemic and most building supplies were in short supply I ended up picking up 12 sheets of 12mm BB plywood to cover my walls and 4 sheets of 3/4 BB plywood for the cleats themselves. Even though the shop is insulated and had drywall I like the look of wood everywhere I could manage.

View attachment 6
View attachment 7

I really was liking how the plywood walls were looking but there were two issues I was running into. The first was that my 4'x8' sheets left me with about 1' of bare wall at the ceiling. The other issue was the echo in the workshop was really pronounced. My wife suggested I try out some sound dampening foam to reduce the echo. As luck would have it a 12X12" pyramid sheet of foam fit the space perfectly. It also greatly reduced the echo. Win win!

View attachment 8
View attachment 9
 

Attachments

  • 20200502_170606.jpg
    20200502_170606.jpg
    747 KB · Views: 959
  • 20201022_223945.jpg
    20201022_223945.jpg
    398 KB · Views: 734
  • 20201022_111855.jpg
    20201022_111855.jpg
    276.9 KB · Views: 565
  • 20201024_181622.jpg
    20201024_181622.jpg
    616.7 KB · Views: 611
  • 20201016_120635.jpg
    20201016_120635.jpg
    545 KB · Views: 572
  • 20201011_181555.jpg
    20201011_181555.jpg
    486.1 KB · Views: 921
  • 20200923_175139.jpg
    20200923_175139.jpg
    710.8 KB · Views: 773
  • 20200903_121100.jpg
    20200903_121100.jpg
    934.8 KB · Views: 600
  • 20200428_225411.jpg
    20200428_225411.jpg
    786.1 KB · Views: 877
Joelm said:
I really was liking how the plywood walls were looking but there were two issues I was running into. The first was that my 4'x8' sheets left me with about 1' of bare wall at the ceiling. The other issue was the echo in the workshop was really pronounced. My wife suggested I try out some sound dampening foam to reduce the echo. As luck would have it a 12X12" pyramid sheet of foam fit the space perfectly. It also greatly reduced the echo. Win win!

View attachment 8
View attachment 9

How about installing a large fluffy dog in the shop, like a Newfoundland, should absorb sound.
 
Omg yes!
We definitely want to get a dog soon.  We had a wonderfully lazy greyhound that passed away a few years ago. We miss having a dog for sure.
Seems like a bad time to get one though. All the shelters are empty and wait time for puppies are half a year at least.
I'm also going to gave to fight my wife for who gets the dog. She wants it in her home office and I want it in the shop :)
 
Ha! My Leonberger was big enough to fill the space, but I very much doubt it would have gotten more quiet in there with him in it...  [big grin]
 
Our old girl.
View attachment 1

We are learning towards a doodle of some kind. One thing about greyhounds that wasn't great was their skin was so THIN! She'd regularly be at the vet getting stitches after a stick in the backyard tore her skin.
 

Attachments

  • 20160928_221308.jpg
    20160928_221308.jpg
    1,022.4 KB · Views: 597
In your previous French cleat post, I was going to ask about the Sonex sound panels at the top of the wall...now I know the answer.  [smile]
 
[member=70049]Joelm[/member]  Thanks very much for starting this thread!  It's may seem intrusive, but always informative and an inspiration when someone posts a thread like this.  The table you posted in your other thread was really great, but the views of your shop also generated a number of questions and this will help answer them!

Mike A.
 
Anyway, back to the workshop.

I wanted to pick up a tablesaw to do the long rip cuts for the cleats themselves. I wanted them cut along the whole 8' length of ply as I think the opposing grain directions of the wall and cleats look nice. Only problem was at the time I thought I'd be parking my car in the garage this winter during ice storms. I was determined to get a SawStop but just had to figure out what would fit. I laid out tape on the floor to see what the actual footprint would be and determined the only size that made sense at the time was the jobsite saw.
View attachment 1
View attachment 2

I started ripping down wide strips of plywood using my mft3 and extension table. After the very first cut the offcut of ply (which was most of the 4x8) fell onto the floor and dinged up the corner pretty good. I looked around town and found the wood dealer I bought the BB from had some STM's in stock. I called them up and they delivered it to my door about an hour later! This table works great! I love using it.
View attachment 3
View attachment 4
View attachment 5

After I had all my strips cut I unpacked and plugged in my tablesaw for the first time (also my first time at a tablesaw). I cut the strips in half along the length at a 45degree angle to make my cleats.
View attachment 6

I did not want to run cleats all the way down the wall to the floor in case I decide to someday build cabinets. I picked and arbitrary height from the floor, bought a laser level and started screwing the cleats into the studs with 3" woodscrews. I used 2 scraps of 2x4 as spacers so that the cleats are evenly spaced. On my first wall I tried to get fancy and offset the ends of the cleats from each other so you did not see a pattern. After that took way too long I said forget it for the second wall and just put them in as fast as I could.
View attachment 7
View attachment 8

I had 1 sheet of 1/2 plywood left over from my original purchase. I used up almost all of it building custom holders and shelves for my tools.
View attachment 9

So far I'm really happy with the cleat wall and decided it was time to work on projects before making any more shelves. The only thing that has fallen was my ceramic space heater. The cleat itself stayed but the heater popped off of the screws it was hanging from. The whole thing smashed on the floor and shattered. I bought a new heater and just made a small shelf for it.

I left a few spaces on the cleat walls. These are where I will eventually get outlets installed. Right now everything in the garage runs off of 1 15amp circuit. Even the lights and garage door. Since we are in lockdown here I'm going to wait until spring to get an electrician in to do the work. For now I'm running an extension cord under the garage door to an exterior plug.

I also want to do something with the concrete floors since I'm no longer planning on parking a car in the garage. It can get cold here in the winter so I don't think epoxy will be sufficient. Maybe this summer I'll install some dricore and then some flooring on top of it. That is TBD.


Attachments

  • 20201029_223925.jpg
    20201029_223925.jpg
    556.9 KB · Views: 674
  • 20201101_171936.jpg
    20201101_171936.jpg
    624.5 KB · Views: 408
  • 20201116_204558.jpg
    20201116_204558.jpg
    1.1 MB · Views: 1,139
  • 20201116_204609.jpg
    20201116_204609.jpg
    1 MB · Views: 1,053
  • 20201028_221834.jpg
    20201028_221834.jpg
    224.3 KB · Views: 450
  • 20201026_220444.jpg
    20201026_220444.jpg
    595.8 KB · Views: 552
  • 20201026_185603.jpg
    20201026_185603.jpg
    421.3 KB · Views: 424
  • 20201026_213256.jpg
    20201026_213256.jpg
    572.5 KB · Views: 452
  • 20201022_135438.jpg
    20201022_135438.jpg
    686.9 KB · Views: 592
  • 20201010_225908.jpg
    20201010_225908.jpg
    752.6 KB · Views: 515
I've found our Golden Doodle Molly does an excellent job keeping the floor tidy but not so much in the sound deadening area.  IsoTunes work excel at that task! 

[attachimg=1]
 

Attachments

  • Molly_Shop.jpg
    Molly_Shop.jpg
    159.7 KB · Views: 3,385
Finally I'll show some of the tool holders in detail and answer some questions from my other table thread. I've tried uploading a big reply a few times now but the forum won't let me, so I'll split my last post up into several replies.

Cheese, you asked about the air filter being on cleats. I was worried about this too. When I first attached the cleats I put the air filter on the lowest row of cleats and shoved my garbage bins right under just in case something gave away. I left it overnight and in the morning nothing was on the floor so I figured I was safe to put it wherever.
View attachment 1

Other heavy things I've attached to cleats include my new Ridgid sander and shop fan. Both are holding up just fine.
View attachment 2
View attachment 3


Attachments

  • 20210121_185501.jpg
    20210121_185501.jpg
    972.7 KB · Views: 477
  • 20210121_185402.jpg
    20210121_185402.jpg
    354.6 KB · Views: 530
  • 20201102_211923.jpg
    20201102_211923.jpg
    612.7 KB · Views: 528
I've made tool holders for my battery collection, push sticks and block, shop safety equipment, jigs, rulers and am in the middle of making a sandpaper holder. I also picked up 4 wall control pegboards that are on cleats as well.
View attachment 1
View attachment 2
View attachment 3
View attachment 4
View attachment 5
View attachment 6

Here is the back of the shop with my dust collector and cargo bike. I'm currently stacking my sheet goods and lumber behind the bike. Not convenient to get to but it is out of the way.
View attachment 7

I really like how easily I can alter my shop layout with cleats. I have a bunch of systainers on carts that I also roll around. I'm not sure what I'll do with those. I'd maybe make some sys-az drawers but I don't want to get locked down to a specific shop layout yet. Here is an example of how flexible this layout is. I can get a nice spray station in a few minutes for finishing.
View attachment 8


Attachments

  • 20210109_124548.jpg
    20210109_124548.jpg
    733.9 KB · Views: 465
  • 20210121_185526.jpg
    20210121_185526.jpg
    845.1 KB · Views: 517
  • 20210121_185348.jpg
    20210121_185348.jpg
    806.5 KB · Views: 567
  • 20210121_185432.jpg
    20210121_185432.jpg
    905 KB · Views: 462
  • 20210121_185454.jpg
    20210121_185454.jpg
    921.4 KB · Views: 511
  • 20201114_224432.jpg
    20201114_224432.jpg
    461.1 KB · Views: 446
  • 20201113_182818.jpg
    20201113_182818.jpg
    498.4 KB · Views: 510
  • 20201121_235806.jpg
    20201121_235806.jpg
    662.2 KB · Views: 605
The next big shop project for me is a hand tool workbench. I bought some hand planes and hand saws for my last project and the mft3 was way to wobbly.
View attachment 1
View attachment 2

I just finished reading the anarchist workbench and will be coming up with some plans in the near future. I also gave up my large 60"x30" router table from my old shop. I still have the insert, router and incra fence but have not decided if I want another router table or what kind I would build/buy. I'm just using my OF1010 in the meantime. I'd also like to one day soon get a drill press and bandsaw. Maybe once I get those I can settle on a layout I like.

Thanks for reading this thread. I'm still learning a ton from everyone here everyday and thought someone might enjoy my thought process in setting up a small woodshop. If anyone has ideas for me, please let me know.


Attachments

  • 20201219_180807.jpg
    20201219_180807.jpg
    1.3 MB · Views: 764
  • 20201222_165008.jpg
    20201222_165008.jpg
    788.9 KB · Views: 504
wow yer new shop is coming slong great please keep posting I need ideas for mines
 
Joelm said:
...
I really like how easily I can alter my shop layout with cleats.
...

Is there a tutorial you liked for the cleat layout?
Having the pegboard on the cleats is a nice touch.
 
RustE said:
Joelm said:
...
I really like how easily I can alter my shop layout with cleats.
...

Is there a tutorial you liked for the cleat layout?
Having the pegboard on the cleats is a nice touch.

I watched a lot of youtube videos on cleats. However once you get started it is pretty straight forward.

I ended up with cleats that are 3 1/4" tall. I used a 2x4 as my spacer. So starting from the top of the plywood wall I measured down 3 1/4" for a cleat and then 3 1/2" for the spacer. I kept measuring and marking all the way down the wall until I found the height where I wanted to start the cleats. From that starting mark, I used a laser level and screwed my cleat to the wall so that it was level. I then went up the wall with my 2x4 spacer and screwed the next cleat to the wall. I found the laser level was really helpful with keeping my screw pattern nice and even along each stud.

I really hated the pegs that you get with a standard pegboard. They were always coming off when I picked up a tool. The last straw was when I grabbed a hammer and the peg and the hammer both came off the wall and made a nice dent on one of my table legs. I've now replaced all the standard pegs with wall control pegs. These are slotted and do not come out easily.
 
jobsworth said:
wow yer new shop is coming slong great please keep posting I need ideas for mines

Thanks! I'm all out of good ideas so I'm watching your shop build thread for my shop ;)
 
gunnyr said:
I've found our Golden Doodle Molly does an excellent job keeping the floor tidy but not so much in the sound deadening area.  IsoTunes work excel at that task! 

[attachimg=1]

What a great shot dog! I've got isotunes but prefer just using regular earmuffs and blasting tunes with a bluetooth speaker. I find the isotunes earbuds always come out of my ears so I'm constantly fiddling with them instead of concentrating.

I'm totally ok if people want to post more shop dog pics here!
 
Joelm said:
...
I really hated the pegs that you get with a standard pegboard. They were always coming off when I picked up a tool. The last straw was when I grabbed a hammer and the peg and the hammer both came off the wall and made a nice dent on one of my table legs. I've now replaced all the standard pegs with wall control pegs. These are slotted and do not come out easily.

Most of the ‘standard’ pegboard hooks I use now are from Talon:https://www.leevalley.com/en-us/shop/hardware/hooks/tool/50353-talon-hook-sets

Looks like there are some different tool holders that only come with the Wall Control system.
 
You can omit the lower cleat from the fan mount.
It’s lifting the upper cleat off the rail.

If worried about the fan climbing off the rail when spinning you can stick a long wedge above the cleat.
 
Back
Top