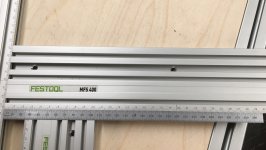
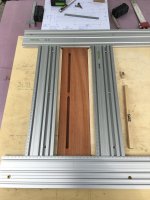
The graduations are useful to a point, but I like your use of shims for repeatability even more, esp. in the second picture. Why not make those shims do double duty and use them to set the width as well? That would be my first inclination, so I'm interested to hear why you use them to limit the length rather than the width.
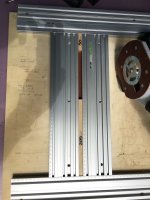
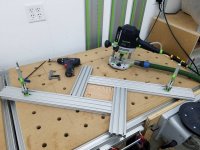
In this example, I was making 12 HVAC vents that were 5/16" thick. For ease of a repetitive and accurate processes, I decided to hold the lateral placement of the grooves with the secured MFS rails and use the ply shims for only length placement. I could have done exactly as you say and do double duty with the shims. It's just a matter of personal taste. The work flow was to insert a 3/4" blank into the fixture, insert length shims, route 1st pass at say .170" depth, plunge an additional .170" route 2nd pass. Remove blank from fixture, flip end-for-end, reinsert in fixture, reinsert the shims and repeat that process. Then repeat this entire process for the next 5 blanks. So only having to worry about 2 small shims in this situation was a bonus. Also if you place multiple shims against each other, they can buckle a little bit and muck up the process.
Another "shim" example - if you're doing a single pass with a router bit, as you might when routing a flute, why not use the guide bushing to set the width? In your HVAC example, for instance, why not move one rail to the scale setting, and then use the guide bushing to set the other rail?
You're right...that's exactly what I did. However having markings on the top and bottom horizontal rails was extremely handy. Those 2 horizontal rails are screwed to the fixture while the vertical rails are only locked in with the fasteners. So, unlock both vertical rails, move the LH rail 14mm and lock down, insert top & bottom shims, move RH rail to contact shims and then lock down. The shims were 11mm wide, while the guide bushing was 10.8mm wide.
I'm generally skeptical of using measurements to get precision, since the setting is only as precise as you can set the jig to the scale. For some things it doesn't matter, but for joinery where 100ths of an inch matter, I'm not sure I trust either my scales or my eyes (even with glasses
")
) to get it right - even more if I want a mark between the scale markings. For flutes, it also seems like it might be important to get the width of the flute and the distance between flutes to at least within a couple of hundredths.
Again Harvey I agree. I tend to use hard stops whenever I can. The item may not be exactly some desired dimension, say 1.000", however, when using stops, it will consistently be whatever that dimension turns out to be, say 1.006", every single time.
I think you could get by with a variable distance of .020"-.030" between flutes without the eye picking up on it. The width of the flutes as well as the distance between flutes as well as the color (if they're painted) would all come into the equation. [big grin]
It's not like I don't use scales, but I do tend to use them to get in the ballpark (maybe around 1/16-1/32" at best) rather than to get high precision. So I'm not trying to rag on the use of scales, just trying to understand in more detail the tradeoffs and judgements that you apply when doing this kind of work, in order to make my jigs more useful and easy to set up.