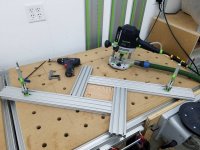
New Woodpeckers OneTIME Tool Variable Router Jig / MFS (US)

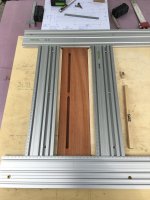
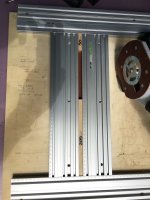
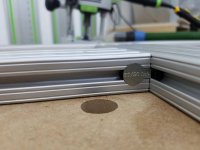
It looks like the sides with the groove for the fastener washer can fit any super track edge that doesn't have the routed groove.  Am I right?
So the stiles don't need the routes groove, just the rails from the kit.
If that's the case it would help me plan this OTT purchase knowing that I can get any super track stile later?
 
[member=11933]ScoFF[/member] the problem arising from the fact the longer extrusions don’t  have the slots is that you can’t change the width of the template. It will always be 18 inches or 32 inches wide
 
Bob D. said:
Does anyone really trust those engraved markings? Do you blindly use the
scales on your MFS and not bother to check with your trusty calibrated rule?

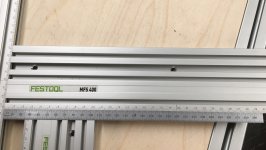
As Brice mentioned, the markings are spot on. The photo below compares the MFS 400 to a Starrett metric scale.

As an aside, I also checked the MFS 400 with a Woodpeckers 50" rule and the results were the same.
 

Attachments

  • A394E2E3-078D-41CC-BA9F-4ACF4F0F1B8F.jpeg
    A394E2E3-078D-41CC-BA9F-4ACF4F0F1B8F.jpeg
    758.9 KB · Views: 374
mwildt said:
Probably don't have a laser big enough to make the markings, which is fair I guess.

I’m not so sure, I own a Woodpeckers 50.5” rule and it’s laser engraved. Unless I’m missing something, it seems that a 48” Supertrack would fit within the physical constraints of the laser marker...possibly even the 60” track. We don’t know what we don’t know.
 
Cheese said:
Michael Kellough said:
Someone was interested in using it for fluting.

That was me... [big grin]...think multiple fluting in columns or pilasters.

Nice idea - hadn't thought of that, but now that I have, it raises all sorts of other interesting possibilities for routing objects that are not flat.
 
HarveyWildes said:
Cheese said:
Michael Kellough said:
Someone was interested in using it for fluting.
That was me... [big grin]...think multiple fluting in columns or pilasters.
Nice idea - hadn't thought of that, but now that I have, it raises all sorts of other interesting possibilities for routing objects that are not flat.
Realigning MFS for every cut on pilaster will be awkward. I think a simple edge guide will work better.
 
Svar said:
Realigning MFS for every cut on pilaster will be awkward. I think a simple edge guide will work better.

When I made some trim with parallel fluting, I just cut ply shims that would fit inside the MFS aperture. Install shim, route, remove/install new shim, route...really simple for repetitive cuts.

The photo of the HVAC vent below is a variation on that same theme. Ply shims fit in the aperture of the MFS and limit the routed length rather than the routed width/placement.

Also note the way the MFS is configured. In this application, I needed to easily/quickly change the horizontal placement of the vent slots which this assembly does. Route vent slot, loosen vertical rails, move over 14mm, tighten, reinsert router stops, route next set of vent slots.

This is another reason I really like the graduations on the MFS, it's very easy to loosen and move the correct distance...so fast and
accurate. No ruler is needed.
 

Attachments

  • 4135.JPG
    4135.JPG
    2.1 MB · Views: 652
  • 4128.jpg
    4128.jpg
    2.1 MB · Views: 363
Cheese said:
When I made some trim with parallel fluting, I just cut ply shims that would fit inside the MFS aperture. Install shim, route, remove/install new shim, route...really simple for repetitive cuts.

The photo of the HVAC vent below is a variation on that same theme. Ply shims fit in the aperture of the MFS and limit the routed length rather than the routed width/placement.

Also note the way the MFS is assembled. In this application, I needed to easily/quickly change the placement of the of the vent slots which this assembly does. Route vent slot, loosen vertical rails, move over 14mm, tighten & reinsert router stops, route next set of vent slots.

This is another reason I really like the graduations on the MFS, it's very easy to loosen and move...so fast and accurate.

The graduations are useful to a point, but I like your use of shims for repeatability even more, esp. in the second picture.  Why not make those shims do double duty and use them to set the width as well?  That would be my first inclination, so I'm interested to hear why you use them to limit the length rather than the width.

Another "shim" example - if you're doing a single pass with a router bit, as you might when routing a flute, why not use the guide bushing to set the width?  In your HVAC example, for instance, why not move one rail to the scale setting, and then use the guide bushing to set the other rail?

I'm generally skeptical of using measurements to get precision, since the setting is only as precise as you can set the jig to the scale.  For some things it doesn't matter, but for joinery where 100ths of an inch matter, I'm not sure I trust either my scales or my eyes (even with glasses :)) to get it right - even more if I want a mark between the scale markings.  For flutes, it also seems like it might be important to get the width of the flute and the distance between flutes to at least within a couple of hundredths.

It's not like I don't use scales, but I do tend to use them to get in the ballpark (maybe around 1/16-1/32" at best) rather than to get high precision.  So I'm not trying to rag on the use of scales, just trying to understand in more detail the tradeoffs and judgements that you apply when doing this kind of work, in order to make my jigs more useful and easy to set up.
 
HarveyWildes said:
The graduations are useful to a point, but I like your use of shims for repeatability even more, esp. in the second picture.  Why not make those shims do double duty and use them to set the width as well?  That would be my first inclination, so I'm interested to hear why you use them to limit the length rather than the width.

In this example, I was making 12 HVAC vents that were 5/16" thick. For ease of a repetitive and accurate processes, I decided to hold the lateral placement of the grooves with the secured MFS rails and use the ply shims for only length placement. I could have done exactly as you say and do double duty with the shims. It's just a matter of personal taste. The work flow was to insert a 3/4" blank into the fixture, insert length shims, route 1st pass at say .170" depth, plunge an additional .170" route 2nd pass. Remove blank from fixture, flip end-for-end, reinsert in fixture, reinsert the shims and repeat that process. Then repeat this entire process for the next 5 blanks. So only having to worry about 2 small shims in this situation was a bonus. Also if you place multiple shims against each other, they can buckle a little bit and muck up the process.


Another "shim" example - if you're doing a single pass with a router bit, as you might when routing a flute, why not use the guide bushing to set the width?  In your HVAC example, for instance, why not move one rail to the scale setting, and then use the guide bushing to set the other rail?

You're right...that's exactly what I did. However having markings on the top and bottom horizontal rails was extremely handy. Those 2 horizontal rails are screwed to the fixture while the vertical rails are only locked in with the fasteners. So, unlock both vertical rails, move the LH rail 14mm and lock down, insert top & bottom shims, move RH rail to contact shims and then lock down. The shims were 11mm wide, while the guide bushing was 10.8mm wide.

I'm generally skeptical of using measurements to get precision, since the setting is only as precise as you can set the jig to the scale.  For some things it doesn't matter, but for joinery where 100ths of an inch matter, I'm not sure I trust either my scales or my eyes (even with glasses :)) to get it right - even more if I want a mark between the scale markings.  For flutes, it also seems like it might be important to get the width of the flute and the distance between flutes to at least within a couple of hundredths.

Again Harvey I agree. I tend to use hard stops whenever I can. The item may not be exactly some desired dimension, say 1.000", however, when using stops, it will consistently be whatever that dimension turns out to be, say 1.006", every single time.
I think you could get by with a variable distance of .020"-.030" between flutes without the eye picking up on it. The width of the flutes as well as the distance between flutes as well as the color (if they're painted) would all come into the equation. [big grin]


It's not like I don't use scales, but I do tend to use them to get in the ballpark (maybe around 1/16-1/32" at best) rather than to get high precision.  So I'm not trying to rag on the use of scales, just trying to understand in more detail the tradeoffs and judgements that you apply when doing this kind of work, in order to make my jigs more useful and easy to set up.

No ragging implied...we're just exchanging thoughts. [big grin]
 
bnaboatbuilder said:
How about telling him to make this available ALL THE TIME and not the silly one time tool dog and pony show. It's as if they don't understand that tools which are available all the time can actually make them money all the time. They have their head in the sand. They don't really make tools to be honest, they make toys and collector items. That's the real business they are in doing the OTT. It's an insult to woodworking, building, crafting communities. If they want to make products and sell them all the time like every other business does, then the products will become actual tools. I own some of their products, but have lost most respect for them as a company. They have the machinery to make anything, anytime.

Shane Holland said:
If you guys are interested in some other Frankensteined together kit, let me know your thoughts. I can pitch it to Woodpeckers and see what they say. I communicate regularly with the guy that runs the show there, El Presidente.  [smile]

I can think of a few reasons why they do the one time tool thing.

Usually, their one time tools don't have a large market.
This month's product being a definite example.

Technically, their customers are the retailers, which aren't going to want to
order things that they might sell one of...ever. 

They also probably don't have the cash nor warehouse space to make these products part of a hard line.   
I've never purchased a one time tool, but I'm guessing either the customer or the retailer pays up front. 

Having manufacturing equipment doesn't necessarily mean it's setup to crank out
a specific product.  Also, there are the employees who do the handwork.  I presume that some are experts that can handle any new task while others require training and a comprehensive set of instructions.

Finally, the woodworking hobbiest market, specifically woodpeckers customers, has a large demographic of older or retired persons with more than this week's paycheck in their bank account.  I can't be depended on to have savings set aside to dip into
if I find out I have a month to purchase these One Time Tool offerings. 
However, a large amount of the market does. 

So, it may be annoying, but, it's definitely a model that makes sense.
I'm confident that the other option would be to never offer these items at all.

Personally, I find the items that they always sell to be the items I always use.
Meanwhile, the limited items, I find to appeal to a limited audience. 

It is what it is. 
 
yetihunter said:
So, it may be annoying, but, it's definitely a model that makes sense.
I'm confident that the other option would be to never offer these items at all.

Doesn't Bridge City Tools do the same thing?  Small runs that are eventually discontinued.
 
ben_r_ said:
amt said:
Looks like a nice system, except the clamping solution.  They couldn't manage to get the f-clamp to slide in the slot in the extrusion?  If it can't then it's a botched design.
They are trying to repurpose an existing design. The aluminum extrusions are not new ones, just modified from an existing rail they already sell.

They ought to offer a modified F-clamp along with their two-part clamp system. They could either buy and modify f-clamps themselves or partner with a vendor to have some made.  The system they are offering is awkward at best.  Still might get one though . . .
 
[member=48572]Shane Holland[/member]
I wish they made replacement rails available outside the production cycle.  I realize that is a departure from their OTT model, but with certain tools it's a sticking point.  I don't like banking on the idea that they might have something buried in a drawer or box somewhere if I call and ask.  I'm usually obsessively careful with my tools, but things happen.  I've dinged an MFS template early on, unfortunately that was after they discontinued them.  [sad]  Anyway, at least in the case of this OTT offering, having access to replacement rails would be nice.  And since they are a modified version of something they already offer in regular inventory, maybe there is a way to make that happen?
 
Good old [member=8352]erock[/member] is using 8020.
[attachimg=1]
[attachimg=2]


Attachments

  • 8020.jpg
    8020.jpg
    86.6 KB · Views: 1,490
  • 8020connector.jpg
    8020connector.jpg
    145.6 KB · Views: 1,636
RobBob said:
Good old [member=8352]erock[/member] is using 8020.
Unfortunately the extrusion is 25 mm thick, which takes away from your cutting depth, and the slots won't fit a standard rail clamp.
 
[member=21249]RKA[/member] according to Woodpeckers, spare parts should not be a problem for this OTT. And, they plan to probably run it again in the next 18 months. Obviously making it not-so-OneTIME.  [big grin]
 
The first part is good news, thanks Shane!  The second part was a given (in my mind) since I suspect it will be received reasonably well and nobody else is offering a similar mousetrap.  Thank you for following up!
 
RobBob said:
Good old [member=8352]erock[/member] is using 8020

That’s always been problematic. It’s certainly doable but not very convenient when you have to attend to the extra amount of real estate that’s necessary for router bit length and the issues of clamping.

I was going to try to use the 2012 or 25-5013 profiles because they're only 1/2" tall. However, clamping and joining profiles together became an issue.
 
Svar said:
RobBob said:
Good old [member=8352]erock[/member] is using 8020.
Unfortunately the extrusion is 25 mm thick, which takes away from your cutting depth, and the slots won't fit a standard rail clamp.

Thanks for pointing out those two issues.  I would not have thought of that.
 
Back
Top