New workshop build

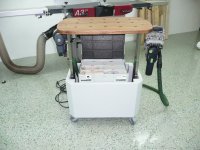
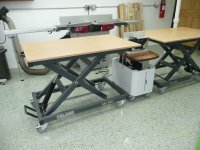
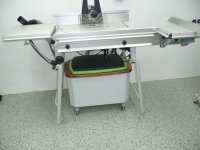
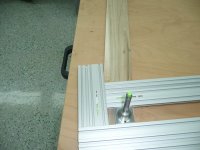
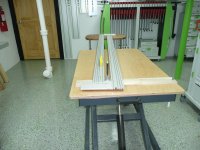
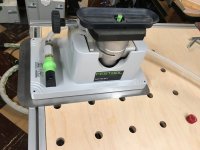
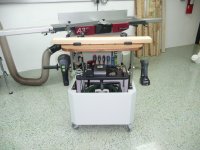
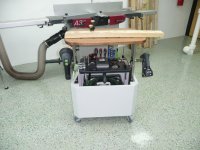
Here the table hight is exact with mft3 with ct sys in the box so we got the dust collector and the tool tray and hardware with some tools.
I will post more pics tomorrow as I have to leave now. Thanks for watching and happy Friday.

[attachimg=1]

[attachimg=2]

[attachimg=3]
 

Attachments

  • P1060560.JPG
    P1060560.JPG
    3.1 MB · Views: 4,509
  • P1060561.JPG
    P1060561.JPG
    707.1 KB · Views: 4,130
six-point socket II said:
Very interesting, thanks for sharing! And a flawless build as always :)

Kind regards,
Oliver
Thanks Oliver, your comments are much appreciated.
 
Just got home from work. Looks like one attachment had a problem so I try again.

[attachimg=1]
 

Attachments

  • P1060559.JPG
    P1060559.JPG
    3.1 MB · Views: 4,418
Very cool table/stool.  Execution is just fantastic!

Do you have a mill and metal brake for the metal forming?

Thanks for making us all jealous with this shop!  You do great work.

Neil
 
neilc said:
Very cool table/stool.  Execution is just fantastic!

Do you have a mill and metal brake for the metal forming?

Thanks for making us all jealous with this shop!  You do great work.

Neil
Thanks Neil. [smile]
I do not own any mill or brake but I am a full time employee at welding and metal fabricating shop for a long time and this is my bonus that my boss let me do anything I want with the respect to the business. So when shop is busy I have to wait till machine become available.
Just finished the outdoor work and going down in the shop. Will post few more pics soon. 
 
Just few more pictures. Here the set up for DF500 joiner. The tray can be removed and the hangers on each side can stay on.
The ct sys and assorted tenon systainer on the top open.

[attachimg=1]

Set up for HL 850 planer.

[attachimg=2]
 

Attachments

  • P1060562.JPG
    P1060562.JPG
    732.1 KB · Views: 3,810
  • P1060565.JPG
    P1060565.JPG
    702.9 KB · Views: 4,170
There is a 8mm hole at the center of the table from both sides and here is 2000mm homemade compass. [big grin]
I made this two years ago and now I do not need the 2x4 to do this. It already worked great now just easier.

[attachimg=1]

[attachimg=2]

[attachimg=3]

[attachimg=4]

And finally a cool place to park.

[attachimg=5]
 

Attachments

  • P1060572.JPG
    P1060572.JPG
    2.7 MB · Views: 4,355
  • P1060571.JPG
    P1060571.JPG
    2.8 MB · Views: 4,125
  • P1060569.JPG
    P1060569.JPG
    679.5 KB · Views: 3,770
  • P1060568.JPG
    P1060568.JPG
    2.7 MB · Views: 4,224
  • P1060567.JPG
    P1060567.JPG
    2.9 MB · Views: 4,244
HAXIT said:
lifting hardware that I made.
Laser cut from 304 stainless then time saved.

I was going to ask who did your laser cutting, but after reading a bit further, I now know...You. [cool] That's a nice perk to have in your back pocket. I really miss not having access to the Engineering Model shop.  [crying] [crying]

I really enjoy this thread and your work.  [smile]

FWIW...if you were to attach 2 custom turned aluminum/stainless dogs to the bottom of the green tray, you could then remove the seat/tray assembly without needing to remove the 4 screws. I did that for the Vac Sys and I can now place it anywhere on the MFT.[attachimg=1]


Attachments

  • 5613.JPG
    5613.JPG
    1.6 MB · Views: 3,725
  • 5615.JPG
    5615.JPG
    1.8 MB · Views: 1,020
Cheese said:
HAXIT said:
lifting hardware that I made.
Laser cut from 304 stainless then time saved.

I was going to ask who did your laser cutting, but after reading a bit further, I now know...You. [cool] That's a nice perk to have in your back pocket. I really miss not having access to the Engineering Model shop.  [crying] [crying]

I really enjoy this thread and your work.  [smile]

FWIW...if you were to attach 2 custom turned aluminum/stainless dogs to the bottom of the green tray, you could then remove the seat/tray assembly without needing to remove the 4 screws. I did that for the Vac Sys and I can now place it anywhere on the MFT.[attachimg=1]
Thanks for the comments, and my idea about securing the green try is exact what you did but machine that I had to use got busy with 1100 pieces of work and got the Stainless round stock left over for now but can be done later. I am using the split dogs from lee valley for now and the screws does not have to be removed. Just a turn and it comes right out.
http://www.leevalley.com/us/Wood/page.aspx?p=59754&cat=1,41637

I had this for something else and used them for now, but in the future I will replace it with dogs as far nothing will be changed.
 
I wish this thread didn't end. Someone should pay this guy to show us everything he's working on weekly
 
George K said:
I wish this thread didn't end. Someone should pay this guy to show us everything he's working on weekly
I just stumbled upon this thread and am blown away! Would love to see an update and some projects you’ve been working on [member=63059]HAXIT[/member] (I see you haven’t logged into here in years, but hoping you setup email thread notifications)
 
Back
Top