Newbie Question... Can I make this look better.

jafenske

Member
Joined
Mar 26, 2014
Messages
37
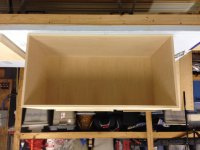
I'm working on my first festool project. I'm building a cabinet for the garage. I glued hardwood edging to the front of the cabinet.

[attachimg=#]

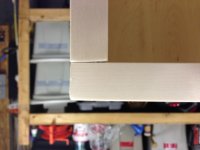
When I put the pieces together the hardwood edging doesn't line up really well. I'm planning on painting the cabinet to finish it. After painting it, I plan on using the LR32 to drill holes for shelf pins.

[attachimg=#]

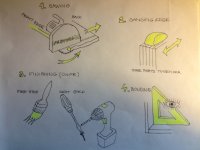
I was hoping someone had a suggestion on how I could make this look a little better or a suggestion on how I could do a better job with this in the future.

Thank you for the help.
 

Attachments

  • cabinet 1.jpg
    cabinet 1.jpg
    242.2 KB · Views: 864
  • cabinet detail.jpg
    cabinet detail.jpg
    214 KB · Views: 854
I have just done some similar panels and found the easiest way for me was to run my TS55 with guide rail and trim back the whole side 1mm (or enough to get the glued edge lined up with the panel). The next lot I did I left the panels long by 10mm and trimmed back the 5mm either side after the glue trim had set, this gave me true 90' corners with not a lot of hassle.
 
cut your panels after edging
Also I hope you re planning on drilling the shelf holes before putting the cabinet together
 
mastercabman said:
cut your panels after edging
Also I hope you re planning on drilling the shelf holes before putting the cabinet together

+1!  Always do your edging before assembly so you can do any trimming using the MFK700 (if you have one).  You're going to have a very difficult time using the LR 32 on an assembled cabinet.  Just remember that edging and line boring are most efficiently done before assembly of the cabinetry. 

 
first rule Sawing from the front edge to the back.

second rule Sensitively observed geometry sanding edges.  If I do not know it,  is better to grind a few edges together.

third rule Always apply a finish (paint) before assembling the cabinet, this also applies to drilling.

fourth rule Bonding at the box closely examine the observance of the right angle.

I wish much success for  continue

(I hope you understand me )

[wink]
 

Attachments

  • rules.JPG
    rules.JPG
    499.3 KB · Views: 360
Was your carcass square before you glued the face frame? If you didn't check it, and it is out of square, you will battle the misalignment of the face frame every time. Check the angles with a triangle or square and measure the carcass diagonals before you apply any face frame.  A kreg pocket hole system or domino will also help assembling the face frame prior to attaching to the carcass.
 
      Apply the edging before assembly. Leave it a bit longer than the panel. Use the track saw to trim off a whisker (or leave the panel a bit long as well) of the panel along with the excess edging that is sticking out from the end. That will make the edging ends flush and square with the panel. Be sure not to plunge or retract the saw into or out of the wood, sometimes that action will take a hair more off at the corner.  In the picture it looks like the edging was end trimmed or sanded crooked along the joint where the panels meet.

    Pretty sure you can't use the LR32 after assembly unless, maybe, the rail will fit inside the cabinet.

Seth
 
Sorry. It was late when I posted this and I forgot to mention that the carcass is only test fitted currently. I plan on pulling it apart and masking off the dominos mortises and the dado on the back and then priming and painting. Once the side panels are complete then I am going to drill the LR32 holes. During final assembly I will make sure the carcass it square.

I cut the panels to the finish dimensions and then I applied the edging with glue. Once the glue was dry I used a flush trim saw to cut the trim to length. To trim the length I used my OF 1400 with a flush trim bit. My mistake was that I sanded the edges crooked.

Thank you all for the tips. I guess I will have to do it better the next time. 
 
Back
Top