Mario Turcot
Member
- Joined
- Nov 26, 2017
- Messages
- 1,247
[member=69479]Jiggy Joiner[/member] Question about the Laser you installed. When you move the table up/down do you have to calibrate the laser again?
Jiggy Joiner said:I also added a Wixey laser, this has been a great addition, not only for quick line up but, also quick alignment of the table.
Once I’d lined my table up, I marked two reference points at the rear of the table. So whenever I move the table sideways, it takes seconds to return to dead centre.
rvieceli said:[member=44099]Cheese[/member] is there any way to mount the laser on the head instead of the column? My head can rotate on the column and I assume that would throw off the laser. Correct?
Cheese said:Jiggy Joiner said:I also added a Wixey laser, this has been a great addition, not only for quick line up but, also quick alignment of the table.
Once I’d lined my table up, I marked two reference points at the rear of the table. So whenever I move the table sideways, it takes seconds to return to dead centre.
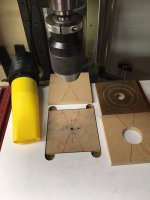
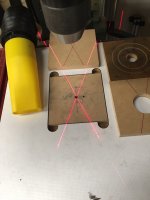
Like this [member=69479]Jiggy Joiner[/member] ...?
[attachimg=1]
[attachimg=2]
The Wixey is a nice addition. I had a different laser originally and it literally fell apart after about 9 months. [mad] Worse yet, if you changed the height of the table by more than 6-8" the centering would be off...Good Riddance. The Wixey works well. [big grin]
Michael Kellough said:When setting up my Wixey lasers maybe I didn’t have time or patience to get them perfect but my work height range was about 16” and the laser’s X wasn’t the same from top of range to bottom.


rvieceli said:Looks good Jiggy
")
Mario Turcot said:Very nice [member=69479]Jiggy Joiner[/member]. From the pictures I can tell you didn't use the extra plate on the laser right?
I'm almost done with the Kapex butterfly and next project is the DP table
Side note: You have to update your avatar. [big grin]
Michael Kellough said:[member=66597]Mario Turcot[/member] I want intersection of the lasers to indicate the center axis of any bit I might put in the chuck regardless of where the table is (laterally). The benefit is drilling one off holes in big loose parts that aren’t suitable for a table with fences etc.
Once adjusted it works well, depending on your ability to interpolate which part of the fuzzy red lines is most indicative. Tip, it helps to put matte black tape over the target.
I did get it to work well at one table altitude but when I had to lower the table a foot the lasers were off and I could use fixtures for that operation so didn’t readjust.
Cheese said:Nice base...nice table Jiggy. [smile] Some storage would be nice on the base.
The blue tooth setup is convenient, I like that.
The chuck guard however, is the solution to a problem that never existed. [crying]