OF1400 Router round base

Neil Lickfold

Member
Joined
Mar 10, 2025
Messages
87
Location
Hamilton, New Zealand
Hi all,
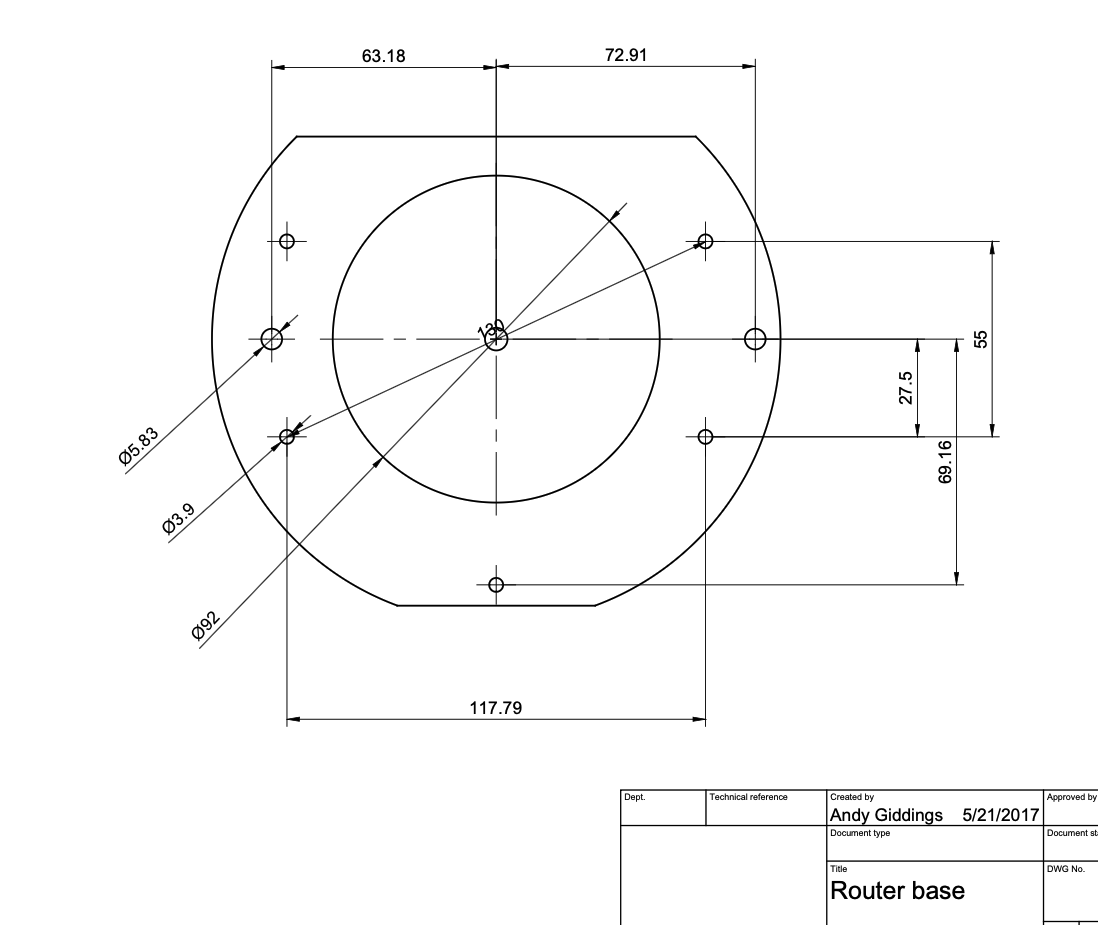
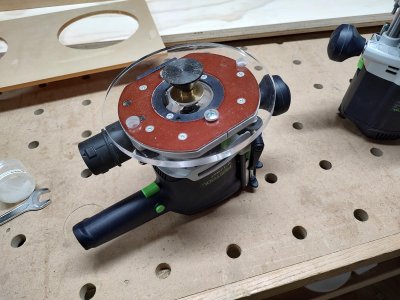
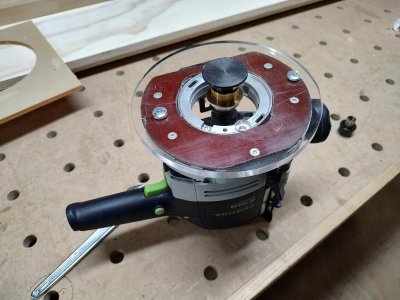
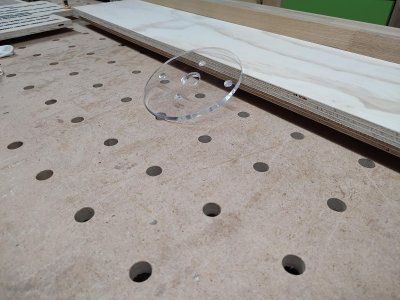
Does anyone know if a round base is available for the OF1400 router? I want to use the router inside a frame, and don't want to be using the copy rings. The flats on the sides of the current base is a pain, and don't want to go and buy another router for this one job. Rather buy a round base insert. If one is not available will make one.
 
That's also a nice way to get around the "non-centered/moving copy rings" problem on the 1400. (y)
 
It looks like it does. The pics show counterbored holes and pan head screws
Thanks - mine is so far off I can even see it without my "cheaters" on. I have seen some remove the rolled pins in the base and recentered it themselves. Might just try that first.
 
I plan on making a centering tool, that fits the 1/2inch collet, essentially made in 2 pieces. A 1/2 inch pin, and an adapter ring that is a neat fit to the hole in the plastic base. Then my latest hair brain scheme is to make a DTI arm adapter, that will allow the sweep on the outside of the ring adapter, and check it's concentricity to the run of the spindle. Well, the generic Noga single locking arms on the mini DTI holders, have an M5 thread on the end of the Ball arm. The larger one is M8. So just going to tap M5 into a piece of 1/2 inch stock, and will use that, with a finger type indicator that can have the face horizontal with the stylus at 90 deg. Will post pics when I get something done. Thanks for the inspiration of ideas. What Im talking about are these indicator holders.
I see that the arms are now available on their own.
I just took the arm off the magnet.
Neil

S3b32a54731454438b0ed2da69ed8381aV.webp

S53d67950dae94923b2d644cde728c431Q.webp
 
@Neil Lickfold I applaud your efforts to get as close as possible to perfect concentricity, I don't know how realistically valuable or practical that is though? You mentioned the other day about using wheels from a knurling tool which leads me to think you have a metal lathe, unless you're referring to the Robert Sorby wood knurler?

If you do have a metal lathe, turning something like the attached pic which is a snug fit in the 30mm template ring hole with a 1/2" shank, would be as close to perfect as practicable that you can get with a router without a lot of hassle.
 

Attachments

  • Tapered Alignement Tool.jpg
    Tapered Alignement Tool.jpg
    11.3 KB · Views: 39
@Neil Lickfold I applaud your efforts to get as close as possible to perfect concentricity, I don't know how realistically valuable or practical that is though? You mentioned the other day about using wheels from a knurling tool which leads me to think you have a metal lathe, unless you're referring to the Robert Sorby wood knurler?

If you do have a metal lathe, turning something like the attached pic which is a snug fit in the 30mm template ring hole with a 1/2" shank, would be as close to perfect as practicable that you can get with a router without a lot of hassle.
Yeah, I have a little Myford S7 lathe which has been invaluable to me over the years. That's a really good idea too with the plate alignment tool. The problem is that NZ is kind of out of the way for getting things posted. So cutting out a piece of plastic or going to a local laser place is actually quite cost effective, as I don't need to by a 1/2 sheet of material etc. I can see how it will be vert close for being concentric too without all the hassle of using indicators.
Thanks to all for the constructive discussion.
Neil
 
I drew up a model of this for the Shaper Origin, last night, and tested it this morning, on some 1/4" MDF. (Seemed like the thing to do before offering it to anyone else)
Turns out, it was a good thing I checked, before committing to the acrylic. For some crazy reason, the mounting holes on the OF1400 are 5mm off-center? The smaller pattern, for the OF1010 is centered, as I would expect.
I should have time to get one done tomorrow, since I found some 6mm screws this afternoon.
Assuming that it works as expected, I will put it up as a Hub project on the Shaper site. Then anyone with access to an Origin can make their own.
 
Last edited:
I drew up a model of this for the Shaper Origin, last night, and tested it this morning, on sone 1/4" MDF. (Seemed like the thing to do before offering it to anyone else)
Turns out, it was a good thing I checked, before committing to the acrylic. For some crazy reason, the mounting holes on the OF1400 are 5mm off-center? The smaller pattern, for the OF1010 is centered, as I would expect.
I should have time to get one done tomorrow, since I found some 6mm screws this afternoon.
Assuming that it works as expected, I will put it up as a Hub project on the Shaper site. Then anyone with access to an Origin can make their own.
This is the dimensioned drawing for the screws I have for the OF1400, how well does it match up for your one?
 

Attachments

  • Festool 1400 Router Base Pattern Dimensions.JPG
    Festool 1400 Router Base Pattern Dimensions.JPG
    72.4 KB · Views: 29
This is the dimensioned drawing for the screws I have for the OF1400, how well does it match up for your one?
You know, I've been active on this forum for so long that sometimes when I post I feel like I'm just shouting into the wind. And then every now and then I uncover a crumb of my relevance to this forum. Tonight is such an occurrence.
@luvmytoolz posted the drawing above and I immediately recognized it. It was produced by me circa 2020 before my Windows computer gave up the ghost.

No mea culpas need to be said and no acknowledgements need to be made...I'm just glad that some folks are deriving some benefit from my incessant chatter. That's a good thing. :):):)
 

Attachments

  • Festool 1400 Router Base Pattern Dimensions.jpg
    Festool 1400 Router Base Pattern Dimensions.jpg
    300 KB · Views: 28
Those numbers are pretty close to the numbers on this drawing I found a few years ago. I've used this to create a simple square base on my 2021-era 1400 but w/o a way to mount guide bushings.
Festool_-_OF_1400_-_Router_-_Base_Drawing_v1.pdf_2025-08-21_20-41-45.png
 
You know, I've been active on this forum for so long that sometimes when I post I feel like I'm just shouting into the wind. And then every now and then I uncover a crumb of my relevance to this forum. Tonight is such an occurrence.
@luvmytoolz posted the drawing above and I immediately recognized it. It was produced by me circa 2020 before my Windows computer gave up the ghost.

No mea culpas need to be said and no acknowledgements need to be made...I'm just glad that some folks are deriving some benefit from my incessant chatter. That's a good thing. :):):)
Thank you and may your camels never thirst! :-)

I spent ages trying to track down a proper dimensioned drawing before I finally found yours somewhere, god knows where though.
 
My camels will never thirst...thanks to you. (y) (y) (y)

As I mentioned, no accolades needed or accepted, it's just a refreshing thing to find that other folks are finding some of my chatter worthwhile. :)
 
Yes, the dimensions that I measured are within .01mm of what @4nthony posted, but in this application, only 2 of them matter. The ones at the top of that diagram are all we need here. Those are the ones I was saying are off center.
They are bigger holes (6mm threads) and do not contribute to holding the original base in place.
The OF1010 has similar holes, thought they are closer together and centered.
The combo/adaptor only uses these 4 holes.
That's kind of the beauty of this, you don't have to remove any of the original tiny screws.
 

Attachments

  • OF base plate bushing.jpg
    OF base plate bushing.jpg
    375.5 KB · Views: 13
  • OF base plate.jpg
    OF base plate.jpg
    277.4 KB · Views: 12
  • OF bushing adaptor.jpg
    OF bushing adaptor.jpg
    370.3 KB · Views: 11
Back
Top