SMJoinery
Member
- Joined
- Nov 17, 2013
- Messages
- 522
Hi All
Hope this recent experience can help others.
My "2200" resides in my CMS (I know NAINA) but this helps anyway. I always fit the plastic shield that comes with the CMS to prevent dust ingress when the machine is inverted.
Went to change bits last week and ratchet mechanism isn't holding so no way to remove the bit.
I knew a few on FOG had this issue and therefore knew to vacuum all the dust from that area, but still no joy!
So I called service and spoke to a techie and explained all the above.
He told me that although my machine is under warranty it's ok to go ahead and remove the four screws holding the cover and then blow out / vacuum the debris.
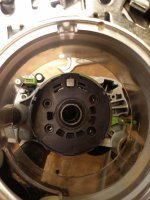
So I hung up and set about removing the screws and cover only to find you can't get the cover fully over the collet so it can't be removed only loosened.
I then retried to vacuum out /dislodge the dust and noticed that the square shaft that you can see when looking at the router base "behind" the collet was moving slightly. This square shaft is the ratchet mechanism pin.
So using an 8mm spanner I lightly operated the shaft "left and right" which within a few attempts freed the ratchet and allowed me to remove the bit.
I completed the task by then fully removing the cover, vacuuming the debris etc and hey presto we are "back in the game"
Hope this helps anybody else with same problem.
The service guy did say they recommend removing the cover and removing the debris regularly as a maintenance item. I would think this only necessary between heavy use in the CMS inverted position.
Best regards
Scott
Hope this recent experience can help others.
My "2200" resides in my CMS (I know NAINA) but this helps anyway. I always fit the plastic shield that comes with the CMS to prevent dust ingress when the machine is inverted.
Went to change bits last week and ratchet mechanism isn't holding so no way to remove the bit.
I knew a few on FOG had this issue and therefore knew to vacuum all the dust from that area, but still no joy!
So I called service and spoke to a techie and explained all the above.
He told me that although my machine is under warranty it's ok to go ahead and remove the four screws holding the cover and then blow out / vacuum the debris.
So I hung up and set about removing the screws and cover only to find you can't get the cover fully over the collet so it can't be removed only loosened.
I then retried to vacuum out /dislodge the dust and noticed that the square shaft that you can see when looking at the router base "behind" the collet was moving slightly. This square shaft is the ratchet mechanism pin.
So using an 8mm spanner I lightly operated the shaft "left and right" which within a few attempts freed the ratchet and allowed me to remove the bit.
I completed the task by then fully removing the cover, vacuuming the debris etc and hey presto we are "back in the game"
Hope this helps anybody else with same problem.
The service guy did say they recommend removing the cover and removing the debris regularly as a maintenance item. I would think this only necessary between heavy use in the CMS inverted position.
Best regards
Scott