You are using an out of date browser. It may not display this or other websites correctly.
You should upgrade or use an alternative browser.
You should upgrade or use an alternative browser.
On-going shop reorganization build thread [updated 7.18.20]
- Thread starter ear3
- Start date
gsdvorak
Member
- Joined
- May 28, 2013
- Messages
- 339
Nice work- like the setup so far. Very efficient use of the space.
I used the same 14" 3/4 extension glides you did on a custom sys port I built. It's what I had on hand and I thought they would be fine, but after using them for a few months, they are getting replaced with full extension glides. I cannot stand not being able to open the lid 90 degrees- drives me nuts sometimes.
Regards,
Gerald
ear3
Member
Not that often, but when I need it, it really comes through. I originally got it for this run of crown moulding I had made, and then really put it through its paces on a build I had last Fall where I had to mill 300+ feet of astragal moulding. I also used it on face frames, but have since switched over to the RTS400 for that. What other applications do you use it for besides moulding?
bkharman said:How often do you use your ls 130? I just got mine a few months back and really really like it. I have found a lot of uses for it of late.
Cheers. Bryan.
bkharman
Member
- Joined
- Jul 1, 2013
- Messages
- 2,019
Edward A Reno III said:Not that often, but when I need it, it really comes through. I originally got it for this run of crown moulding I had made, and then really put it through its paces on a build I had last Fall where I had to mill 300+ feet of astragal moulding. I also used it on face frames, but have since switched over to the RTS400 for that. What other applications do you use it for besides moulding?
bkharman said:How often do you use your ls 130? I just got mine a few months back and really really like it. I have found a lot of uses for it of late.
Cheers. Bryan.
I have used it mainly to refurb about 25 doors in my house. Flat pad works great on the panel faces, and I made up some DIY pads for the details. That combo' with my ETS 150 and RO 90, have made the project a LOT more tolerable!
It is a rock star item if it fits your needs. I wish I could use my profiles on a hand sander sometimes but so far I have just dealt with some occasional dust.
Cheers. Bryan.
ear3
Member
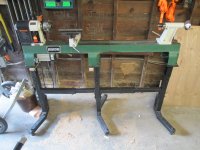
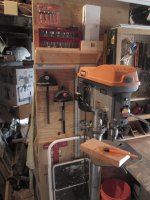
Finished up the lathe stand.
Original one that I bought with the unit was fine and functional, but it created all this dead space due to its center pillar construction:
[attachthumb=1]
So I decided to modify one of the DIY designs I saw on google images-- one that would be rock solid and provided underneath storage.
Materials were 2x6s and 2x12s, laminated in pairs to be extra strong. Because much of it was scrap, and a little cupped, I drove in a bunch of screws during the lamination process to secure a tight fit:
[attachthumb=2]
Planed down the ends:
[attachthumb=6]
And then used the Carvex to cut notches for the cross beams. I know the Carvex has gotten some heat lately on the forum, but I was pretty happy with a 3" plumb cut:
[attachthumb=3]
Attached the legs together with 10mm dominoes and then clamped them up (bottom parts made of the 2x6s were 1.5mm thicker than the 2x12 tops -- decided just to use the domino fence to offset the mortises rather than plane them down to equal size -- the boards were still a little cupped and so it would have required more than just a quick pass through the planer). Thank god Bessey makes the 50" clamps:
[attachthumb=4]
[attachthumb=5]
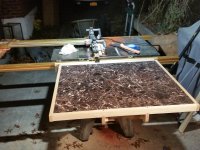
Joined the two legs with the cross-pieces, secured with 1/2" threaded rods that I drilled out with an extra long speed-bore spade bit, added two cross pieces for more stability, topped it off with Baltic Birch (was 1 inch shy on either side on the ply since I needed to make the full span 62" to give clearance for the bolts securing the lathe to the stand):
[attachthumb=7]
[attachthumb=8]
[attachthumb=9]
Attached the stand to the wall studs and anchored the feet into the concrete for good measure:
[attachthumb=10]
[attachthumb=11]
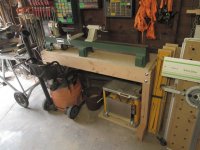
Underneath now have storage for the shop vac and planer:
[attachthumb=12]
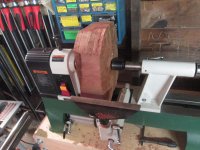
I couldn't resist so I decided to put it to a real test, mounting a blank measuring the full 12" swing:
[attachthumb=13]
Good thing I tested it as I had forgotten that the motor had to drop very low when the belt was at the slowest setting, and so I now realized I had to cut a hole in the ply for the motor to sink slightly below table level. Sounds like a job for the Multi Master:
[attachthumb=14]
Motor cleared, I was able to turn the blank round, experiencing no extra vibration or rocking in what ended up being a rock solid stand:
[attachthumb=15]
Original one that I bought with the unit was fine and functional, but it created all this dead space due to its center pillar construction:
[attachthumb=1]
So I decided to modify one of the DIY designs I saw on google images-- one that would be rock solid and provided underneath storage.
Materials were 2x6s and 2x12s, laminated in pairs to be extra strong. Because much of it was scrap, and a little cupped, I drove in a bunch of screws during the lamination process to secure a tight fit:
[attachthumb=2]
Planed down the ends:
[attachthumb=6]
And then used the Carvex to cut notches for the cross beams. I know the Carvex has gotten some heat lately on the forum, but I was pretty happy with a 3" plumb cut:
[attachthumb=3]
Attached the legs together with 10mm dominoes and then clamped them up (bottom parts made of the 2x6s were 1.5mm thicker than the 2x12 tops -- decided just to use the domino fence to offset the mortises rather than plane them down to equal size -- the boards were still a little cupped and so it would have required more than just a quick pass through the planer). Thank god Bessey makes the 50" clamps:
[attachthumb=4]
[attachthumb=5]
Joined the two legs with the cross-pieces, secured with 1/2" threaded rods that I drilled out with an extra long speed-bore spade bit, added two cross pieces for more stability, topped it off with Baltic Birch (was 1 inch shy on either side on the ply since I needed to make the full span 62" to give clearance for the bolts securing the lathe to the stand):
[attachthumb=7]
[attachthumb=8]
[attachthumb=9]
Attached the stand to the wall studs and anchored the feet into the concrete for good measure:
[attachthumb=10]
[attachthumb=11]
Underneath now have storage for the shop vac and planer:
[attachthumb=12]
I couldn't resist so I decided to put it to a real test, mounting a blank measuring the full 12" swing:
[attachthumb=13]
Good thing I tested it as I had forgotten that the motor had to drop very low when the belt was at the slowest setting, and so I now realized I had to cut a hole in the ply for the motor to sink slightly below table level. Sounds like a job for the Multi Master:
[attachthumb=14]
Motor cleared, I was able to turn the blank round, experiencing no extra vibration or rocking in what ended up being a rock solid stand:
[attachthumb=15]
Attachments
-
 IMG_5023.JPG3.7 MB · Views: 936
 -
 IMG_5057.JPG542 KB · Views: 692
 -
 IMG_5054.JPG417.2 KB · Views: 665
 -
 IMG_5053.JPG516.5 KB · Views: 671
 -
 IMG_5039.JPG3.2 MB · Views: 817
 -
 IMG_5038.JPG3.5 MB · Views: 626
 -
 IMG_5034.JPG440.6 KB · Views: 620
 -
 IMG_5035.JPG456.3 KB · Views: 708
 -
 IMG_5033.JPG537.5 KB · Views: 671
 -
 IMG_5003.JPG3 MB · Views: 700
 -
 IMG_5012.JPG3.5 MB · Views: 677
 -
 IMG_5019.JPG3.7 MB · Views: 781
 -
 IMG_5018.JPG4.4 MB · Views: 730
 -
 IMG_4998.JPG3 MB · Views: 734
 -
 IMG_5026.JPG2.9 MB · Views: 653
ear3
Member
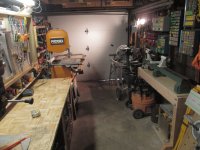
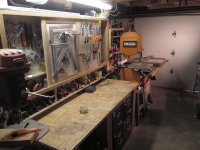
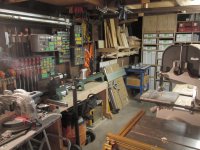
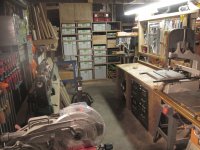
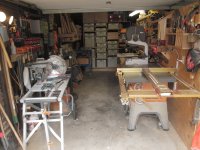
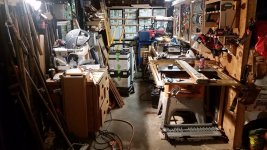
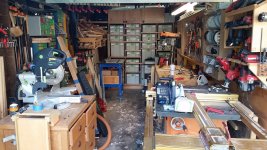
Just took a step back and realized how much progress I've made in the past few weeks. Once again, the before from last Fall:
[attachthumb=1]
And now:
[attachthumb=2]
[attachthumb=3]
[attachthumb=4]
[attachthumb=5]
[attachthumb=6]
[attachthumb=7]
Gonna take a break, but will eventually get around to redoing the workbench. I need to think about it some, though, and decide whether I want to have full cutting capabilities on it, or whether I'll just keep it as a clamping/assembly/sanding station.
Attachments
blaszcsj
Member
- Joined
- Feb 21, 2015
- Messages
- 545
Edward A Reno III said:Just took a step back and realized how much progress I've made in the past few weeks. Once again, the before from last Fall:
[attachthumb=1]
And now:
[attachthumb=2]
[attachthumb=3]
[attachthumb=4]
[attachthumb=5]
[attachthumb=6]
[attachthumb=7]
Gonna take a break, but will eventually get around to redoing the workbench. I need to think about it some, though, and decide whether I want to have full cutting capabilities on it, or whether I'll just keep it as a clamping/assembly/sanding station.
I am going to steal some of your organizational tricks for my shop as I build it out. Good job!
ear3
Member
Can one steal from a thief? Look forward to seeing your build.
ear3
Member
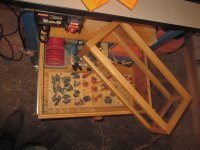
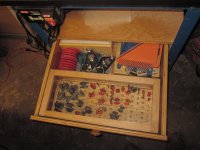
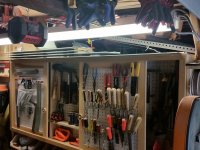
One more storage improvement. I wanted to compact the storage of all my spare router bits that don't already have their proper cases, and have the case be both transparent and sealed enough so that I could stick in some dessicants to inhibit rust. So I milled some narrow maple pieces and cut plexiglass panels to fit inside the dadoed pieces. Assembled with 4mm dominoes. Then drilled a bunch of 1/2" and 1/4" holes in a board cut to the size of the case to hold the bits upright and attached it to the bottom of the drawer I'd already made for the router table. I might be a bit optimistic thinking this will solve the rust problem, but it's certainly better than the previous setup I had of just having them out in the open.
[attachthumb=1]
[attachthumb=2]
[attachthumb=3]
[attachthumb=4]
[attachthumb=1]
[attachthumb=2]
[attachthumb=3]
[attachthumb=4]
Attachments
ear3
Member
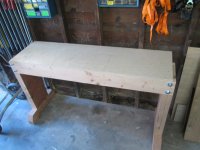
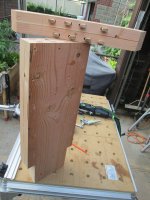
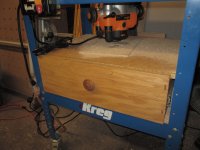
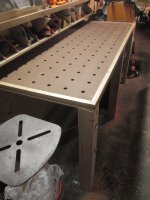
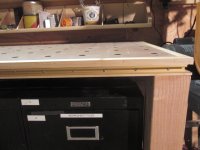
Took my weekend away from the installation to do the workbench, using the Woodrave Template and a Bosch 20mm boring bit that I will never use again due to the burning.
I spent a long time thinking about what the perfect workbench might look like, but then I realized that the perfect workbench was simply one that fir my needs at the moment. And I can always modify it as my needs change.
My three principles were these:
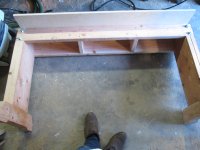
1. Have space underneath to fit my metal filing cabinets, with enough room from the top of the cabinet to tighten knobs underneath
2. Have space underneath to place the Festool CT
3. Match the length of the existing cabinet I built a few months ago
I'll use the bench largely for sanding and assembly rather than cutting. I don't do much hand planing so I thought the 3/4 MDF would be good enough.
I put some dadoes in the 5/4 edging and put in Incra T-tracks, and will later add additional dados on top for a T-track along the edge so that I can get some of those auto lock T-track clamps like Rockler makes to supplement the Festool clamping elements when necessary, as well as additional hold down clamps.
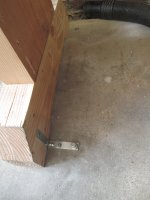
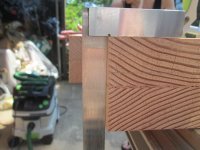
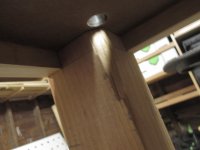
Notched the three 4x4s with the Carvex for the 5/4 edging to nest in. Put one cross piece underneath for additional support, and then secured it to a 2x4 running along the wall. 4x4s are also anchored into the concrete, so the bench is pretty solid.
Put a few coats of Danish oil on the MDF, and will finish it off with some wipe on poly.
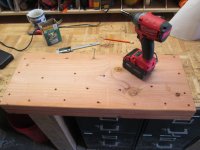
Added a few dog holes down the 4x4s for support when I'm doing edge sanding on long boards.
[attachthumb=1]
[attachthumb=2]
[attachthumb=3]
[attachthumb=4]
I spent a long time thinking about what the perfect workbench might look like, but then I realized that the perfect workbench was simply one that fir my needs at the moment. And I can always modify it as my needs change.
My three principles were these:
1. Have space underneath to fit my metal filing cabinets, with enough room from the top of the cabinet to tighten knobs underneath
2. Have space underneath to place the Festool CT
3. Match the length of the existing cabinet I built a few months ago
I'll use the bench largely for sanding and assembly rather than cutting. I don't do much hand planing so I thought the 3/4 MDF would be good enough.
I put some dadoes in the 5/4 edging and put in Incra T-tracks, and will later add additional dados on top for a T-track along the edge so that I can get some of those auto lock T-track clamps like Rockler makes to supplement the Festool clamping elements when necessary, as well as additional hold down clamps.
Notched the three 4x4s with the Carvex for the 5/4 edging to nest in. Put one cross piece underneath for additional support, and then secured it to a 2x4 running along the wall. 4x4s are also anchored into the concrete, so the bench is pretty solid.
Put a few coats of Danish oil on the MDF, and will finish it off with some wipe on poly.
Added a few dog holes down the 4x4s for support when I'm doing edge sanding on long boards.
[attachthumb=1]
[attachthumb=2]
[attachthumb=3]
[attachthumb=4]
Attachments

ear3
Member
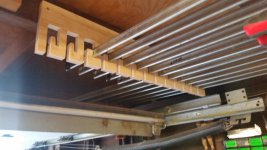
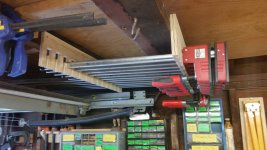
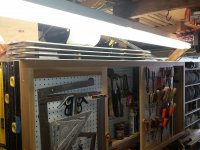
One small space-saving addition. I'm going to be building a miter saw cart for my Kapex, so I wanted to clear out some wall space for it to park it as close to the wall as possible. So I took advantage of my low garage ceiling and moved some of the long clamp storage overhead.
Marked off a single piece of plywood with the slots, then ripped it down the middle once they were jigsawed to ensure a mirror image:
[attachthumb=1]
BTW, I learned that my newly acquired Rockler bench cookies still work well after you accidentally jigsaw them!
I have overhead space now for up to 13 Bessey parallel and long bar clamps -- with the bar side tucked in above the open garage door:
[attachthumb=2]
[attachthumb=3]
[attachthumb=4]
Attachments

Billy stray
Member
- Joined
- Jun 16, 2015
- Messages
- 307
Good idea, I've worked out of small spaces b4 and there's nothing like that ah ha moment when you find just a little more room
ear3
Member
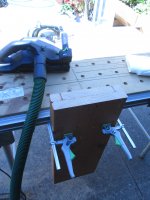
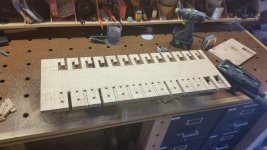
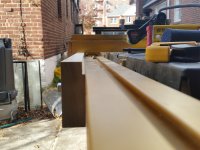
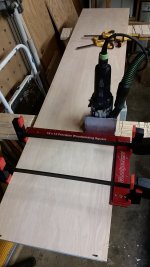
I've been thinking about the design for the extension wing for my Kapex cart, but wanted to test out various sliding and folding solutions before I did something permanent, so I decided to experiment by building an folding outfeed table for my table saw.
I modified a design I found on the internetz so it could integrate with my Incra fence. Basics of the table are two pieces of MDF or ply that get covered on both sides with laminate, and then edged out with solid wood (poplar in my case).
[attachthumb=1]
[attachthumb=2]
[attachthumb=3]
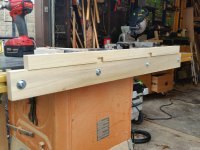
The mounting "plate" was in two parts. First was a piece of 5/4 poplar fitted with bolts and the sliding nuts that go in the track on the Incra fence extrusion. It needed a rabbet at the top to give clearance for the fence to pass. Screwed into this was another piece of 5/4 poplar, chiseled out to fit over the two central bolt heads of the first board. This second board has the piano hinge at the bottom attaching it to the table panel. In order to get the top flush, I predrilled the second piece to the first, and then removed it to hinge it to the panel.
[attachthumb=4]
[attachthumb=5]
[attachthumb=6]
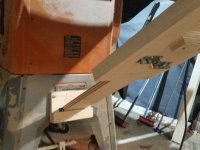
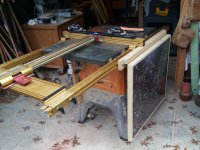
I bought a 48" hinge and cut down approximately 16" with the grinder, and then attached the panel:
[attachthumb=7]
[attachthumb=8]
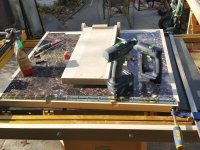
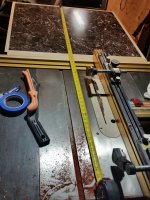
The leg mechanism is just a large sliding dovetail assembly made of plywood and poplar, attached with bolts to two radiused pieces fitted into dadoes I routed into the underside of the panel. The leg slides until it fits into a wooden rest attached near the bottom of the table saw cabinet. I cut up some metal shims with the grinder and attached them to the bottom of the sliding leg and the rest to firm up the assembly and avoid and changes in the level of the table due to wood degradation:
[attachthumb=9]
After leveling out the top and marking the position, the leg got locked into place with two sliding bolts.
[attachthumb=10]
Total surface area of the extension is 32x28, which gives me almost 5 feet of depth from the front of the saw to the drop off at the back of the extension. I realize now that I could have even gotten away with less depth on the extension -- the Jessem stock guides I have on my fence act as a great hold down to keep pieces from tipping off too soon. But the extension will definitely come in handy when I'm doing long rips of 8/4 material or other heavy stock.
I just realized I have put more money into accessories and modifications for the table saw then I originally spent on the saw itself. It's been worth it, though, as I now have 100% confidence in the tool.
I modified a design I found on the internetz so it could integrate with my Incra fence. Basics of the table are two pieces of MDF or ply that get covered on both sides with laminate, and then edged out with solid wood (poplar in my case).
[attachthumb=1]
[attachthumb=2]
[attachthumb=3]
The mounting "plate" was in two parts. First was a piece of 5/4 poplar fitted with bolts and the sliding nuts that go in the track on the Incra fence extrusion. It needed a rabbet at the top to give clearance for the fence to pass. Screwed into this was another piece of 5/4 poplar, chiseled out to fit over the two central bolt heads of the first board. This second board has the piano hinge at the bottom attaching it to the table panel. In order to get the top flush, I predrilled the second piece to the first, and then removed it to hinge it to the panel.
[attachthumb=4]
[attachthumb=5]
[attachthumb=6]
I bought a 48" hinge and cut down approximately 16" with the grinder, and then attached the panel:
[attachthumb=7]
[attachthumb=8]
The leg mechanism is just a large sliding dovetail assembly made of plywood and poplar, attached with bolts to two radiused pieces fitted into dadoes I routed into the underside of the panel. The leg slides until it fits into a wooden rest attached near the bottom of the table saw cabinet. I cut up some metal shims with the grinder and attached them to the bottom of the sliding leg and the rest to firm up the assembly and avoid and changes in the level of the table due to wood degradation:
[attachthumb=9]
After leveling out the top and marking the position, the leg got locked into place with two sliding bolts.
[attachthumb=10]
Total surface area of the extension is 32x28, which gives me almost 5 feet of depth from the front of the saw to the drop off at the back of the extension. I realize now that I could have even gotten away with less depth on the extension -- the Jessem stock guides I have on my fence act as a great hold down to keep pieces from tipping off too soon. But the extension will definitely come in handy when I'm doing long rips of 8/4 material or other heavy stock.
I just realized I have put more money into accessories and modifications for the table saw then I originally spent on the saw itself. It's been worth it, though, as I now have 100% confidence in the tool.
Attachments
-
 20151127_184816.jpg2.4 MB · Views: 499
 -
 20151127_175951.jpg1.3 MB · Views: 511
 -
 20151127_133941.jpg3.7 MB · Views: 511
 -
 20151127_112305.jpg2.5 MB · Views: 547
 -
 20151127_110904.jpg3.8 MB · Views: 505
 -
 20151127_114357.jpg2.8 MB · Views: 475
 -
 20151127_105749.jpg3 MB · Views: 506
 -
 20151128_082015.jpg3.7 MB · Views: 650
 -
 20151127_191239.jpg1.8 MB · Views: 535
 -
 20151127_191059.jpg2.9 MB · Views: 682
ear3
Member
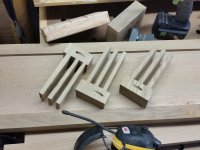
Small improvement to my rail storage, which had simply involved stacking them on top of one another above the workbench cabinet. It worked fine, but obviously, if I needed to grab the 75" rail, I had to take all the others down first
View attachment 1
So I took some small blocks of 8/4 white oak i had lying around and jigsawed some slots
View attachment 2
Realized as I was attaching them that I only needed two, since the longest rail remains on the bottom. They are much more accessible now
View attachment 3View attachment 4
View attachment 1
So I took some small blocks of 8/4 white oak i had lying around and jigsawed some slots
View attachment 2
Realized as I was attaching them that I only needed two, since the longest rail remains on the bottom. They are much more accessible now
View attachment 3View attachment 4
Attachments
ear3
Member
This is just for my own personal benefit so I can consolidate all my shop improvements in a single thread for future reference:
http://festoolownersgroup.com/festool-jigs-tool-enhancements/kapex-cart
http://festoolownersgroup.com/workshops-and-mobile-vehicle-based-shops/abrasive-storage-continueda/
http://festoolownersgroup.com/workshops-and-mobile-vehicle-based-shops/hybrid-workbench-build/
http://festoolownersgroup.com/festool-jigs-tool-enhancements/kapex-cart
http://festoolownersgroup.com/workshops-and-mobile-vehicle-based-shops/abrasive-storage-continueda/
http://festoolownersgroup.com/workshops-and-mobile-vehicle-based-shops/hybrid-workbench-build/
ear3
Member
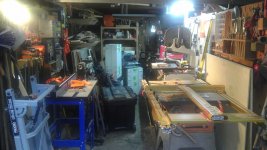
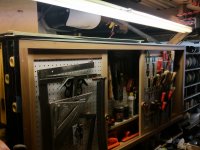
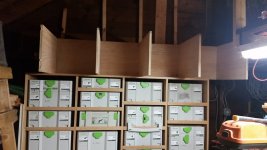
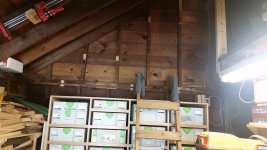
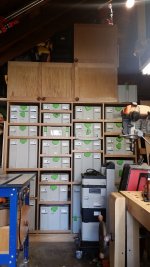
I thought I had built in enough room for growth when I redid the cabinets, but over the past year my systainers have spilled over, both due to new Festool acquisitions and because I've been systainerizing my other tools. Despite a concerted effort to weed out some of my older, no longer frequently used tools through resale or donation, it was starting to get crowded on the shop floor, with the sys-roll serving as an ad hoc systainer storage unit:
View attachment 1
View attachment 2
The cabinets above the systainer ports were similarly stuffed to the gills:
View attachment 3
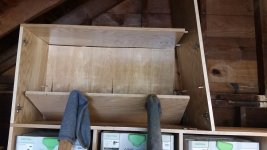
So I decided to squeeze a few more square feet out of the back cabinet and add some more systainer ports without sacrificing too much cabinet space. Fortunately I had built everything using only dominoes for alignment and pocket hole screws as fasteners, so it was really simple to dismantle the top unit:
View attachment 4
I was able to trim and recycle most of this material, though I did have to get one more sheet of red oak ply and edge it with red oak hardwood to match. I should note here that the HKC 55 was a real champ on this project -- the longer 670 rail was perfect for handling the 15 1/2" wide material out of which the cabinet is made.
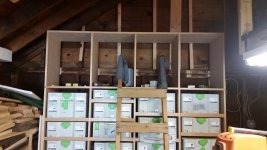
With everything temporarily pulled out of the cabinets and on the shop floor, I was having flashbacks to the chaos that had prompted me to do the original reorganization:
View attachment 8
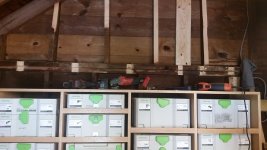
With the top cabinets disassembled, I took the opportunity to trim, notch and fortify the studs on the back gable -- the cabinet itself is plumb because of the base I built, but variations in the concrete floor and presumably the back wall made the cabinet butt into into the framing materials:
View attachment 5
View attachment 6
I again dominoed and pocket holed everything -- some I was able to do on the floor:
View attachment 7
But a lot was done in situ perched on a ladder. So for the systainer port expansion, I only had to make the top horizontal shelf and the dividers -- these were then just secured in place to the top of the existing systainer bay with dominoes and pocket screws:
View attachment 9
View attachment 10
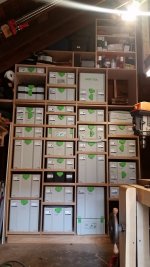
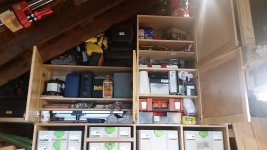
End result gave me room for the equivalent of another four Sys-5's with headroom to spare for handles or stacks of multiple systainers:
View attachment 11
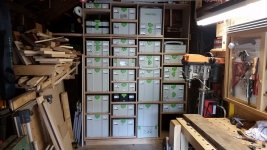
The new cabinet configuration on the upper portion is roughly the same amount of square footage as before -- I didn't measure the difference, but I've been able to put (almost) everything back that was up there, and also took the opportunity to weed out a few more items that were just collecting dust:
View attachment 12
View attachment 13
The cabinet is, however, 11 feet tall now, and so I am going to redo the 2x4 ladder to give me a few more feet so I'm not stretching above my head when I have to grab stuff from the very top.
As you can see, I've been able to squeeze just about every last square inch out of that back wall.
View attachment 1
View attachment 2
The cabinets above the systainer ports were similarly stuffed to the gills:
View attachment 3
So I decided to squeeze a few more square feet out of the back cabinet and add some more systainer ports without sacrificing too much cabinet space. Fortunately I had built everything using only dominoes for alignment and pocket hole screws as fasteners, so it was really simple to dismantle the top unit:
View attachment 4
I was able to trim and recycle most of this material, though I did have to get one more sheet of red oak ply and edge it with red oak hardwood to match. I should note here that the HKC 55 was a real champ on this project -- the longer 670 rail was perfect for handling the 15 1/2" wide material out of which the cabinet is made.
With everything temporarily pulled out of the cabinets and on the shop floor, I was having flashbacks to the chaos that had prompted me to do the original reorganization:
View attachment 8
With the top cabinets disassembled, I took the opportunity to trim, notch and fortify the studs on the back gable -- the cabinet itself is plumb because of the base I built, but variations in the concrete floor and presumably the back wall made the cabinet butt into into the framing materials:
View attachment 5
View attachment 6
I again dominoed and pocket holed everything -- some I was able to do on the floor:
View attachment 7
But a lot was done in situ perched on a ladder. So for the systainer port expansion, I only had to make the top horizontal shelf and the dividers -- these were then just secured in place to the top of the existing systainer bay with dominoes and pocket screws:
View attachment 9
View attachment 10
End result gave me room for the equivalent of another four Sys-5's with headroom to spare for handles or stacks of multiple systainers:
View attachment 11
The new cabinet configuration on the upper portion is roughly the same amount of square footage as before -- I didn't measure the difference, but I've been able to put (almost) everything back that was up there, and also took the opportunity to weed out a few more items that were just collecting dust:
View attachment 12
View attachment 13
The cabinet is, however, 11 feet tall now, and so I am going to redo the 2x4 ladder to give me a few more feet so I'm not stretching above my head when I have to grab stuff from the very top.
As you can see, I've been able to squeeze just about every last square inch out of that back wall.
Attachments
-
 20170629_165115.jpg186 KB · Views: 623
 -
 20170629_165024.jpg221.3 KB · Views: 443
 -
 20170628_101834.jpg162.3 KB · Views: 391
 -
 20170627_222237.jpg152.2 KB · Views: 396
 -
 20170627_213130.jpg253 KB · Views: 450
 -
 20170627_200713.jpg185.6 KB · Views: 400
 -
 20170627_132646.jpg170.6 KB · Views: 454
 -
 20170627_120501.jpg175.9 KB · Views: 410
 -
 20170627_114415.jpg157.9 KB · Views: 417
 -
 20170627_102333.jpg177.8 KB · Views: 434
 -
 20170627_085659.jpg289 KB · Views: 490
 -
 20170627_085629.jpg189.6 KB · Views: 568
 -
 20170629_165143.jpg179.1 KB · Views: 432
HarveyWildes
Member
- Joined
- May 3, 2016
- Messages
- 941
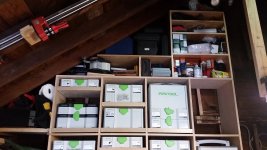
Looks like there is still a triangle about half way up the ceiling that you could use for maybe a #3 systainer.
I have this image of a systainer library with a rolling library ladder along the wall for reaching the high stuff. It would only take a few tweaks to your 2x4 ladder.
On the ridiculous extreme, perhaps a "soda vending machine" mechanism that moves in two dimensions along the wall to retrieve the systainer that you want. Then you just tell Alexa that you want systainer D-7 that's 9 feet up, and wallah!
ear3
Member
[member=60461]Bob D.[/member] It's an add-on accessory:https://www.amazon.com/Festool-497856-Auxiliary-Handle-Systainer/dp/B003ZX7UJS
Works for the smaller systainers when you want to carry them like a briefcase in a situation where you're only transporting a few to a job and don't need a sys roll or sys cart.
Works for the smaller systainers when you want to carry them like a briefcase in a situation where you're only transporting a few to a job and don't need a sys roll or sys cart.
Bob D. said:What comes in a Systainer with the carry handle mounted on the front?
Don't believe I have ever seen a Systainer with the handle on the front.
Middle column, half way down.
Similar threads
- Replies
- 52
- Views
- 3K
- Replies
- 25
- Views
- 2K
- Replies
- 8
- Views
- 397
- Replies
- 9
- Views
- 659