Osmo LED Smart Oil

Are you sure the UV curing unit is a full $4K for you? Dusty said in an Instagram comment on that same video that that the lamp was around 1K in Canada which seems wildly low...it's pushing 2K here in the US, but that might be from crazy tarrifs. Everything imported to the US is nutty expensive now. All Osmo products took a huge jump in the last year.

Have you checked with your Osmo dealer/rep for a price?
I haven't checked with Osmo yet, but yes unfortunately the single supplier is pretty expensive.

In Oz we get absolutely reamed on anything from Europe or the States. A local supplier has a much cheaper 25W Cuvo branded one, but my concern is that it's one of the Asian imports, it might be great or it might be ordinary.
 

Attachments

  • 500W.UV.Light.PNG
    500W.UV.Light.PNG
    495.9 KB · Views: 7
  • Cuvo.UV.Light.PNG
    Cuvo.UV.Light.PNG
    400.8 KB · Views: 7
Long ago, I went and helped a fellow FOGger take a dining table top to a local drawer factory. Monster facility and only makes drawers. He was having them run the table top through a UV curing machine. I hadn't heard of that at the time. Popped it on a conveyor, first booth sprayed the top from all sides leaving what looked like a goopy mess. Advanced to the next booth where iirc it vibrated the piece slightly. Third booth warmed it up for a bit (not super hot, but likely enough to ensure a good cure). Last booth was the UV chamber. It came out perfect. Been eager for some of that tech to be available for us. The shop guy pulled out a sample board that had fully cured. Ran an 80 grit sander on it for a while and you couldn't tell. Crazy.

The more crazy part was that we took the tabletop there, got it clear-coated, then drove to the customer's place and installed it. Nice.
 
Blacktail Studio uses a UV curing finish and he uses one heck of a fan cooled LED UV wand to do the curing. Vesting oil is what he calls it.
Cam uses the large $4k light I posted a pic of earlier in the thread, as well as the small handheld cordless one I've attached a pic of here that's $1k here in Oz.

The Cuvo branded ones I also attached a pic of earlier seem to be used professionally for the Clean Armor UV cured finish product (cures from 365nm to 405nm), and from reviews and videos appear to be legit good. Cheaper than the Osmo unit but still expensive I think:


I have been doing some digging and these dirt cheap units on Ali seem to have very good reviews, and the power output is incredible, the 800W in particular puts out 1100mW/cm2 and is $227AUD shipped:

https://www.aliexpress.com/item/1005008818386114.html
 

Attachments

  • Small.UV.Light.PNG
    Small.UV.Light.PNG
    661 KB · Views: 5
Last edited:
Blacktail Studio uses a UV curing finish and he uses one heck of a fan cooled LED UV wand to do the curing. Vesting oil is what he calls it.
Here is Vesting's page:

I think Cam also sells it.
 
So with bated breath and much excitement I await the arrival of the 800w UV light I ordered from Ali. Should be here today or in the next few days. I also ordered a Linshang Radiometer so I can measure the output.

No luck finding a local supplier of the Osmo LED Smart however which was what I really wanted, all the distributors I rang have never heard of it. I might call Osmo Aust and see what they can do.

I went and looked at a ton of videos and the Vestings seems to be really well regarded for holding up to use, and as luck has it a local supplier (Oslek Flooring) has their own branded version which I believe is the same formula licensed or maybe just re-labelled from Vestings. I'm picking up a 1L tin of the "Invisible" on the way home tonight so I'll ask them about that.

I'll be trying it over the weekend, and if it can hold up some abuse and I can get anywhere near the smooth tactile feel I currently get using Odie's Oils I'll be extremely rapt.

I can't understate how exciting this is for me, if it goes well this could be a massive game changer for me.
 
My can arrived just before the snowstorm and unfortunately sat in the freezing mailbox overnight. You won't have that problem in OZ. Popped it open to sniff - definitely doesn't smell Like regular Osmos products. I then just grabbed a paper towel and rubbed some onto a scrap of walnut. Grabbed the UV curing flashlight from Solarex I had and my glasses and tried to see if it would dry. It did. Now someone else can do something real.

Peter
I was wondering how you went with yours!

Do you reckon you try a hot cup of coffee on it, maybe spill some fresh hot coffee on the sample Peter to see if it leaves rings or water marks?

From what I've seen, Vestings is reported to be more robust in this regard than Osmo, but I'd love to know real world examples.

The fact that these are all zero VOC's is a huge bonus, and no lingering smells.
 
Perhaps I will actually try out a larger piece of "rustic" walnut I picked up a couple of years ago. $200 for 200 bd feet. I didn't dry anything on my finger, but, like I said, I just wanted to really see if my little flashlight would work. Last thing I would want to do is purport to show something as less than acceptable if my parts of the equation were the cause. That just wouldn't be right.

Peter
 
OK. Tried out the Osmo LED Oil today on a piece of walnut. I did it upstairs in my 68 degree multi purpose room. Walnut and oil were all at the same temp. Walnut sanded to 180 using ETS 125. Vacuumed and wiped with fresh clean microfiber. Finish was stirred well per the instruction.

Finish is thicker than regular hard wax oil. Too thick to really brush on. Instructions say to use a microfiber roller - I didn't want to waste a roller for this little bit so I started with a quality foam brush. Much more effective to drip finish off of stir stick then rub in using white woven pad. The finish doesn't seem to soak in as far as regular. So, how well you rug in and wipe will determine how smooth the finish will be. Cured with a Solarex flashlight that has about a 1 1/2 diameter beam. Obviously a larger more powerful light would be be the choice for real work. Curing time for each side was between 3 and 4 minutes.

Sanded / scuffed between coats with maroon woven pad. Instructions call for 320 grit. Wiped clean with microfiber cloth. Left side received three coats, right side received 2 coats. There is a film aspect to this finish as shown by the ridge where the masking tape was removed. There is a slight remaining odor after cure. Too early to say how long that lasts.

Rubbing you hand on the finished board you can feel the wood texture - no plastic film feel. The side that has three coats does feel smoother to the touch than the two coat side.

Liquid Test - Tested both sides with both regular Coke and red wine for 10 minutes. After wiping off there does not seem to be an appearance difference. Washing with water didn't harm either.

Photos with captions:

IMG_6166A.pngIMG_6168A.pngIMG_6173A.pngIMG_6175A.pngIMG_6176A.pngIMG_6177A.png
 
@peter halle That's a great looking result, thanks for the detail Peter!

From what I can see the buildup looks to be a ridge from along the edge of the tape, with the rest looking to be thinner?

If you can please try a hot cuppa on each side next, I'm really curious to see if it gets heat marks or rings?

My lamp might be delivered today with a bit of luck! I picked up the Led Oil yesterday and the lady did a demo for me, it's just insane rubbing a coat of oil on timber and 3 seconds later under the lamp it's fully cured, just amazing!
 
Well the UV light (the longer one at the rear in the attached pic) and the Radiometer from AliExpress were both delivered a short while ago. Too late tonight for me to test the finish but I measured the UV output from the 800W UV light.

At 500mm distance it put out a pretty respectable 73mW/cm2, and at 200mm the meter measured 155mW/cm2.

According to the video by Suman posted earlier here, the finish needs a total of 450mW/cm2, so at 200mm, it's within the 3 seconds to cure window.

Tomorrow I'll get the sander out and do some testing with the finish and post the results, and confirm if the UV light does in fact work as good as it theoretically seems it should.

Osmo recommend the UV light be held at a distance of 100-150mm above the timber surface at a rate of 5 seconds per foot, so to cater for the waving around effect on the output, I waved the light back and forth slowly around this distance and the meter measured a pretty decent output of 339mW/cm2!
 

Attachments

  • AliExpress.1100mW.UV.Lamp.PNG
    AliExpress.1100mW.UV.Lamp.PNG
    444.2 KB · Views: 6
  • AliExpress.1100mW.UV.Lamp.UV.Output.500mm.jpg
    AliExpress.1100mW.UV.Lamp.UV.Output.500mm.jpg
    504.6 KB · Views: 7
  • AliExpress.1100mW.UV.Lamp.UV.Output.200mm.jpg
    AliExpress.1100mW.UV.Lamp.UV.Output.200mm.jpg
    448.6 KB · Views: 6
  • AliExpress.1100mW.UV.Lamp.UV.Output.100-150mm.jpg
    AliExpress.1100mW.UV.Lamp.UV.Output.100-150mm.jpg
    365.8 KB · Views: 5
Last edited:
Well, a coffee mug of boiling water straight from the microwave standing for 10 minutes had no effect. Ice cube and water (to simulate a sweating glass) had no effect after 30 minutes. Dog nails (also called Golden Retriever talons) indented the wood but the finish didn't powder like a scratch. Maybe tomorrow I will attempt a repair to see how it blends. (might be interested in a floor situation.)

Peter
 
Wow that's a fantastic result, and exactly the sort of thing I'm after! Thanks for testing that Peter!

Ok so the Osmo LED oil lives up to the hype, that's really good to know. Today I'll test the Vestings. It does look to be a thinner solution than the Osmo from what I've seen.
 
Last edited:
My apologies for the delay on a review.

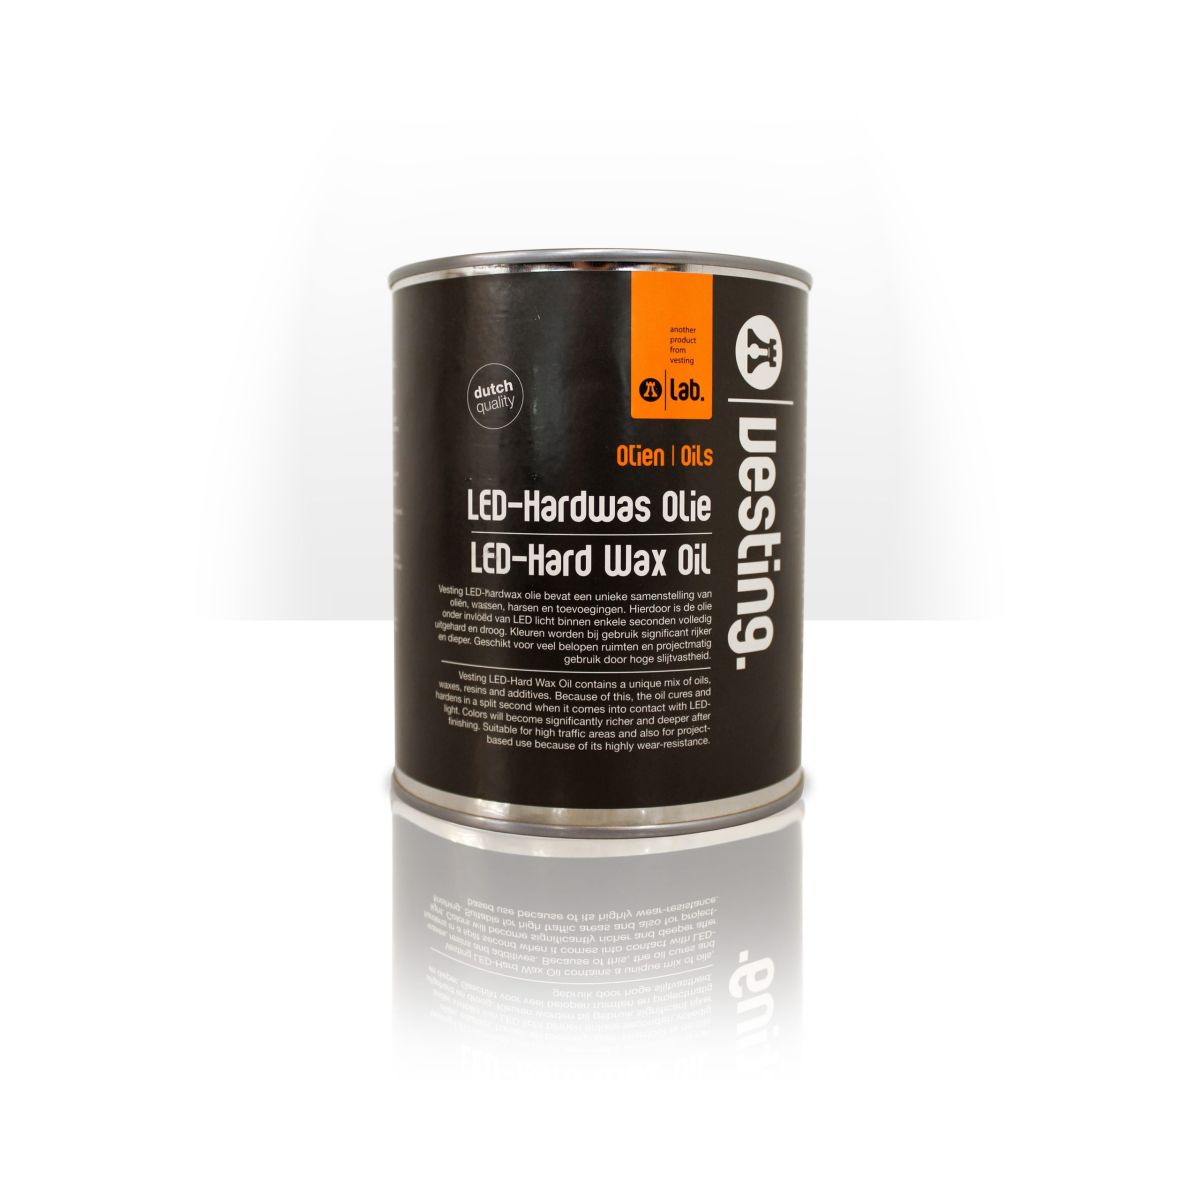
First: the UV oil is much thicker than Polyx, or most any finish I've ever used. It's important to warm the oil. I put the can by the woodstove, but you could just as easily put it in a can of warm water. 70-80 degrees F is recommended.

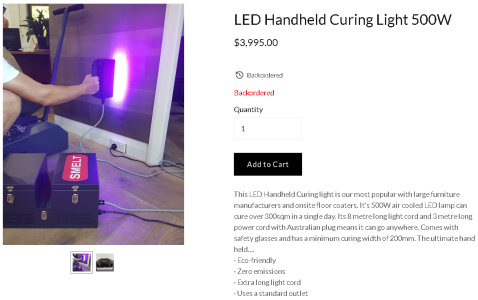
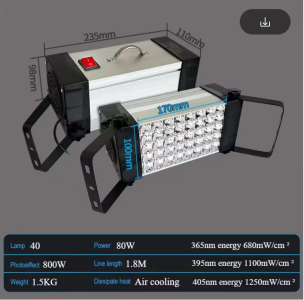
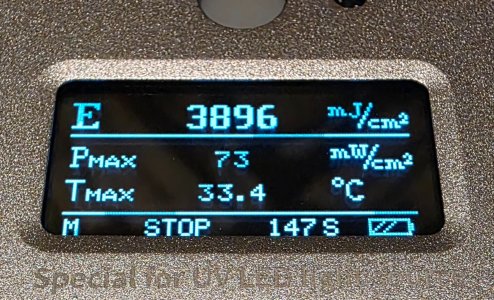
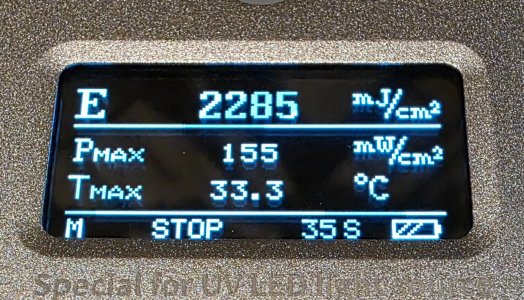
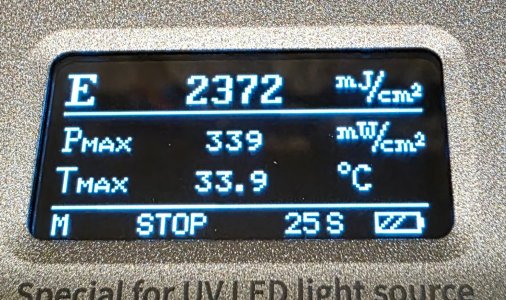
The Osmo light is ROBUST. Ballpark 10 pounds, in a metal case, transformer with fans, 500 watts of LED power. The provided glasses are quite dark, and I turned on every light in the house and also used an industrial headlamp on my noggin. The Osmo lamp is so powerful that it would be easy to burn the surface if you kept it one place, which of course you shouldn't! Cure was almost instant. There's a very slight color shift in curing on wood that really shows up with any finish on blue masking tape. I experimented with running the lamp over the UV Oil much faster than recommended, and it still cured solid. Instantly. Just amazing.

I first tested the oil on some high quality plywood sanded to 180, then followed that up with Doug fir, Alaska yellow cedar, and Western hemlock counters in my home. The fir was new and sanded to 180, the cedar and hemlock counters already had Polyx a handful of years since last application and I sanded at 320.

My first round of rolling on the UV Oil left a bumpy surface, using a mini 1/8" nap roller, high quality roller for enamels, varnishes, etc. Wanting a smooth surface, I dug deeper and found my Osmo mini rollers, and those leave a better surface, but still a little bumpy with vigorous rolling. Of course Polyx and Top Oil (same basic product just different packaging) are a wipe down finish, and being a thinner product, there's a good chance your usual method of wiping down won't work with the UV oil—as the UV oil is just too thick. I love the high quality 3M blue shop towels from Napa Auto for wiping down Polyx. That doesn't work for the UV oil, as the towel is slowly torn apart, leaving little blue felt-like pieces. I also tried high dollar cotton rags that were also amazing for Polyx. Also no good.

Achieving a final surface that is completely smooth was not easy. I'm picky as heck, being a fulltime woodworker of 30 some years. I want smooth, really smooth. The only way I was able to achieve that was to sand between coats with 320, then apply an almost dry Osmo mini roller to the surface to coat ultra thin, then go back and forth in alternating diagonal, with-grain, and counter-grain directions. I'm talking aggressive, darn near aerobic exercise kind of rolling. In short, whatever finish is there when still wet is exactly what you get after waiving the magic UV lamp to cure. Polyx is much more forgiving of minor texture or even a little sloppiness.

I left a couple counters in my home with the tiny tiny texture (as a test, and knowing I can sand at 320 and refinish later.) My family (not woodworkers) barely noticed, even after I said something. But they oooohed and aaahed at the smooth smooth finish I left on the Doug fir.

After texting with my Osmo rep—who is amazing and will always go the distance to help—I ordered the Osmo Easy Pads, which are just a branded very high quality lint free rag. Unfortunately I had no lint free rags, and being in Alaska, I couldn't have any get here for a week. The Osmo Easy Pads are on the way, and I'm fairly confident that will fix the issue. I'll report back on my next test.

All in all, I'm almost happy, but have the one last hurdle to get to a full smooth surface quickly. The online videos and instructions don't convey the difficulty I ran into with achieving a fully smooth surface. But heck—full disclosure here—finish has never been my strong point, despite woodworker being my livilihood for decades. Like the UV oil finish...maybe I'm just a bit thick. ;)

Final thoughts: The instant cure felt miraculous. And zero curing during application and even in the roller tray was also very different. Sanding immediately after curing the first coat—full on revolutionary.

As for water beading on the cured UV Oil finish...Polyx leaves more of a huge water bead, as if it has a bit more wax. Wiping water off with a rag from the UV Oil finish leaves more tiny water droplets than on Polyx. Apparently it's 100% acceptable with Osmo to top coat the UV Oil with Polyx or any other interior Osmo product, if desired. Yeah then you have the curing issue in days, but a super thin top coat of Polyx would barely leave an odor after a couple days.

Speaking of odor. The uncured UV Oil has a smell. Some people report a headache without a respirator. I didn't mind it, and I'm fairly sensitive to odors. Once the magic UV lamp is waved and finish is cured, there is zero discernable odor. My family was out of town during my work, and my wife smelled nothing on coming home a day and a half after I finished the counters. And she could pretty much smell a drop of curing Polyx from 100 yards.

I'm fairly confident I'll get the ultra smooth surface I'm after with a little more learning curve. Hopefully the Osmo Easy Pads are just what I'm looking for. I'll report back when I know more.
 
For application, consider a sopping wet white abrasive pad. It survives and distributes it pretty well. Stick it on a sander/buffer if you're lazy, but I did it by hand for test pieces and it was fine. With the thinner application, you can use the blue shop towels to wipe off excess without it ripping. Once cured, it sands very nicely - I left gloved fingerprints many a times during the test - and it's quite repairable. I know the TDS says one coat for matt, two for satin, but if you're going to repair it, it's always going to be satin because you'll have two+ coats everywhere. It doesn't turn gloss, even with paper bag buffing.

I did apply some to trivets and with heat + glass, things just slide off it. Definitely smooth.
 
As woodferret above said, the non-abrasive white woven pads are generally the best way to buff the finish in, with a wipe to get off the excess. I'm using the Vestings atm, which looks a little less viscous than the Osmo, but buffing it in with the white pad, letting sit for around 45min, and then gently wiping off excess and curing I get a fantastic finish.

One thing I found really effective to get rid of any tiny "fuzzies" or to just give a super smooth finish, is a foam nail sanding block my wife had, one of the sides has a super fine grit that I guess is at least around the 1000-2000grit range, and a few wipes along the grain result in an incredibly smooth result and it leaves no marks of any kind.

Overall, as I perfect my technique, I'm increasingly happy with the results. This is such a game changer!
 
Back
Top