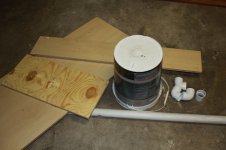
I recently built a Thien Baffle dust separator from a few spares I had at home.
Apart from the paint scheme (which probably was not necessary), I had all the components as spares / left-overs in the garage (and I had to buy the 3 elbows - c R 25 for all three (c US$ 2.00).
I firstly built the box which took a while (I also made notches that it can lock onto the dust extractor) while the lid is held in place with 4 x 8 mm rods & home-made star wheels (with a nut glued into the bottom).
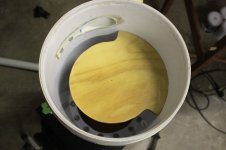
Building the Thien Baffle was actually quite quick. I set my bandsaw table at the same angle as the sidewall of empty paint bucket to ensure the baffle will be horizontal once installed. It is then simply attached with 5 screws from the outside. The baffle was designed at 240/120 degrees (as per Mr Thien's original) but I just guessed how wide I should cut it out - but it seems to work better than I expected.
Attaching the inlet pipe was not too difficult either: I firstly cut the 50mm drain pipe to roughly follow the outside diameter of the paint bucket and then traced the shape onto the bucket. I then drilled a hole & the coping saw finished the job. The two bolts & nuts made sure the pipe stayed in place while applying glue with the hot glue gun.
The bottom of the bucket was simply cut out leaving c 20mm rim to attach it onto the box (which got the same sized hole). Lots of screws & silicon ensure a tight seal.
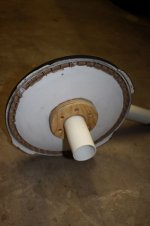
The paint bucket lid got two plywood disks to support the extraction pipe, but the disks were kept relatively small since I wanted to retain flexibility in the lid for mounting & removal if necessary. (In hindsight I should maybe have made them bigger for more rigidity).
Lastly, to make sure the hose fitted over the inlet pipe, I wrapped masking tape around the pipe until I got a tight fit. (Same was done where the pipe enters into the Dust extractor).
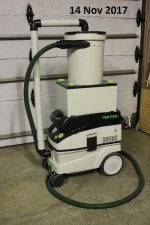
I completed it on 15 November last year, and this weekend I opened it the first time - I was amazed to see how much dust I made in such a short space of time!
Seems to be working very well!
[attachimg=6]
[attachimg=5]
[attachimg=6]
[attachimg=7]
[attachimg=8]
Apart from the paint scheme (which probably was not necessary), I had all the components as spares / left-overs in the garage (and I had to buy the 3 elbows - c R 25 for all three (c US$ 2.00).
I firstly built the box which took a while (I also made notches that it can lock onto the dust extractor) while the lid is held in place with 4 x 8 mm rods & home-made star wheels (with a nut glued into the bottom).
Building the Thien Baffle was actually quite quick. I set my bandsaw table at the same angle as the sidewall of empty paint bucket to ensure the baffle will be horizontal once installed. It is then simply attached with 5 screws from the outside. The baffle was designed at 240/120 degrees (as per Mr Thien's original) but I just guessed how wide I should cut it out - but it seems to work better than I expected.
Attaching the inlet pipe was not too difficult either: I firstly cut the 50mm drain pipe to roughly follow the outside diameter of the paint bucket and then traced the shape onto the bucket. I then drilled a hole & the coping saw finished the job. The two bolts & nuts made sure the pipe stayed in place while applying glue with the hot glue gun.
The bottom of the bucket was simply cut out leaving c 20mm rim to attach it onto the box (which got the same sized hole). Lots of screws & silicon ensure a tight seal.
The paint bucket lid got two plywood disks to support the extraction pipe, but the disks were kept relatively small since I wanted to retain flexibility in the lid for mounting & removal if necessary. (In hindsight I should maybe have made them bigger for more rigidity).
Lastly, to make sure the hose fitted over the inlet pipe, I wrapped masking tape around the pipe until I got a tight fit. (Same was done where the pipe enters into the Dust extractor).
I completed it on 15 November last year, and this weekend I opened it the first time - I was amazed to see how much dust I made in such a short space of time!
Seems to be working very well!
[attachimg=6]
[attachimg=5]
[attachimg=6]
[attachimg=7]
[attachimg=8]