Parf Guide Inspired Workbench - Making Slow Progress

HarveyWildes

Member
Joined
May 3, 2016
Messages
984
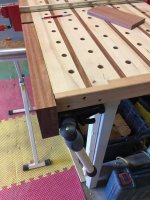
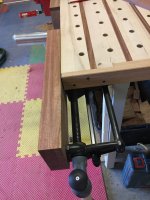
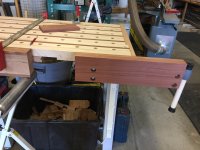
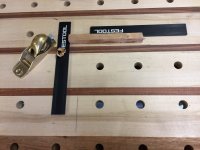
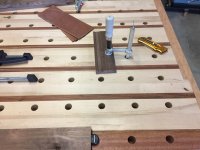
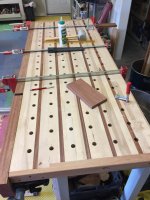
I'm making slow progress on my new workbench, which used the Parf Guide System to drill holes in the top.  The top of the front apron will eventually have a row of holes matching the rest of the bench, and also the vertical surface of the apron will as well for planing.
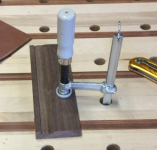
 

Attachments

  • Bench1.jpg
    Bench1.jpg
    637.1 KB · Views: 1,907
Whoops!  I hit the post button before adding info about the vise.  I decided to add the Veritas tail vise to this bench because it looked considerably easier than a traditional tail vise.  It was very easy to install, but you do have to pay attention to the installation instructions to make sure that the vise travels exactly parallel to the front of the bench.  The vise jaw is 2" thick, and about 5" wide.  Note how far down the bolts are on the jaw - that reflects how far down the mechanism extends.  The bench top is only 1.5" thick, so for a thicker bench, the jaw would have to be that much wider.

The jaw is made of jatoba.  The apron is made of cherry with jatoba laminated on top and bottom for strength.  both the apron and jaw will have jaw pads of Jatoba screwed in and countersunk so that they can be replaced if needed.  The breadboard ends are cherry, and the top is alternating granadillo and soft maple.  I used some pallet oak for hidden structural pieces.  The jatoba was supposed to be granadillo, but I picked up the wrong board because I was in a hurry :).  At least the jotoba is plenty hard and will be up to the task.


Attachments

  • bench2.jpg
    bench2.jpg
    677 KB · Views: 1,127
  • bench3.jpg
    bench3.jpg
    768.4 KB · Views: 1,153
  • bench4.jpg
    bench4.jpg
    581.1 KB · Views: 1,189
All the top holes are drilled using the Parf Guide system, and the top is done aside from finishing.  Haven't drilled the apron side holes yet.

I did in my C18 drilling the top holes in the apron, per another post.  Finished it up with a Milwaukee M18 drill that started getting a little hotter than I liked, and finally finished up with a DeWalt 20V (not brushless).  When using the Milwaukee and DeWalt drills I used the 20mm bit that came with the Parf Guide to drill the tops of the holes, but it is enough shorter that I could not get the full depth and had to do a second pass with the Centrotec version of the bit.

I was going to add on a Moxon vise, but the Veritas tail vise seems to hold boards firmly.  We'll see how it does in use.

Here are some pictures of MFT clamps and dogs on the bench.


Attachments

  • clamp1.jpg
    clamp1.jpg
    643.7 KB · Views: 961
  • clamp2.jpg
    clamp2.jpg
    576.8 KB · Views: 873
  • clamp3.jpg
    clamp3.jpg
    610.6 KB · Views: 988
Edward A Reno III said:
Coming out great. How square is the hole pattern?

I drilled all of the holes except those in the apron about two months ago (?) or so.  At that time they were pretty much as perfect within the limits of my ability to measure.  When I came back to drill the apron, I checked out the Parf guide on the holes to see how they fit.  With the grain the fit was still perfect on the 5-10 holes that I tested.  Cross the grain the fit was maybe .1mm or less off, I presume due to wood movement.

Wood movement in Colorado is minimal due to the low average humidity, so that helps.  Most wood shrinkage occurs between 100% and 60% relative humidity.  Colorado humidity averages lower than 60%. http://festoolownersgroup.com/building-materials/wood-shrinkage-in-colorado/msg497873/#msg497873
 
I was just reflecting on how since I finished my bench last Fall with the integral vises, and in particular the benchcrafted wagon vise, I can count on one hand the number of times I've had to resort to the clamping elements, which, prior to the bench, were my most frequently used clamps.

It's amazing how much of a difference a customized bench makes.
 
HW - I see you're using your Festool clamps...with the 'inch and a half' thick  top did you have to open up the holes underneath to allow the clamps to fit in or use a round over bit? I'd be interested to know how they work... Sometimes even on mine (not as thick) it's a challenge.
Thanks
 
Vondawg said:
HW - I see you're using your Festool clamps...with the 'inch and a half' thick  top did you have to open up the holes underneath to allow the clamps to fit in or use a round over bit? I'd be interested to know how they work... Sometimes even on mine (not as thick) it's a challenge.
Thanks
Where do you see him using Festool clamps? I dont think he can with an 1.5" thick top. That was why I asked how thick it was. As I understood it the Festool clamps can only be used with a tabletop thickness of around 3/4" or less, like the MFT/3 has.
 
I think he disassembles the clamp and inserts it from below, note the pin in the end of the clamp in this photo.

[attachimg=1]

RMW
 

Attachments

  • ScreenClip.png
    ScreenClip.png
    367.8 KB · Views: 3,371
Richard/RMW said:
I think he disassembles the clamp and inserts it from below, note the pin in the end of the clamp in this photo.

RMW
Good catch. I think you might be right. Kind of a pain, but nice to get the advantages of using clamps like that AND a nice thick work top.
 
Vondawg said:
HW - I see you're using your Festool clamps...with the 'inch and a half' thick  top did you have to open up the holes underneath to allow the clamps to fit in or use a round over bit? I'd be interested to know how they work... Sometimes even on mine (not as thick) it's a challenge.
Thanks

I tried opening up the holes underneath and found that it simply does not work - at least not leaving a good 3/4" deep hole from the top for dogs, etc. to grab.  The person who suggested that I dissembled the clamps and insert them from below was correct.  Given that, they still work great.  You just have to make sure that you don't fill the space immediately below the top (for ~ 6" or so) with drawers and such.
 
HarveyWildes said:
I tried opening up the holes underneath and found that it simply does not work - at least not leaving a good 3/4" deep hole from the top for dogs, etc. to grab.  The person who suggested that I dissembled the clamps and insert them from below was correct.  Given that, they still work great.  You just have to make sure that you don't fill the space immediately below the top (for ~ 6" or so) with drawers and such.

Bessey just introduced clamps with workbench-adapters for most of the hole-systems in use. It is modular, eg you buy a base for the hole diameter you use and the clamp that attaches to it is sold separately.

Unfortunately Bessey's website is not working properly, but the downloadable new catalog is available. The new Workbench adapters and Clamps are on page 113-115.
 
Bert Vanderveen said:
Bessey just introduced clamps with workbench-adapters for most of the hole-systems in use. It is modular, eg you buy a base for the hole diameter you use and the clamp that attaches to it is sold separately.
This one?

[attachimg=1]
It has one limitation. The leverage is too great for thin MDF top and will deform the hole. Will work fine in steel welding table or thick wood bench.
 

Attachments

  • 00019754_0.jpg
    00019754_0.jpg
    37.5 KB · Views: 2,994
Yep. But the illustrations in the catalogue show the system in use with what looks like material that is about 40 mm thick. Which would suit the OP.
 
Back
Top