Part 1: Routing/Milling 80/20 for Festool clamps using an MFS & a 1010

Michael Kellough said:
[member=44099]Cheese[/member]  What speed did you use?

Am I wrong in thinking that cutting the number of flutes in half is equivalent to cutting the speed in half? That should make a difference too?

[member=297]Michael Kellough[/member]  I can't remember the setting because I did it by sound/feel. Just like what you do with a mill you just dial it up or down until everything sounds & feels right.

I do know it was somewhere under 4 or so but it was also not at the minimum. I was really surprised because I had some terrible chatter down around 1 & 2.

In order to maintain the same chip load and the same feed rate, reducing the flute count by 1/2 would increase the bit speed by 2X.

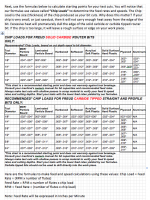
Here's the formula that Onsrud and Freud use.

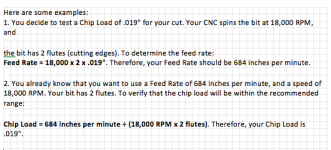
Chip Load = Feed Rate / (RPM x # of cutting edges)
Feed Rate (IPM) = RPM x # of cutting edges x chip load
Speed (RPM) = Feed Rate / (# of cutting edges x chip load)
 
[member=44099]Cheese[/member]  never saw that formula, thanks. So, how do you figure out what the chip load should be? Is there a table?
 
Michael Kellough said:
[member=44099]Cheese[/member]  never saw that formula, thanks. So, how do you figure out what the chip load should be? Is there a table?

Ya I’ll try to locate the Freud chart because it’s handier to use than the Onsrud chart. The Onsrud chart lists every chip load for every end mill they manufacture. The Freud is more generic in nature while using the same math & numbers.

The chip load is the actual size of the chip that will remove the maximum amount of heat from the  flutes of the router/milling bit. If the chip is too small (think dust) the heat removed will be minimal.
 
I use the single O flute router bit that Cheese refers from Toolstoday when I rout aluminum doors for exit devices.  I use my 1400 at about speed 4 and use WD-40 as lube.  I take very light cuts as far a depth is concerned as I seem to remember breaking the first two bits I tried.
 
Found it [member=297]Michael Kellough[/member]

This is the Freud version. The Onsrud version has more materials for instance, they break plywood into hardwood ply & soft wood ply.

[attachimg=1]

[attachimg=2]
 

Attachments

  • Router Bit Chip Loads 1.png
    Router Bit Chip Loads 1.png
    212.8 KB · Views: 588
  • Router Bit Chip Loads 2.png
    Router Bit Chip Loads 2.png
    58.8 KB · Views: 597
[member=44099]Cheese[/member]  this is great! Thank you! Never knew how to find a starting point so always just went by ear and started slow, which sometimes ruined the bit/work right away.

Based on the chip loads presented, I usually feed way too slow.
 
I finally got around to doing a test piece based on a modified version that Richard showed, using t-nuts and screws to hold the guide pieces to the extrusion and then clamping my extrusion to the table from underneath. I had these guide pieces made up for awhile, but never got around to testing it.  Then a week or so ago a Woodpeckers Variable router jig came up for sale in he classifieds so I purchased it, but decided to stick with the plan I already had.

I will be milling slots in 1515 and 1530 profiles, so I made top guide pieces to allow for use on all sides. 

I used a 1.25” guide bushing and a .25” diameter cutter, but it doesn’t fully remove the entire lip in the channel.  Also, I guess my baseplate isn’t quite centered, so I need to re-adjust that.

This is the cutter I ordered, before the recent posts on using a 0-flute bit.

SpeTool 12411 4 Flutes Carbide CNC Square Nose End Mill, 1/4 inch shank diameter, 3 inch Long, Spiral Router Bit with Coatedhttps://www.amazon.com/dp/B07Q4J4HVB/ref=cm_sw_r_cp_tai_XjClEb6SMKTXW

After re-adjusting the baseplate I need to figure out if I want to leave the little bit of lip, or get a 1.0” guide bushing to allow more material removal. Or, a larger 5/16” diameter cutter. 

32786f4d80dd5a357795f08e96cf01db.jpg


f68b7e50788af1459ae5da5d26389720.jpg


Sent from my iPad using Tapatalk
 
Back
Top