Plantation shutter madness

Making progress!

Those TSO stops are pretty slick -- hadn't seen those before.  For situations like dominoing the edge of a long narrow piece basically use the same setup as you do with the clamps, except in place of the TSO I use the veritas stop fences -- they have a lower, sub-1/4" profile, and so when I move over to handplaning or sanding they allow me to work on thinner pieces:http://www.leevalley.com/us/wood/page.aspx?p=69837&cat=1,41637

 
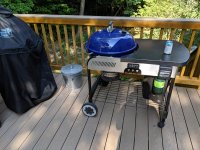
Not much shop time as we prepare for my son's 2nd birthday today. I did do a little Weber kettle maintenance though.

I decided to dry fit the shutters and label the matched parts. It's a pretty great feeling when you grab parts from a pile and they all go together perfectly. Lots of sanding ahead of me but I can start to see the finish line. These 36" quick clamps from Bessey I received as a gift for my upcoming birthday came in real handy for fitting each shutter together. Easy to give the handle a little squeeze at a time as you line up all the louvers.

i-XcPkDmK-4K.jpg


i-7h73dKk-4K.jpg


i-K7rhWkB-4K.jpg


i-4RNsRTn-4K.jpg


And the obligatory Weber picture
 

Attachments

  • IMG_20190729_170539.jpg
    IMG_20190729_170539.jpg
    4.1 MB · Views: 560
Looking good, you've got some time into these already and a ways to go but they are looking great. Yeah, it's nice when you can pick up a random set of pieces and they all fit together like they were milled and fit for each other. You've got your process and machine setup tweaked I would say.

Good to take a break today and spend some time with your Son on his birthday.
 
Sparktrician said:
DynaGlide said:
And the obligatory Weber picture

What's that wearing the burka to the left of the "obligatory Weber"?  [big grin]

[member=7493]Sparktrician[/member] Why do I get the feeling you already know the answer to this question  ;D
 
Finally getting off my butt to make a push to finish these up. I've been avoiding the sanding task as I just couldn't figure out a good way to do it. The stiles all have a beading profile on them and I knew I'd have to be careful not to sand off the rounded portion of the bead. I already partially did one on accident so I stopped what I was doing and came up with a fix.

I took one of the scrap test stiles and routed out a rabbet so when clamped it would cover the beading detail and provide a shoulder for my sander to butt up against. Works great. Now just wish I owned the RTS400. I have to do two sides of 16 stiles. . .so 32 times probably starting at 180 and going up to 220. . .hmmmmmm might be time to start shaking some piggy banks. [member=7493]Sparktrician[/member] I know you have every Festool ever made. .mind if I 'ahem' borrow yours?  ;D

i-JxJjsnL-X4.jpg


i-Nbxtv9r-X4.jpg


i-m5M2S6S-X4.jpg
 
DynaGlide said:
Finally getting off my butt to make a push to finish these up. I've been avoiding the sanding task as I just couldn't figure out a good way to do it. The stiles all have a beading profile on them and I knew I'd have to be careful not to sand off the rounded portion of the bead. I already partially did one on accident so I stopped what I was doing and came up with a fix.

I took one of the scrap test stiles and routed out a rabbet so when clamped it would cover the beading detail and provide a shoulder for my sander to butt up against. Works great. Now just wish I owned the RTS400. I have to do two sides of 16 stiles. . .so 32 times probably starting at 180 and going up to 220. . .hmmmmmm might be time to start shaking some piggy banks. [member=7493]Sparktrician[/member] I know you have every Festool ever made. .mind if I 'ahem' borrow yours?  ;D

Well, [member=65062]DynaGlide[/member], I really don't have every tool Festool ever made.  I just have those that I use.  I do have the RTS 400, and if you need to borrow it, you know how to get in touch.  [smile]
 
Hi my name is Matt and I have a problem. I bought another tool.

After trying to sand these stiles with what I had (ETS EC 125 and Pro5) I realized the RTS 400 REQ would probably work better and it's like it was designed for this task. Using the included edge guard and my scrap piece as a buffer to keep the sander away from the beading profile, it's just perfect. Maybe I'll actually finish these soon?  [big grin] I know, time to join the comedy tour.

i-frnw5FM-X3.jpg
 
You are doing a good job, the shutters look great!  I put them in all the windows of my last house but haven't started them in this one.  I put in new plantation blinds in both houses and made the shutters when the blinds started to yellow in the last one.  Hopefully I will get the other projects complete and make them for this one too.

I made a jig like norm uses to staple the control rod to the shutters.  I used MDF for most of them but used softwood for the center where I used a screw instead of a pin to help hold the shutters dimensions.  I don't remember what I did at the corners, I did not have a domino then so it wasn't that.  I might have made loose tenons with a plunge router.  As you said, the big issue is all the louvers.  It takes awhile if you do not have a shop set up to machine them and then sand them, including after finish is applied.

I used white tinted Resisthane and their primer on mine.  It worked very well.  Very durable and easy to apply.  I am using the same finish on a crib now, changing table is complete and crib is done except for final sanding and then finish.  Everything has been sanded but assembly and a few weeks time means it needs a bit of touchup. 

Anyway, good job. 
 
Painting has started. This is new territory for me. I'm doing the best I can with the SW Wall and Wood primer through the Fuji Q5 T75 w/ 3M PPS 2.0 setup. The finish comes out gritty but sands smooth with 320 by hand. I'm only on my first coat with the louvers. Still have to do the rest of the parts.

i-WS4HR4F-X2.jpg


i-3sgdWf4-X2.jpg


i-RTtNzs8-X2.jpg
 
I'll check in after I get a second coat on with the results before I do any top coats. I need these to turn out.
 
Looking real nice, Matt. I admire your tenacity on this job. My daughter-in-law got tired of waiting for me to build her some shutters.  She went ahead and ordered some. And I'm glad she did.  Not sure I'd be able to handle a job like that.
 
I am unfamiliar with the products you are using but grain raising after the first coat is the normal response to water based finishes like I use.  It raises with others but not as much.  So you have more sanding to do after the first coat.  Putting shellac (alcohol solvent) on first helps a little but isn't worth the extra step IMHO.  Shellac is great about sealing in knots in softwood, however.  If the primer I used did not also have that attribute I would use a coat of sheallac.

When spraying, I try to resist the tendency to get the finish glass smooth because it inevitably leads to runs when I try.  I prefer a little rougher result and no runs.  With good light, you can see the difference but it is also a bit of a feel that you may develop. 
 
[member=61023]BarneyD[/member] Thank you. I'm questioning my sanity every step of the way.

[member=45813]JimD[/member] thank you for the pointers.

I put the first coat on the rest of the parts:

i-29W69qX-X2.jpg


i-DthKZtT-X2.jpg


For the 2nd coat on the louvers I decided to up my game a bit using a cheap turntable off Amazon:

i-mChXBDC-X2.jpg


After letting the 2nd coat dry for a bit I'm really happy (surprised) with the result:

i-QcVBHCM-X2.jpg


It's so smooth I don't even think it needs any sanding. The more I spray the more comfortable I get with technique and mixing. This is all new to me. I'm the last person you'd want to paint a room for you but for some reason if you give me an expensive tool I can figure it out. Brushes and rollers and me just do not get along.
 
I see some familiar looking green knobs and fence dogs in the pictures - glad that they're apparently working well for you.
 
DynaGlide said:
I'm the last person you'd want to paint a room for you but for some reason if you give me an expensive tool I can figure it out. Brushes and rollers and me just do not get along.

Are we related?  [tongue] 
 
Back
Top