ear3
Member
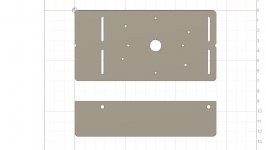
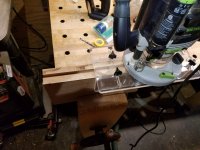
Working on a commission where I have to do a bunch of spline joints in 2" thick boards, so since I have the Shaper, thought I'd work up my own version of the Routing Aid OF-OH 2200, which these days goes for $365 [eek].
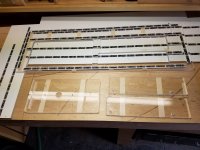
Materials were a 12x36 sheet of 1/2 cast acrylic, a bag of 1/4-20 dowel nuts, with a thickness of .472" so that they didn't protrude from the sides, and some 1/4-20 knobs, all from McMaster Carr. Total materials cost was $90 before tax and shipping.
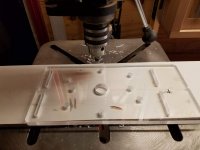
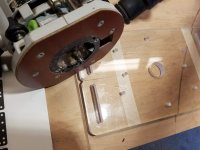
Did holes in two positions each for the 2200 and the 1400 router, and made the opening 30mm, enough for a 1" bit. I was considering making the opening wider to accommodate a 1 1/4" bit, but I don't know when I might want to edge rout a groove that wide -- if I ever need to, I can knock off another jig base now that I have the design.
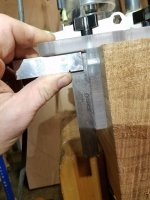
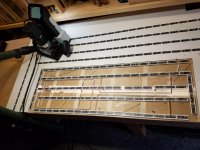
Made the design in Fusion 360. I didn't have exact measurements for the OEM jig, other than knowing that the material was 1/2, but I saw enough pictures to eyeball reasonable proportions and positioning. Ended up making mine 14x7, with 3 1/2" sides. The only tricky part was getting the positioning right on the drill press to add the holes into the edge of the sides for the knobs. I initially hit the mark on only 2 of 4, and so had to expand the hole on the other two with a 17/64 bit to make sure the knobs lined up with the dowel nuts. I also should have ordered 1 1/4" long knobs, rather than the 1 1/2" ones I ended up using -- instead of cutting them off shorter, I simply lengthened the hole on the underside of the cross-dowel nut. I figured this would make the fit a bit more snug in any case.
I didn't include the extra vacuum hole in the back -- I figured that if dust collection were an issue, this could always be added later assuming I can get a similar dust port part as on the OEM jig (they don't seem to sell this as a separate part). In any case, tests with the 2200 thus far have shown superior dust collection, so I'm not sure I'll even need to make the modification.
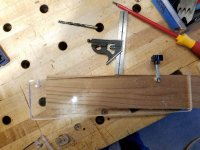
The one additional feature I added was a notch on center at the front and back of the jig to line it up with the center of the board. I didn't add any kind of scale with which to set the sides, but I figure I will almost always be edge routing on center, and on those rare occasions where I have to go off center, I'm sure it will be simple enough to set the jig manually.
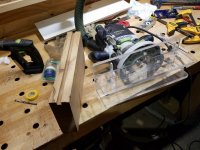
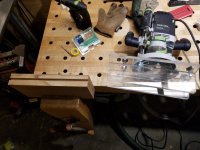
Tests thus far have been a success -- real application will begin sometime next week once I finish dressing the boards designated for work with this setup.
I'll probably be adding a post to the Shaper Origin forum with all the specs and files, but feel free to send me a PM if you want the files directly, which I'd be happy to share. Here's a link to the Project Files on the Shaper Forum. It includes the original .dxf file if you want to modify anything.
Materials were a 12x36 sheet of 1/2 cast acrylic, a bag of 1/4-20 dowel nuts, with a thickness of .472" so that they didn't protrude from the sides, and some 1/4-20 knobs, all from McMaster Carr. Total materials cost was $90 before tax and shipping.
Did holes in two positions each for the 2200 and the 1400 router, and made the opening 30mm, enough for a 1" bit. I was considering making the opening wider to accommodate a 1 1/4" bit, but I don't know when I might want to edge rout a groove that wide -- if I ever need to, I can knock off another jig base now that I have the design.
Made the design in Fusion 360. I didn't have exact measurements for the OEM jig, other than knowing that the material was 1/2, but I saw enough pictures to eyeball reasonable proportions and positioning. Ended up making mine 14x7, with 3 1/2" sides. The only tricky part was getting the positioning right on the drill press to add the holes into the edge of the sides for the knobs. I initially hit the mark on only 2 of 4, and so had to expand the hole on the other two with a 17/64 bit to make sure the knobs lined up with the dowel nuts. I also should have ordered 1 1/4" long knobs, rather than the 1 1/2" ones I ended up using -- instead of cutting them off shorter, I simply lengthened the hole on the underside of the cross-dowel nut. I figured this would make the fit a bit more snug in any case.
I didn't include the extra vacuum hole in the back -- I figured that if dust collection were an issue, this could always be added later assuming I can get a similar dust port part as on the OEM jig (they don't seem to sell this as a separate part). In any case, tests with the 2200 thus far have shown superior dust collection, so I'm not sure I'll even need to make the modification.
The one additional feature I added was a notch on center at the front and back of the jig to line it up with the center of the board. I didn't add any kind of scale with which to set the sides, but I figure I will almost always be edge routing on center, and on those rare occasions where I have to go off center, I'm sure it will be simple enough to set the jig manually.
Tests thus far have been a success -- real application will begin sometime next week once I finish dressing the boards designated for work with this setup.
Attachments
-
 Plexiglass router template v3.jpg27.3 KB · Views: 1,175
 -
 20200119_165206.jpg260 KB · Views: 1,597
 -
 20200119_165133.jpg240.6 KB · Views: 847
 -
 20200119_165126.jpg231 KB · Views: 957
 -
 20200119_165011.jpg212.5 KB · Views: 901
 -
 20200119_163728.jpg224.7 KB · Views: 961
 -
 20200119_161607.jpg186.6 KB · Views: 967
 -
 20200119_155713.jpg253.6 KB · Views: 923
 -
 20200119_150146.jpg152.5 KB · Views: 1,396
 -
 20200119_125207.jpg166.2 KB · Views: 1,314
 -
 20200119_123721.jpg213.2 KB · Views: 891
 -
 20200119_105819.jpg237.1 KB · Views: 1,503
