Precise Offset Rip Guides

rmwarren

Member
Joined
Jul 11, 2010
Messages
3,063
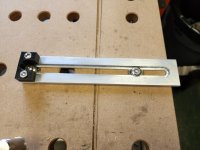
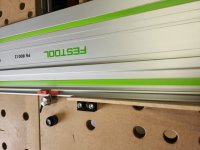
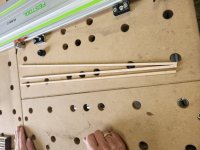
This is v3.0 and finally they are keepers, so it was worth the time to cobble together a quick video. The basic idea is to have guides that can be set anywhere on the MFT and calibrated using a story stick or gage blocks rather than measuring or using a built-in scale.

Since they are calibrated to the saw/blade/guide rail (shown at the very end of the video) then adjusted by offsetting from the edge of the rail to the black stop block they should be goof proof. It's mind boggling how often I can screw up something simple just by doing dumb stuff.

[attachimg=1]

[attachimg=2]

[attachimg=3]

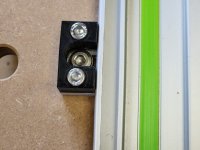
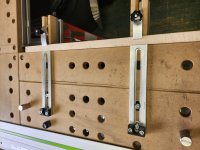
Shaper Origin & 3D printed, as usual. Secured from below with a knob, then above with a hex driver.


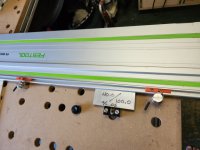
The guides can be moved to any set of holes on the MFT, so they effectively work for any measurement from zero to just under the total width of the MFT surface. I cut a lot of small parts & 90% of the time I will set them up with gage blocks.

RMW
 

Attachments

  • 20230730_110348.jpg
    20230730_110348.jpg
    101.2 KB · Views: 833
  • 20230730_110407.jpg
    20230730_110407.jpg
    160 KB · Views: 842
  • 20230730_111151.jpg
    20230730_111151.jpg
    165.5 KB · Views: 836
Richard,

I am a little slow and very confused. I have no idea how this setup works. How about a little more instruction for slower types?

Thanks
Jack
 
I like that... a lot 8)
[list type=decimal]
[*]They're calibrated to the blade.
[*]They're not attached to the rail thus requiring less space to the rear and the rail can be moved as normal without attaching extrusions to it.
[*]I'm a big fan of using setup blocks or "gap gauges" (for want of a better name) for odd sizes just as you do it.
[/list]

I'd love someone *cough* [member=61691]TSO_Products[/member] *cough* UJK / [member=11196]Peter Parfitt[/member] to help make your idea a reality!
 
Claimdude said:
Richard,

I am a little slow and very confused. I have no idea how this setup works. How about a little more instruction for slower types?

Thanks
Jack

Hey Jack, no problem, I'm a member of that club... To recap (emphasis added to the key features)

Basically they are calibrated to your specific setup by cutting the AL on your guide rail with your saw blade, ensuring a precise zero when the black stop is pressed hard against the rail. The stop is zeroed and the material guide is zeroed exactly to the blade

From there you slide the stops to the left to calibrate for the cut, whatever gap there is between the stop and guide rail is precisely the same as the offset for the material to be cut. By using something physical, like a gage block, or WP style story stick to set both offsets it ensures the cut is parallel along the length.

This method doesn't use the 20mm hole pattern or anything else to calibrate the stops, whatever width is used to set the offset is what you get as a cut width. If I use 3/4" gage blocks for a cut, then come back later and set it up again using the same gage blocks, the result should be exactly the same. Removes human error from the process. It is calibrated to the blade kerf so if you changed out blades that could have an impact.

For whatever reason my splinter strips are in excess of half a MM off from my blade so whenever I use them for alignment I get a small error in the cut. With other setups I also tend to get minor variations over the length of the material, nothing major but enough to bug me.

Hope this makes sense.

RMW
 
Roachmill said:
I like that... a lot 8)
[list type=decimal]
[*]They're calibrated to the blade.
[*]They're not attached to the rail thus requiring less space to the rear and the rail can be moved as normal without attaching extrusions to it.
[*]I'm a big fan of using setup blocks or "gap gauges" (for want of a better name) for odd sizes just as you do it.
[/list]

I'd love someone *cough* [member=61691]TSO_Products[/member] *cough* UJK / [member=11196]Peter Parfitt[/member] to help make your idea a reality!

[member=53696]Roachmill[/member] you pretty much nailed the logic in 3 sentences. I wish I had your gift for conciseness.

Thanks.

RMW
 
“For whatever reason my splinter strips are in excess of half a MM off from my blade so whenever I use them for alignment I get a small error in the cut.”

The splinter guard needs to be moved out. But it’s too time consuming when you’re trying to make sawdust so just stick a Post-It note on the underside of the splinter guard and trim it with the saw.
 
Michael Kellough said:
The splinter guard needs to be moved out. But it’s too time consuming when you’re trying to make sawdust so just stick a Post-It note on the underside of the splinter guard and trim it with the saw.

I just don't rely on them for absolute precision or compensate otherwise. Typically a cut that's 20 thou off isn't a big deal, parallelism is more important.

What I was really thinking of are calibration guides that index off them, and the logic for trimming these guides with the blade.

RMW
 
Here's an example of how small this setup can cut. The boss needed a "stick" to support a droopy houseplant. I had a rip of maple
 

Attachments

  • 20230805_095417.jpg
    20230805_095417.jpg
    241.8 KB · Views: 521
  • 20230805_095454.jpg
    20230805_095454.jpg
    155.9 KB · Views: 522
  • 20230805_095827.jpg
    20230805_095827.jpg
    256.3 KB · Views: 513
  • 20230805_095812.jpg
    20230805_095812.jpg
    189 KB · Views: 508
  • 20230805_100004.jpg
    20230805_100004.jpg
    196.7 KB · Views: 516
  • 20230805_100041.jpg
    20230805_100041.jpg
    239.2 KB · Views: 512
Back
Top