PU glue cleanup

Joined
Apr 25, 2021
Messages
1,224
Location
Derbyshire UK
Greetings from the icy UK.

Not the best time of year to be rebuilding a workshop, but financially and logistically the best time for me to be doing it. There’s currently no running water, power or heating. Faced with a time-critical customer build, I now have the dilemma of an extensive glue and clamp-up at zero degrees C - the usual external Titebond III isn’t an option because of chalking, so it’s out with the PU which I don’t especially enjoy using.

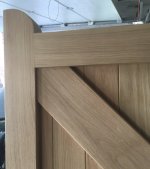
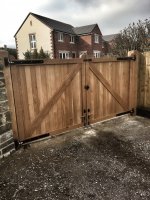
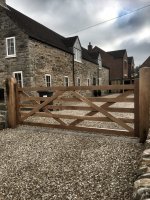
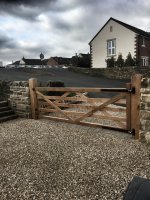
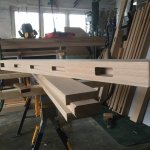
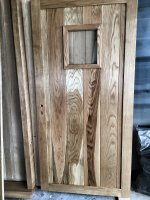
What’s the forum’s go-to method/solvent for cleaning up PU squeeze-out and foam? The application is a huge set of driveway gates in kiln-dried oak. Mortise & tenon main joints, with a V-grooved infill of 4 x 1’s machined into T&G. Lots of nooks & crannies …..

Thanks in advance.
 

Attachments

  • 7B2A98D1-F809-462C-86BA-4F92F918E21E.jpeg
    7B2A98D1-F809-462C-86BA-4F92F918E21E.jpeg
    566.8 KB · Views: 229
Might depend on the glue.  I use PL Premium often enough.  Don't try to wipe squeeze out immediately after clamping -- just spreads it around more.    I like to let it cure for a couple of hours.  By then, it has expanded as much as its going to, and it is stiff enough that you can scrape it off easily.  For any glue that I could not reach until fully cured and unclamped -- I use a sharp chisel.
 
Nice looking gates.

As said PU normally scrapes off okay once it's dry although some brands do seem to set harder than others,

Can't really tell from the photo if you have or not but I would leave at least a couple of mill gap between the T&G boards, they will expand!
 
I’ve taped off the outside of joints.  The glue tends to expand over the tape.  Then pull the tape.  Still needs a bit of cleanup.
 
Can you use a heat gun to warm up the joints and then glue?  I have no idea.

Titebond lists 47 degrees F for the minimum temp.  We've had a week of single digit (F) temps and workshop in my basement is currently 39 degrees.  I have some projects awaiting paint.  I did use some wood filler yesterday and I did not check the temperature range before I used it.  I will have to check when I get home.
 
Mortiser said:
That gate is beautiful!  Nice job. Would love to see it all when it’s hung.

Thankyou for your kind words. These are a duplicate of another set I built last year. Someone drove past the house where I’d installed these (along with an oak farm gate), they stopped the car, knocked on the door and asked the homeowner where they bought their gates. Installation day was pretty stormy as you’ll see from the pictures.


Attachments

  • F9454618-496D-42F9-972A-9CF40AB5E1AB.jpeg
    F9454618-496D-42F9-972A-9CF40AB5E1AB.jpeg
    1.3 MB · Views: 180
  • 238B2B83-172D-4E00-8FC0-9E708C1707E4.jpeg
    238B2B83-172D-4E00-8FC0-9E708C1707E4.jpeg
    1.2 MB · Views: 174
  • 95DD8D66-E481-47FC-9241-CF996E875378.jpeg
    95DD8D66-E481-47FC-9241-CF996E875378.jpeg
    1.3 MB · Views: 159
  • AD588BBE-B6A0-45D8-8A99-A6A7EFF71940.jpeg
    AD588BBE-B6A0-45D8-8A99-A6A7EFF71940.jpeg
    1.3 MB · Views: 155
  • A5939031-7488-4068-95D2-DC5A871534C5.jpeg
    A5939031-7488-4068-95D2-DC5A871534C5.jpeg
    1.2 MB · Views: 156
Doug S said:
Nice looking gates.

As said PU normally scrapes off okay once it's dry although some brands do seem to set harder than others,

Can't really tell from the photo if you have or not but I would leave at least a couple of mill gap between the T&G boards, they will expand!

Thanks. I always clamp T&G tightly together to give a nice-looking seamless infill. Expansion allowance occurs via extra-deep rebate slots machined into the rails. I’ve always found that it’s a better option to allow the entire infill to expand as one piece. I use the same method when building doors.
 

Attachments

  • 81561755-15DF-4706-951E-E9CA3D37FA8A.jpeg
    81561755-15DF-4706-951E-E9CA3D37FA8A.jpeg
    609.4 KB · Views: 170
  • FCE2311B-7E97-40DB-96E1-A9CEA409C1A1.jpeg
    FCE2311B-7E97-40DB-96E1-A9CEA409C1A1.jpeg
    1 MB · Views: 174
Back
Top