Thanks for more feedback, and it's good to see how other people have designed their covers.
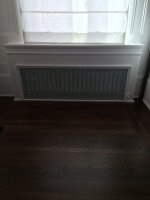
One thing that I haven't finished yet is the lid - waiting on my precisiondogs parallel guides before I start to rip some narrower strips for those. The lid is going to have a lot of ventilation in it, which is why I kept the front closed. The research I found suggested that the most efficient designs will allow the heat to travel vertically, and the radiating out horizontally is of secondary importance. We'll see how it goes! I'd like to see the white speaker fabric, xxjinkyxx. I'm thinking black fabric behind the metal grill might keep things from falling through into the cover.
The clip idea is a good one- Probably too late for the first iteration, though. The front is pretty well faceframed into the surrounding bookcases, which are in turn screwed to the side panel and the wall. So if the valve leaks, then it will be a bit of an operation to remove the whole section. Hopefully it won't leak!
In terms of access to bleed it, the lid will be removable and there is nearly a foot of space on the bleeder side of the radiator.
The other ones won't be integral to anything else. I'll probably keep them in place using a ledger or something along those lines.
Thanks,
Adam
")