Refinishing & Rebuilding Teak Outdoor Furniture

Cheese said:
I'll now be installing a Pella thermopane storm door with louvers between the glass panels to reduce solar gain, I have high hopes.  [big grin]
 

I installed Pella windows in my last house, [member=44099]Cheese[/member].  I chose those with the blinds between the glass panes, AND I also got heat mirror coating on the glass.  What a huge difference in keeping the heat out.  One inadvertent side-effect I noted was that all my plants inside the house started dying from a lack of UV light (due to the heat mirror coating), so I had to buy a grow light to make up the difference for the plants. 
 
[member=44099]Cheese[/member],
you and Matt of “Plantation Shutter Madness’ fame, have qualified for the Project Completion Olympics. Beautiful work, step after step, you complete projects which are easy to start but an endurance challenge to see through to completion.

My hat’s off to you not only for completing it so beautifully. Your step-by-step pictorial- and narrative documentation pulling in FOG resources to light the way when choices need to be made about methods and materials are an inspiration to "lurkers" to participate.

Thank you for providing a head start for anyone else considering a similar project!
Hans
 
Peter_C said:
Even Sunbrella which is the standard for the marine industry must have a DWR (Durable water repellent.) If it needs to be done yearly so be it. I stored my boat outside full sun in California. Normally we actually do get rain here, although the storms in MN enthralled me.

Peter,

You may want to check out 303 Fabric Guard. I've been using it on my outdoor umbrella in TX for a few years now. In the past, I tried the Nikwax DWR after Gore sold off their ReviveX DWR line. I think the 303 lasts longer in the sun.

-Todd
 
Cheese said:
Michael Kellough said:
Agree with Venkman, amazed at the amount of improvement you’ve produced. Almost looks like new furniture.

About the Cubitron, do you feel the abrasive ratings are comparable to other abrasives? Seems to me the Cubitron is cutting coarser than the rating, compared to other brands/composition

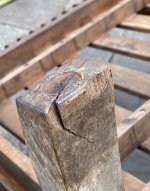
Thanks Michael... [big grin] ...the results so far have been well worth the effort.

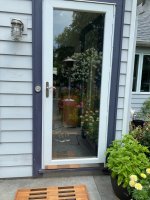
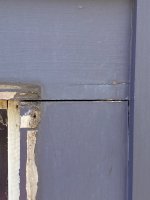
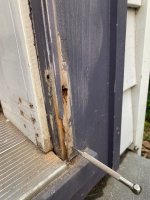
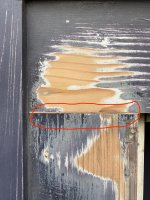
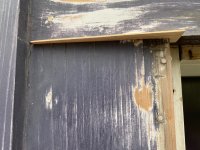
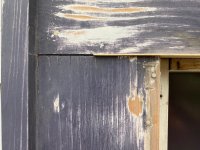
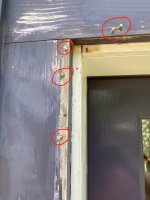
And on another note, the new exterior storm door arrived ahead of schedule so this teak project will be once again put on hold while I prep the opening for a new storm door which in the real world is more important than patio furniture.

Just to vent for a few minutes, I've mounted Pella storm doors on 2 of the 3 door openings. Years & years have gone by and the Pella storm doors are still the best items available. On the 3rd opening, which faces directly west, I decided to mount an Andersen storm door because it was the only thermopane (2 glass panes with a gas fill between them) door available at the time. In the winter the cats & the dogs all love to sit in front of the storm door and watch the wildlife go by. So a thermopane door was a bonus round both for the animals and for the heating bills.

However, the bottom line is, the Pella doors use bronze/oilite bushings to support the weight of the door while the Andersen door with double the glass weight uses PLASTIC bushings to support the weight of the door. So after 2 years of use the Andersen door was sagging on its hinges and refused to close & lock. I'll now be installing a Pella thermopane storm door with louvers between the glass panels to reduce solar gain, I have high hopes.  [big grin]

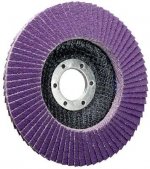
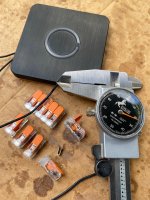
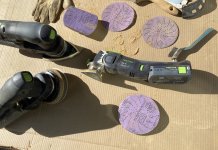
Now on to the sandpaper, I feel the 3M Cubitron punches above its weight class, meaning it's just more aggressive and it maintains that aggressiveness for a longer time. Is it sharper? Is it harder? Does it have a better binder? I don't know but it really seems to be a lot more aggressive.

Here's a 3M Lab Tech Data Sheet from a number of years ago. You'll notice that USA/ANSI 180, which is how 3M rates their products is the equivalent of P180.

View attachment 1
  I use 3M Cubitron II for several uses. I tried the Original Version in a 4 1/2" grinding wheel a few years when it first came out since the video of the wheel 'eating' a solid rod of metal was impressive.  I've got some small 1 x 42" sanding belts for a Jet Combo sander and that one 3M belt in 80 grit really lasts for me.
The grinding wheels are great too.
It's more of good stuff from 3M.... [thumbs up] [thumbs up] [thumbs up]
 
Wow missed this one... been busy with a storm door.

[member=7493]Sparktrician[/member] That plant UV thing is really weird yet it makes sense, I'm pretty impressed with the capabilities of Pella & Marvin windows.

Thanks Hans [member=59331]TSO Products[/member] , I'm not on another forum nor do I want to be on one....life's too short. My only focus on this forum is to pass on the troubles and travails along with the successes I've had with wood working and metal working and any other craft that's passed across my venue.

[member=10952]leakyroof[/member] I also was introduced to Cubitron II when I chose to use them for .040" cut-off discs. Before then, I'd pretty much sampled all of the variations out there. The 3M Cubitron discs made me sit up and take notice.

FWIW....3M now produces flap discs in Cubitron II

[attachimg=1]
https://www.3m.com/3M/en_US/p/d/b40064995/
https://multimedia.3m.com/mws/media/1268693O/cubitron-ii-cutting-grinding-catalog.pdf
 

Attachments

  • Cubitron™ II Flap Discs 2021.jpg
    Cubitron™ II Flap Discs 2021.jpg
    37.8 KB · Views: 377
So like I've mentioned already, I've recently had to change outdoor project priorities, from teak refinishing to storm door installation. An initial glance of the old door reveals nothing serious only some worn-off paint on the bottom of the sill area.

[attachimg=1]

However, when looked at a bit closer, on the RH upper corner there is a separation of the cedar boards along with a horizontal crack.

[attachimg=2]

While on the LH upper corner there is a separation of cedar again, several small vertical splits along with some putty that is popping from one of the finish nails.

[attachimg=3]

Unfortunately, in the lower RH corner there's a small section of soft cedar that's not noticed until I started to probe the area with the small diameter Starrett scribe. Before I started to probe the area, paint covered all of the damage and only after some serious probing with the scribe did some of the paint lift and then some of the damaged wood flaked off.

[attachimg=4]

All in all not too bad as I installed this about 15 years ago and it faces in a West/South direction so it gets sun from 10:00 AM till sunset and receives the brunt of the weather for 8 months of the year.  Also shame on me, it's never been painted since I first installed it so that's 15 years on SW Duration paint, 1 coat of exterior oil primer & 2 top coats of Duration.
 

Attachments

  • Andersen 10777.JPG
    Andersen 10777.JPG
    771.7 KB · Views: 396
  • 10791.JPG
    10791.JPG
    541.3 KB · Views: 379
  • 10792.JPG
    10792.JPG
    627.8 KB · Views: 378
  • 10795.JPG
    10795.JPG
    803 KB · Views: 407
I'll quickly go over the repairs I made because I learned some things along the way.

There were a lot of screw holes in the trim from the old storm door and with the new door being from a different manufacturer, I'm sure none of the holes were going to line up so I decided to plug them. Some short pieces of poplar dowels and TB III water proof glue fixed those issues.

[attachimg=1]

For the upper areas where the cedar boards separated from each other, my 1st thought was to just caulk, thinking about that for a moment, my 2nd thought then became an epoxy filler, however, noodling for a bit longer I decided on cedar wood filler strips. The more difficult solution to implement but certainly the longest lasting fix. Nothing to peel away and nothing to crack & fall out allowing the weather in.

[attachimg=2]

I produced a different thickness, full depth cedar shim for each side of the door because the gaps were different widths. A couple of trial cedar slices with the bandsaw and some refining with a hard sanding block with 80 grit paper, some trial fitting and they were done.

[attachimg=3]

[attachimg=4]

I mixed up a small batch of Smith's CPES and spread it on both the upper part and the lower part of the gap and I then buttered the cedar shim on both sides with CPES and inserted the shim. As I pushed it into place, some of the CPES oozed out...exactly what I wanted because now I was assured that everything was fully bedded in epoxy. I only wiped off the epoxy that was dripping down the face of the trim. I left any epoxy that was on the surface so that everything became encapsulated.

I let it cure for 24 hours and then hit it with the ETSC 125 with 180 grit Cubitron. It's tough to tell but in the outlined area, everything has been tied together using the CPES. Even the small vertical wood splits are now also filled with CPES. Time for some oil based primer. [smile]

[attachimg=5]


Attachments

  • 10792d.JPG
    10792d.JPG
    1.2 MB · Views: 360
  • 10792c.JPG
    10792c.JPG
    534.1 KB · Views: 356
  • 10792b.JPG
    10792b.JPG
    565.3 KB · Views: 379
  • 10792.JPG
    10792.JPG
    627.8 KB · Views: 345
  • 10792a.JPG
    10792a.JPG
    742.1 KB · Views: 362
As part of this storm door rejuvenation, the door bell actuator gave up the ghost several years ago so that became another area to address. Years ago, the door bell button was directly attached to the standard 18 gauge door bell wire, however recently, the latest grouping of LED inspired door bell actuators have instead been using 26/28 gauge silicone jacketed wires permanently attached to the printed circuit board which can become problematic because of the wire's diminutive size. The wire core is only .020" in diameter,

[attachimg=1]

With the new LED door bell buttons no longer being directly wired to the 18 gauge wire, a wire connector now needs to be introduced to connect the 18 gauge wire to the 28 gauge wire. Having enough space for these small connectors behind the door bell button has now become an issue. The hole that the door bell wires exits is usually 1/2" to 3/4" in diameter and roughly 3/4" deep. So finding a quick disconnect connector to fit in that space is problematic. Small wire nuts will not work because the hole/thread diameter is too large. The alternative is to solder the wire connection but that brings along its own baggage.

My solution was to take a Wago 221 5-terminal connector and remove each end connector. I used the 5-terminal connector because it was large enough to hold in the vise. I originally started with the 3-terminal version but it became too small to hold. The interesting thing with these Wago connectors is that there's a common copper buss bar that extends across the entire width of the connector but each connection is self contained with its own closing/latching mechanism so when you cut off an end, it still operates like it should. This way the QD connector is small enough for the hole and you just place both wires into the connector and press the orange lever down.

[attachimg=2]

[attachimg=3]

Quick notes:
I used the vise and a coping saw to section the Wago connector.
Cut into the adjacent connector as close as you can to the connector you want to save, that way you'll only have to cut through the copper buss bar and will miss the stainless actuator spring. If you hit the stainless spring you will rip off all of the teeth on the coping saw blade.

[attachimg=4]


Attachments

  • 10890.JPG
    10890.JPG
    204.7 KB · Views: 361
  • 10880.JPG
    10880.JPG
    805.4 KB · Views: 325
  • 10878.jpg
    10878.jpg
    413.7 KB · Views: 349
  • 10879.jpg
    10879.jpg
    404.7 KB · Views: 315
I was refinishing some additional teak furniture today when I was gobsmacked by two items.

First, is how durable the 3M Cubitron sandpaper is. One disc lasted for an entire chair and it was still ready for a second chair. I've always liked Granat but this Cubitron stuff is seriously better for raw wood.

Second, is how brutally slow sanding is with an oscillating tool when it can oscillate only and does not have any rotary motion capabilities. I threw a Fein sanding pad on the OSC 18 because I needed to get into a tight area, the sanding experience was just plain awful. I eventually went back downstairs and gathered up the Festool DX 93.

Just thinking out loud.  [smile]

[attachimg=1]
 

Attachments

  • 12183.jpg
    12183.jpg
    1.2 MB · Views: 196
Cheese said:
I was refinishing some additional teak furniture today when I was gobsmacked by two items.

First, is how durable the 3M Cubitron sandpaper is. One disc lasted for an entire chair and it was still ready for a second chair. I've always liked Granat but this Cubitron stuff is seriously better for raw wood.

Second, is how brutally slow sanding is with an oscillating tool when it can oscillate only and does not have any rotary motion capabilities. I threw a Fein sanding pad on the OSC 18 because I needed to get into a tight area, the sanding experience was just plain awful. I eventually went back downstairs and gathered up the Festool DX 93.

Just thinking out loud.  [smile]

[attachimg=1]
Yes, I gave up on using any oscillating tool as a Sander unless both of my DX-93's die out for some horrible reason. The only reason I keep any of my Fein sanding attachments is they came with the machine, and if you're carrying just that one Fein case for a job, hey, at least they're there in a pinch if you need them... [smile]
Other than that, I too love the 3M Cubitron abrasive. I've got it in several forms. Grinding Wheels for small angle grinder, Sanding Belts for my Jet 1 x 42" Sander and some assorted Discs too.  Good stuff
 
Hey [member=44099]Cheese[/member], how is your original teak refinish holding up just over a year later?

I just came across this thread now. I have used CPES for 3 decades now with good success on wood windows and doors. I did use it on some outdoor teak furniture, but found that it doesn't hold up as well on horizontal surfaces, at least after a year or two. But, then again, I didn't use as many coats as you did.

However, I do think your approach may not be optimal. The way you layered it on appears to have gone way beyond wicking and into building up filler layers with the epoxy. Smith's sells an actual filler that you can put on after the CPES has wicked and dried, that filler will be faster and might hold up better with wood expansion/contraction.

While I agree it makes sense to use as much CPES as will actually wick into the wood, filling cracks with it isn't something I want to take the time to do. My biggest problem, however, is that I haven't found a good surface finish to put on top. Sikkens is more like transparent paint and needs sanding and reapplication every year for horizontal surfaces - vertical you can get away with more time between refinishing. Other teak finishes wear out even faster and all are a pain to sand to refinish.

One other note is that CPES exposed to sun needs some kind of topcoat, as sunlight/UV will degrade the CPES. Smiths sells a two-part polyurethane, but as Smith's documentation explains, all transparent finishes use UV blockers that are sacrificial. So, at some point you need to remove and recoat the transparent finish. Poly is especially nasty to sand off.

I'm in Northern CA, btw.

 
smorgasbord said:
Hey [member=44099]Cheese[/member], how is your original teak refinish holding up just over a year later?

However, I do think your approach may not be optimal. The way you layered it on appears to have gone way beyond wicking and into building up filler layers with the epoxy. Smith's sells an actual filler that you can put on ofter the CPES has wicked and dried, that filler will be faster and might hold up better with wood expansion/contraction.

I'm extremely happy with the results of the CPES. Here's a photo of one of the chair legs that had a huge crack and several chips out of it. This was going to go south in a hurry if I didn't do something to it.

[attachimg=1]

[attachimg=2]

After it was repaired

[attachimg=3]

After it was coated with 2 thin coats of Starbrite Teak Sealer in Classic Teak color.

[attachimg=4]

After 1 year of being exposed to rain and a Minnesota winter.

[attachimg=5]


Attachments

  • 10659c 1 year later.jpg
    10659c 1 year later.jpg
    1 MB · Views: 240
  • 10659b.JPG
    10659b.JPG
    795.8 KB · Views: 243
  • 10659a.jpg
    10659a.jpg
    340.6 KB · Views: 247
  • 10658.jpg
    10658.jpg
    262.7 KB · Views: 242
  • 10657.jpg
    10657.jpg
    308 KB · Views: 252
Teak is a durable wood, but as you've experienced, the Minnesota winters and constant exposure to the elements can really take a toll. To address the water absorption issue, consider applying a penetrating epoxy sealer to the end grain of the legs. This will help seal the wood and prevent water from being sucked up. For the refinishing part, start with a thorough cleaning using a teak cleaner, followed by sanding to remove the weathered surface, and finish with a teak oil or sealer to restore its natural color and protect it from further weathering.
 
francimario said:
Teak is a durable wood, but as you've experienced, the Minnesota winters and constant exposure to the elements can really take a toll. To address the water absorption issue, consider applying a penetrating epoxy sealer to the end grain of the legs. This will help seal the wood and prevent water from being sucked up.

That's exactly what I did...I sanded the chair leg bottoms and then I taped up the legs of the chairs and left the tape slightly proud of the bottom of the leg so that a cup would be formed. I then applied 12-15 coats of Smith's Clear Penetrating Epoxy Sealer (CPES) to the bottom of each chair leg until the surface was absolutely smooth and no voids could be seen. I'd estimate the finished coating is 1.0-1.5 mm thick. After that, I attached a nylon furniture glide to the bottom of each leg. That really makes it a lot easier to move the chairs over the patio stone.

[attachimg=1]

[attachimg=2]

[attachimg=3]

[attachimg=4]
 

Attachments

  • 10492.jpg
    10492.jpg
    635 KB · Views: 81
  • 10435.jpg
    10435.jpg
    550.4 KB · Views: 79
  • 10493.jpg
    10493.jpg
    190.6 KB · Views: 78
  • 10554.JPG
    10554.JPG
    587.4 KB · Views: 77
Back
Top