Removable Auxilary Fence for Kapex in 10 minutes

skids

Member
Joined
Oct 14, 2012
Messages
951
Finally got around to this..Got tired of dodging little pieces panel molding flying by my face..Anyway, one of the reasons I put this off for so long is I didn't want to have an Aux fence permanently attached to the Kapex. Then, lightbulb...I took a good look at the scrap I had laying around, and basically traced the fence shape out and traced the bolt holes on some 1/2 inch plywood. Two quick cuts with the jigsaw, drilled it, sanded it and done. Only thing I had to run to the store for was the knobs, which for my needs was the key. Easy on, easy off.

Being that it was only 1/2 inch plywood it takes up less of my saw bed. I am going to put some epoxy in those panhead bolts to permanently fix them in the plywood aux fence pieces. But the knobs make it pretty nifty to take on and off in seconds. Probably paint it or throw 40 coats of Poly on it to see how shiny I can get it.  ;)

 
I know that reading the manual isn't considered the "cool thing to do", but the Supplemental manual includes dimensions and instructions for making auxiliary fences for the Kapex. The one detail you might have forgotten was back-cutting the faces so that they can slide in and out with clearance to the fixed portion of the Kapex fence. This is shown in the manual in the upper right image on that page.

[attachimg=#]
 
Thanks! I gotta refer to that manual more often. In this case my primary goal was making them quickly removable since I don't always need them on there. What is the purpose of cutting the back? That is getting by me. I can slide my fences with these on there.
 
Rick Christopherson said:
I know that reading the manual isn't considered the "cool thing to do", but the Supplemental manual includes dimensions and instructions for making auxiliary fences for the Kapex. The one detail you might have forgotten was back-cutting the faces so that they can slide in and out with clearance to the fixed portion of the Kapex fence. This is shown in the manual in the upper right image on that page.

[attachimg=#]

Rick, while I have you here...Is there a place to get the stock perfect thickness for the ZCI or do I need a thickness planer? I don't have one of those, dont' want one. Any suggestions? I would like to use plywood if this is possible.
 
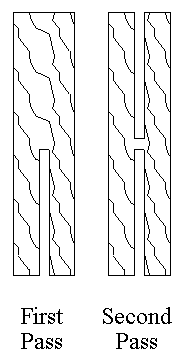
A thickness planer is the best choice, but if you don't have one, the only other suggestion I have is a tablesaw or bandsaw. The tablesaw will be more accurate, but you will probably have to rip it, flip it, and rip it again to be able to cut all the way through. Here is an old graphic from an article I wrote a long time ago, Tablesaw Techniques. The key is that you don't cut all the way through with your second pass. The small amount left in the center can either be snapped by hand, or bandsawn. For aesthetics, the sawn surface would go down so you don't see the saw marks.

resaw.gif


As for the reason for the back cut mentioned above, The fence faces can slide in and out, but the lower half of the fence system is stationary. Without the back cut, the wood face can drag against the stationary face. In hindsight, this may or may not be necessary depending on how true your faces are to vertical. It only takes a very tiny fraction of a degree, and the faces will either slide or bind depending on whether they tilt in or tilt out. You can't even measure a thousandth of a degree in a wood shop, but that may be enough of an angle to make a difference.
 
Rick Christopherson said:
A thickness planer is the best choice, but if you don't have one, the only other suggestion I have is a tablesaw or bandsaw. The tablesaw will be more accurate, but you will probably have to rip it, flip it, and rip it again to be able to cut all the way through. Here is an old graphic from an article I wrote a long time ago, Tablesaw Techniques. The key is that you don't cut all the way through with your second pass. The small amount left in the center can either be snapped by hand, or bandsawn. For aesthetics, the sawn surface would go down so you don't see the saw marks.

resaw.gif


As for the reason for the back cut mentioned above, The fence faces can slide in and out, but the lower half of the fence system is stationary. Without the back cut, the wood face can drag against the stationary face. In hindsight, this may or may not be necessary depending on how true your faces are to vertical. It only takes a very tiny fraction of a degree, and the faces will either slide or bind depending on whether they tilt in or tilt out. You can't even measure a thousandth of a degree in a wood shop, but that may be enough of an angle to make a difference.

Awesome! Thanks for the advice and graphics! SUPER helpful. I hate resawing on the TS, but I supposed if I use MDF it doesn't matter. Guess I will go that route. I really think a ZCI is mandatory for this saw. Only thing, once you bevel, it's shot. And use the bevel alot, and try to use it as much as I can since it's the best feature of this saw if you ask me.
 
skids said:
I really think a ZCI is mandatory for this saw. Only thing, once you bevel, it's shot. And use the bevel alot, and try to use it as much as I can since it's the best feature of this saw if you ask me.

Actually, a zero-clearance insert for a miter saw is far less critical than, for example, a tablesaw. That's because the path of the cutting teeth on the blade are moving upward into the wood. It doesn't really do anything regarding bottom-side tearout. So I wouldn't worry about replacing it after making a bevel cut. Furthermore, the saw comes vary close to having "single point entry" like the TS saws. I don't know how perfect the zero-point entry is, but it is close enough that I haven't noticed the insert's kerf being any wider than the blade. (Obviously it MUST be slightly wider simply due to the geometry of a tilted blade.)

[attachimg=#]
 
Skids said:
"I really think a ZCI is mandatory for this saw. Only thing, once you bevel, it's shot. And use the bevel alot..."

Absolutely.  So when I make an aux fence or ZCI, I make the first one, and then a dozen or so copies with a flush trim bit.  Use the first one to mark screw holes, slots for the blade, etc on the copies, too. 
 
Rick Christopherson said:
skids said:
I really think a ZCI is mandatory for this saw. Only thing, once you bevel, it's shot. And use the bevel alot, and try to use it as much as I can since it's the best feature of this saw if you ask me.

Actually, a zero-clearance insert for a miter saw is far less critical than, for example, a tablesaw. That's because the path of the cutting teeth on the blade are moving upward into the wood. It doesn't really do anything regarding bottom-side tearout. So I wouldn't worry about replacing it after making a bevel cut. Furthermore, the saw comes vary close to having "single point entry" like the TS saws. I don't know how perfect the zero-point entry is, but it is close enough that I haven't noticed the insert's kerf being any wider than the blade. (Obviously it MUST be slightly wider simply due to the geometry of a tilted blade.)

[attachimg=#]

Thanks Rick, this is all great information. Appreciate you taking the time to explain.
 
I made my ZCI out of 1/2" BB.  You can use a router or table saw with dado blade to cut a rabbet around the edge to the correct depth for the thickness given in the manual referenced above.

[attachimg=#]
 
Back
Top