Stephen B
Member
- Joined
- May 6, 2013
- Messages
- 2,469
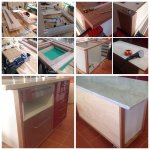
Mobile Island Bench using IKEA leftovers, some Mountain Ash and a recycled Marble Slab.
Materials[size=10pt]
Recycled Butchers Shop Marble Slab
Plantation Mountain Ash - re machined KD 70X19 and 90X45mm,
Luan Ply - 2400X1200X3mm
IKEA
. Kitchen install leftovers including including 2/700X600 IKEA Kitchen Cabinets, Shelf, Drawer runners
and Draw Fronts
. new Stainless Steel Drawer Fronts
Caster Wheels X 4
Cabinet Connectors
Consumables - Dominos - 4X20, 8X40 and 10X50mm, FeastWatson Mastertouch Satin Wipe on Poly, Gilly Stephensons Carnauba Polish, Titebond 111 Wood Glue, Sika Silicon Adhesive, Festool White Vlies, Granat and Titan 2 sanding discs, and various screws.
Festools
Domino 500, TS55 and rails, ROTEX 150, ETS150/3, CSX, C15, QF1400, CT22 and Midi as well as Centrotec 5mm and 10mm drill bitts, and Self Centering Bit.
Other - Thicknesser, bench planner and bench saw, Makita 250mm Compound Saw and 1/2 sheet Sander, and Slot and Phillips Head screwdrivers.
[size=13pt]Stage 1
MountainAsh base and top chassis.
The bottom chassis is made from 90x45mm Mountain Ash to support cabinets and a longer top of 70X19mm also of MA to support the overhang of the Marble Slab Top. Both chassis are supported by four Mountain Ash 70X35 corner posts. These were sized by rip cutting and thicknessing some of the 90X45mm Mountain Ash. Off cuts were kept for edge banding on future projects.
Slots for the Luan Ply back were cut in continuous lengths of the Mountain Ash prior to cutting and assembly. I used TS55 and rails; the rails being shifted slightly after the first cut to accommodate the 3mm ply thickness. Ply also cut to size with T55 and rails.
All parts from Ash and Ply were sanded to 240grit and three coats of Wipe On Poly applied. Inter coat sanding was with 320 grit.
Chassis and ply then assembled around two joined IKEA cabinets using Cabinet Screws [see images] joining the posts to each chassis.
Stage 2
Rejuvenation of Marble Slab - which had been in the kitchen of another house for thirty years and prior to that was in a Butchers Shop.
The aim was not to sand out all the character and history, but rather to clean and rejuvenate. Using ROTEX 150 in ROTEX and Orbital modes for each grit, the slab was sanded from 60 to 1500 grit.
It was then coated with the Carnauba Polish. Despite working small areas at a time, I found the turpentine in the Polish 'offed' quicker than I could work using the ROTEX and white Vlies. So MsUntidy and myself together quickly reapplied the polish by hand with lint free cloths.
[size=8pt]
Reference:
https://tutorwood.files.wordpress.com/2012/10/granat-1.pdf
[size=13pt]
Marble top was then attached to top chassis with Silicon Adhesive on Domino based table buttons. I chose this method after considerable effort was required removing the slab from another bench by cutting through silicon and adhesives using a MultiTool. I figured if the slab was removed from this bench in the future a multi tool wood blade could cut the dominos.
[size=8pt]
References:
http://festoolownersgroup.com/building-materials/attaching-marble-slab-to-island-bench/msg390198/#msg390198
http://festoolownersgroup.com/festool-how-to/help-re-a-past-thread-re-conecting-a-benchtabletop-to-base-using-dominos/msg369462/#msg369462 [size=13pt]
Stage 3 Drawers
The IKEA red drawer fronts [see image] matched the cabinet size and drawer runners as these were all left over from our Kitchen install. During the last four years IKEA had changed their cabinet and drawer front configurations using revised Blum fittings. Hence the newer stainless steel drawer fronts were modified to fit existing older model drawer sets by drilling new holes at the back at revised distances from the drawer front's bottom edge. Here the Centrotec Self Centering and the 5 and 10mm bitts were invaluable.
[attachimg=1]
[size=10pt]For the Aussies, TutorWood is Bryan at JustTools, Melbourne.