Sanding face frames flush

thender

Member
Joined
May 1, 2008
Messages
130
Greetings and Happy Holidays Festoolians-

I have a basic question about sanding face frames flush....  so I thought I'd see how you pros do it.

When I assemble a face frame, I do my best to keep things flush on the show side, but inevitably things are off a little bit.

Usually I hand sand with 80-grit to level the rails, and accepting any cross-grain scratches that appear in the stiles. 

Then I hand-sand the stiles to remove the cross-grain scratches, avoiding the rails. 

Then random-orbit sand the entire surface, going through the grits.

FWIW I have an ETS125 available as well as an ancient hand-held belt sander.

Any suggestions or feedback on a better way to do it would be appreciated!

-Tom in SoCal
 
I sand face frames when necessary with the RO 125 in the rotary mode.

I run my stock through a planer, helps with alignment.

Tom
 
Depends,
A coulpe of them Id sand them with my RO 90 if I have a kitchen full Id go to s local cabinent that has  a wide drum sander and pay them. Normmally its like $25 for a 1/2 hour, I can do a kitchen inna about 15 mins
 
I use the hard pad on my 90, it helps keep the corners square .  Using the domino makes most sanding nonexistent.  Pocket screws help also, but often are THE source of misalignment so practice is critical.  If I'm  leveling I use gear drive.  Random orbit for surface prep.
 
Tom,

Using your ETS 125 through the grits will work well.  If I only have a few to do, I use a hand plane with a very sharp edge and very shallow shavings.  If I'm patient I can feel the proud edge and start the plane iron edge without hitting the perpendicular rail or stile.

It works better and much faster than sanding for me.

Seasons greetings all [big grin]

Jack
 
Back when I made cabinets for a living, my first choice was the belt sander, followed by ROS. Only if I was lazy and the joints were close to flush would I skip the belt sander.

The key to running the belt sander is that you operate it "with authority". Unlike most other tools where you let the tool do the work, with a belt sander, you operate it with force and control. This keeps the sander platen flat to the workpiece. Even though my belt sander is variable speed, I would still tickle the trigger for control in short bursts. The primary operation was pulling it back against rotation.

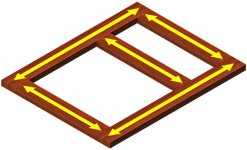
For faceframes, you use a sequence similar to what you've described by sanding the stiles first. However, you should not be avoiding the cross-grain over the rails. Then you hit the rails to level them and remove the cross-grain scratches. Oh, if the rails were proud of the stiles, I would put a little L-shaped pattern to the end of the stroke. Yes, that is cross-grain with the rail, but it levels the rail very quickly.

I just remembered another thing I did. Many times I would start out running 45 degrees to the joint so that both stile and rail were semi-cross-grain. A belt sander is far more aggressive going across the grain, so this would level the joint very quickly before I would switch back to an in-line pattern.

[attachimg=1]

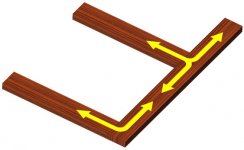
After the frames are leveled with the belt sander I would use the ROS. The key with the ROS is that you keep it moving across the joints to avoid creating low spots. I use repeating L-patterns over the joints with short strokes to focus on the joint, but mixed in with long strokes to cover the whole frame member.

[attachimg=2]
 

Attachments

  • Frame2.jpg
    Frame2.jpg
    50.7 KB · Views: 2,716
  • Frame.jpg
    Frame.jpg
    38.6 KB · Views: 2,758
All great advice about correcting alignment, but I'm curious as to why this occurs. When I use Dominos, I get flush fits consistently and I'm only a hobbiest.
 
If your face frame isn't flush before you glue it up I don't understand

why you would proceed  to the next step.

Make sure your stock is all the same dimension thickness wise.

Do a  dry run and make sure everything aligns properly, flush, square,
perpendicular, etc.....

Then glue it up.  I agree with Birdhunter, unless you like extra work.....
 
Thanks for your inputs everyone;  very much appreciated.

Maybe someday I'll assemble a perfect face frame, but for now I'll need to sand it flush.

-Tom in SoCal
 
jobsworth said:
You guys are doing your best to get me to buy a belt sander arent yas????

It's Christmas you know you want to... There's never a better time to justify a purchase, listen to the voices :)
 
I just use random orbit unless something is way off then Rotex in aggressive mode. For me the random orbit does it most of the time and no worries about cross grain scratches.

Seth
 
jobsworth said:
You guys are doing your best to get me to buy a belt sander arent yas????

A lot of woodworkers are intimidated by them. I think it's because they give up before they've had the chance to learn how to use them. My first day on the job as a newbie woodworker at a shop, I burned through the veneer on a pullout pastry board. Fearing the scorn of the boss made me an expert with them very quickly. When I moved on to the next shop I got the reputation for being the go-to guy for anything needing the belt sander. I wouldn't hesitate flushing a 16th-inch off a faceframe to flush it with a veneer carcase, and never burned through after that first day.

The key to a good belt sander is the platen. A lot of them I have seen produced a ridge at the front of the platen. So I rarely used the front handle. I placed my forward hand on the motor housing, which is over the platen instead of in front of it.

Don't waste your time with a 3" belt. It's not about how much they can do, but the stability of the wider 4" belt that is important. It is a stability that will give you a much flatter surface than any type of rotational sander.
 
Rick
I've been thinking about getting the Festool belt sander with the sanding base. I've been playing with the idea for a while. It only comes in 240 which is no biggie as I will always have a 220 outlet in my shop.
I'd just have manually turn the extractor on as all my tools are 110V US spec
It is pricey like all Festools that's what stopping me right now
 
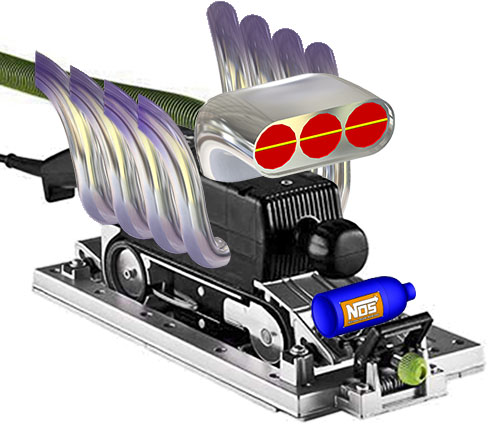
Well, if you're going to go with the Festool model with the sanding frame, then I recommend this one.....

BeltSander.jpg


[big grin] [big grin]

I've been using my Bosch belt sander for about 20 years...long before I ever heard of Festo. I think this is the model...

GBS100A.jpg
 
waho6o9 said:
If your face frame isn't flush before you glue it up I don't understand

why you would proceed  to the next step.

Make sure your stock is all the same dimension thickness wise.

Do a  dry run and make sure everything aligns properly, flush, square,
perpendicular, etc.....

Then glue it up.  I agree with Birdhunter, unless you like extra work.....

Totally disagree dry runs can be very slow.  Often I'll  find it all fits perfectly well enough so you feel like you waisted a lot of time just checking.

I just domino and glue up I don't have time to check every single one.  Sometimes not always it ain't perfectly flush and require sanding and the rotex does it in no time. 

So the amount of time I save over the risk one or two joint requiring a little sanding attention is worth it.

I did have one joint not long ago where I got it all glued up and found after I dominod one end from the wrong face.  That annoyed me a little but hey not the end of the world.
 
I find sanding these joints flush to be almost therapeutic.  I actually look forward to it.

I bought an RS 2 a few months ago.  It will level a joint in seconds.  It's become my go to sander for this task. 

It's a big powerful finish sander and it can get a little hectic on you, but it's still a finish sander and easier to control than a belt sander or even a Rotex in aggressive mode. 
 
Wow Rick no wonder the Festool Belt sander is NAINA.

I cant pass the EPAs Emissions test :>D

Yea thats the frame I was talking about. A friend of mine has one and swears by it
 
I use a wide belt to flatten all face frames out.  Then use the RO to sand the the cross scratches out.  Very fast and accurate
 
Back
Top