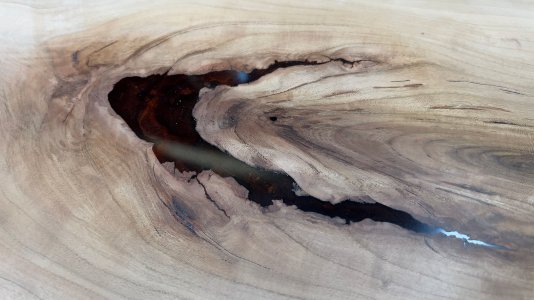
Second layer of epoxy after first has dried?

Thanks for the toothpick idea. I've read that mixing small batches is tricky as getting the proportions of resin and hardener right is more difficult and you might have too much of one or the other.
When you do it you'll need to approach the holes from the side with the toothpick, and let the resin flow in, otherwise you'll trap another air bubble that may not break through.
 
Big lesson for me here is to plan on pouring two layers from the get-go. First to fill more than half, leaving like ½" for the second pour.
 
Unless I want some degree of colour separation, I normally pour the layers pretty close to each other, but either way shouldn't present any issues.

Part of the trick of getting a good result is to brush some of the poured resin along the timber edges, and let it flow slowly to reduce air bubbles during the fill.

Any moisture in the timber however will cause small bubbles to appear along the edges, so frequent attacks with a propane torch will help clear these.

Not all resins are equal when it comes to naturally dissipating bubbles though, the ones I use are non-exothermic and no matter how roughly mixed, all clear bubbles for the most part on their own.
 
I did a coat of CPES almost a week before my first pour, which should have sealed everything well. I think the bubbles occured during the second pour - maybe I didn't take enough time with the heat gun.
 
Colder temps or short working times can make the resin more viscous, which makes it harder for bubbles to rise and pop, warming it up in a container of warm water can help to make it less viscous and easier to get bubbles out.

Other times it could simply be the result of a pocket underneath somewhere that releases the air some time later, so it doesn't rise all the way.

I think you're right though with the heatgun, if I zoom into the earlier picture there's quite a lot of bubbles along the timber edges, so they must have just kept appearing. It's a battle some days! ;-)
 
I've only done 3 epoxy pours and started out using a Milwaukee heat gun that has a variable temp up to about 1000º. After that, I started to use a MAP gas torch because of the higher temps that are available. The low temp Milwaukee method was slow so I opted for the MAP gas method. That works really well but you have to be careful with MAP because too much heat brings on an accelerated curing time for the epoxy. Somewhere between these two extremes is probably the sweet spot.

The MAP is nice because you just point & shoot and the bubbles are gone...the heat gun is slower but safer and less prone to accelerated curing issues.
 
Map/Propane torches are much better and less disruptive to the surface than heat guns, and it only takes the briefest of waves to instantly burst the bubbles, so there's no lingering heat issues.

And because you're only using it in really short bursts, the fuel lasts for ages.
 
I still think there's a sweet spot though somewhere between the low temp & wide area of the heat gun and the high temp & narrow area of the MAP torch. It could evolve into a new tool specifically designed to service the epoxy pouring crowd. :)
 
OK. I do have a propane torch, just seemed harder/more dangerous to break that out than to use a heat gun, but will do that for future pours, thanks.
 
OK. I do have a propane torch, just seemed harder/more dangerous to break that out than to use a heat gun, but will do that for future pours, thanks.
They're really the best I find, just get a strong yellow/slightly blue flame and a fast wave over the surface is all that's needed. Won't affect the resin at all.
 
I've only done 3 epoxy pours and started out using a Milwaukee heat gun that has a variable temp up to about 1000º. After that, I started to use a MAP gas torch because of the higher temps that are available. The low temp Milwaukee method was slow so I opted for the MAP gas method. That works really well but you have to be careful with MAP because too much heat brings on an accelerated curing time for the epoxy. Somewhere between these two extremes is probably the sweet spot.

The MAP is nice because you just point & shoot and the bubbles are gone...the heat gun is slower but safer and less prone to accelerated curing issues.
Max temp of MAPP is about 136F higher than propane. Adjusting flame width should also modify temp?
 
Max temp of MAPP is about 136F higher than propane. Adjusting flame width should also modify temp?
The temp doesn't really matter at all with popping bubbles, any general heat setting is just fine, as you literally wave it really fast over the surface a couple of times.

On my larger boards that are 530mm x 360mm it's a one second pass end to end a couple of inches above the surface.

That's why I stopped using the heatgun pretty quickly, it took longer to get the same result, and it affected the surface (and resin/mica effects) too much.
 
When epoxy cures it produces an exothermic reaction and heating with a torch or heatgun just exacerbates the issue. That's one of the reasons they advise you to pour epoxy in thin pours.

The issue I've had using the MAP torch is that you're constantly looking for bubbles and then immediately flashing those bubbles with the torch to eliminate them. In some thicker pours, when too many bubbles are produced in the same area, you tend to overheat the area with the constant use of the hot torch. I've learned that it takes some self control to just watch those bubbles accumulate and wait for several minutes before you flash the area. This method puts less heat into the epoxy but it's a tough thing to do because your eyes see the bubbles and your brain tells you to eliminate them NOW.:)
 
@Cheese That's why I made the exothermic reference earlier. As I do fairly thick pours I avoid exothermic resins like the plague as they can introduce a whole array of issues depending on the materials being used.

In fact the vast majority of resins available to us here are the non-exothermic variety which makes life much easier and gives far more consistent results.

I last used an exothermic resin some 8 or so years back, and it got so hot it actually melted the tooling board mold I was using. After that I thought I'm looking for something better now, and luckily over time the industry here has improved the options available.
 
Back
Top