Setting My New Shop Up (Formerly Shop Build Progress)

Started building a clamp rack.

I used the LR 32 system to drill the 1/2 dia holes and my CMS w my  Jig saw module to cut the slots for the clamps.

Couldnt finish had to take the boss (wife) to lunch.
 

Attachments

  • IMG_4784.jpg
    IMG_4784.jpg
    128.5 KB · Views: 446
Today I finished the clamp rack nothing special but it got all my clamps hung and off the floor and out of the drawers for the smaller F clamps

This is rev 1 Im sure there will be others coming. I still deciding on what to put on the walls
 

Attachments

  • IMG_4785.jpg
    IMG_4785.jpg
    250.2 KB · Views: 500
Nothing Special today havent been in the shop the last few days so I thought today go spend some time.

I built a CMS insert for my bench top belt/disk sander combo. Its a little one but I use the heck out of it. I also set a cabinet near the out feed side of my CMS VL which I use primarily as a router table. this cabinent holds my router bits and stuff for the router table different collets spacers, wrench etc etc... also decided to drill some holes in the top t hold a screw driver , the took I use to turn the screws to tighten a module in place....
Like I said nothing special...

Oh I moved a MFT to the back wall cuz I felt I needed a work table there

Oh I think Im gonna dry wall the walls, dont know when as its starting to get hot now..its in the mid 90s and climbing... Maybe in the fall.
 

Attachments

  • IMG_4794.jpg
    IMG_4794.jpg
    266.5 KB · Views: 387
  • IMG_4795.jpg
    IMG_4795.jpg
    224.1 KB · Views: 403
You do impressively tidy.
Smart to make inserts for the CMS and being able to store on the wall. I’m thinking of doing similar with my simple green Bosch belt sander, and the FT planer to use as a very small jointer.

I know you too have these long aluminium accessories from Festool.. I have a very compact (small!) room were I have my workshop now. And I got really tired of storing these various profiles in a corner, risking knocking them over.
So I did this, a totally flexible shelf rack, not too far from yours in steel. I only wanted to make shelf pins that are dedicated to these extrusions, from KA-KS, UG wings, legs for KA-KS and the sliding table for the router table. I’ve just done the first for the sliding table (I’ll even scribe a bit for the profiles later). This is a rack I’m going to build on, moving in to larger space later this year I hope.

Just to give you an idea..

View attachment 1 View attachment 2 View attachment 3
 

Attachments

  • 5E00B4F6-E458-4CAE-8963-F614C572BCAF.jpeg
    5E00B4F6-E458-4CAE-8963-F614C572BCAF.jpeg
    107.1 KB · Views: 255
  • A17E3E39-4376-4383-8875-519447EB896D.jpeg
    A17E3E39-4376-4383-8875-519447EB896D.jpeg
    82.2 KB · Views: 277
  • E0547DA5-9A4D-496C-9CBE-C80C816F10D7.jpeg
    E0547DA5-9A4D-496C-9CBE-C80C816F10D7.jpeg
    107.1 KB · Views: 360
Hey Ron, I know you’re probably bleeding cash already, but try getting a drywall quote and get someone in there to knock it out in a couple of days.

I thought you were going to put in a mini split for cooling.

Ron
 
Yea Im bleeding profusely and my wallets shaking in fear  [embarassed].

I got request out for a couple of quotes for drywall. I was going to hold off but thought , hey its the last piece might as well get it done .

we'll see how the bids come in.

Worse comes to worse I have a friend whose pretty good at drywall willing to give me hand.

But Im old and well beat up going to the Drs in May get my shoulder looked at.

Anyway, Im going to get it done....

Yah I got 220v ran for the min split.

Dont know if Ill get it done this year.

Hoping the summer wont be as brutal as last years
 
Got a bid today on dry walling my shop.... Ouccchhhh, got another coming next week and got a couple of referrals to some other contractors from the same guy who referred the insulator to me.

Well see how that goes. Worse comes to worse, Ill use some paneling or even T111. I can install that myself and no muding or taping
 
Hi Jobsworth, I'm installing elec. now, and was thinking of DW, would you mind sharing the estimate per linear ft/sq ft?  And I too was thinking T 111 if DW was too spendy
 
[member=75382]Christophl[/member]

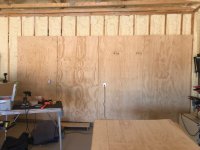
Im using 3/8 thk T-111 4x8 sheets. Im getting it for $31.30 a sheet. I expect to pay about $1000k If I do it myself.
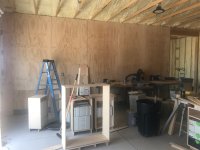
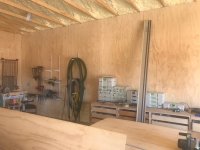
by using T111, yes it cost more, but there is no mudding or taping involved. I got 10' walls , Im not sure if Im going to t=put the full sheet on the top or bottom. Im think of the bottom. No ones gonna be looking at the walls above 8' any way. I also found some rustic barnwood looking panels I might use on the back wall. should make it look nice....

I cut and pasted this from the quote. This is only one quote. Im expecting another one next week.

Work Shop: Hang 1/2 inch sheet rock                                3,085.00
and round  corner bead , tape seams                                       
apply two coats of joint-compound o                                       
1,387 sqft of surface.     

[member=71322]Imemiter[/member] 
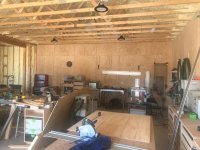
Im not covering the ceilings only the  walls.

But maybe that rustic paneling would look good in the office area                                         
____________________________________________________________________________
 
“ No ones gonna be looking at the walls above 8' “

Might be the opposite. The lower part of the walls will probably be covered by cabinets tools workbench etc.
 
If you call around you might be able to find some T1-11 siding in 4’x10’ pieces. They do make it.
 
[member=66185]Alanbach[/member]

Oh they make it and my supplier could get it, but he told me it was pretty expensive.  So I went with 8' instead
 
Ok started on setting the T-111.

Came out ok not great but OK once I dress it up itll look fine.

Made a stand to set the siding on to keep it the same level. Used a level to make sure it was. Still got a piece to cut thats less than 48" w Ill come back to it My son will help me with the heavy stuff next week. Hes home on leave.


Attachments

  • IMG_4799.jpg
    IMG_4799.jpg
    165.6 KB · Views: 365
  • IMG_4800.jpg
    IMG_4800.jpg
    254.2 KB · Views: 440
Hi ya'll havent forgotten yas.

Been busy hanging the 3/8  T111.

It isnt the best looking install (havent set siding in many many many moons.

But compared with paying the contractor to install drywall, Im saving over $2K.

So I can live with a few ooopsies that I can correct. Fixing the ooopsies will make a nice summer project with the heat. Its already starting to get warm here.

Insulation does make a difference.

My sons on leave and been giving me a hand (using his muscles) which is nice as Ive been doing all this solo.
Did with a little help from my daughters...

Taking full advantage of having the son home  [big grin]

If I get around to it Ill take some photos or might wait till I piece everything in.

If not tomorrow
 
Thank You!  And boy, that's expensive!  I just finished wiring up my shed yesterday and I'll prob. go with T1-11 too.  But 4" on center.
 
No photos yet guys. Im a few pieces short of finishing the t 111.  I got to go buy maybe 3 more sheets. I got enough to piece in some of the gaps in the lower section of the wall. I prolly will take photos today.

Special shout out to [member=2912]Don T[/member]. who stopped by and gave me a hand yesterday as my sons leave is over and he had to return to base.

Thought I may add this to the discussion.

Seems to be a good place in the build and set up process.

Lessons learned which were a lot so far:

Remember i did the set up other than the insulation on my own.

Cost more to build the shop than I anticipated.

Needed a lot more work/ money to set this up that I anticipated and didnt think it through w all the things which I didnt think about ,  you know the didnt know what I didnt know.

Working alone takes a lot more time the I anticipated.

Building a shop form scratch maybe a lot of peoples dream, but it takes time a lot of time and work.

The time invested seems like it will be fun as you are well building your shop right?

But it turns into a job. To get it done its a everyday effort, like going to work which takes the thrill out of it after a while.

You will make mistakes putting it together , you will compromise things may not look as nice as you pictured in you mind.

But with time and tweaking it will turn out to be a very nice shop.

But time is the key.

It drags on and gets to the point ya just want to get it done and over with and start building projects.

Once you keep that in mind that you can tweak and correct over time it does make you feel better.

I will feel like a big accomplishment once you finish. I know Ill feel that way once Im finally done.

Oh chances are it wont look like these guys shops on You Tube who have hugh following at first which sort of look like a showroom or display and get stuff /tool donated to them.

Im sure it will over time. Thats where the tweaking comes in and once yous tart enjoying the shop building things you can take yer time and make it like the shop of your dreams.

FYI I started this thread Jan 2020 when i was moving here. I moved into this house early April 2020 so Ive been dealing with this shop for about a year now starting with funding a contractor ad architect to make the drawings......
 
I totally get what you are saying. After doing a baby version of this many years ago, when I moved into our current house in 2008 I contracted much more of the work than in previous iterations. I hate that I didn’t build all of the cabinets in this shop and I hate that I did not do all of the wiring myself but ultimately I was glad that i did it the way that I did it so I could get the shop in order and ready to work right away.

Either way, once you have everything where you want it you will be so happy and proud that you have done it and have it how you want it. Ultimately you are going to be so happy that you have this comfortable space to go to anytime you want.
 
well as promised,
here the photos of the shop

with the siding up, well most of it.

Still got to patch in a few pieces here and there. Hide my oooppssies and Oh shucks

But its pretty much complete..

Now put the stuff back where it should be and straighten and tidy it up when I finish it. Take a break from the grind and go back after a bit.

im going to do a couple of projects finish one just to break up the grind


Attachments

  • IMG_4809.jpg
    IMG_4809.jpg
    2 MB · Views: 487
  • IMG_4810.jpg
    IMG_4810.jpg
    1.6 MB · Views: 426
  • IMG_4811.jpg
    IMG_4811.jpg
    172.6 KB · Views: 448
Back
Top