Shaper Origin deliveries?

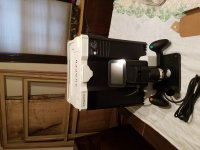
I had some time to play with my shaper origin, and so far I am pleased.

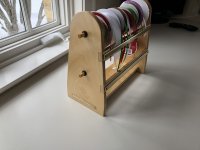
I am in the process of making a cabinet to store multiple HF small parts bins, ala adam savage and more recently bob Claggett from “I like to make stuff”. I wanted the dividers to have a cutout that matched the handles to make grabbing the bins easier.

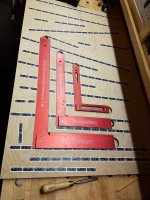
It took me more time to design the shape in fusion 360 than it did to cut it out of mdf, which I then used as a template for the already cutout dividers. The design is not complicated (rectangular inset with 2x 5mm fillets and 2x 20mm fillets), but I need more fusion experience. Once designed, the origin addin to fusion created the svg, which was the placed on the flash drive.

I had some trouble aligning the drawing with the edge of the mdf, but I chalk this up to lack of experience. I am also not completely bought in to the concept of cutting all the parts out with the origin yet from a large piece of plywood - I would rather make templates and revert to known techniques;  this may change over time, but would end up using more shaper tape.

More to come.
 
Svar said:
I'm actually surprised they went with tape instead of some reusable targets. Moreover, in these days of SfM technology even those are not needed. You can orient your machine just by analyzing surrounding static objects (on the second thought processing time will be limiting).

This is actually a really good point that I've been thinking about... The tape is really unnecessary from a technological standpoint. Nowadays, vision systems are capable of detecting the most nuanced changes in contrast. A rudimentary example would be a computer mouse I just purchased for my mother this Christmas - a Logitech Anywhere MX 2 laptop mouse. A tiny thing, yet it is capable of working on virtually any surface material including glass... Which is pretty amazing when you consider it's a $40 device.

A smarter implementation would have been a vision system capable of tracking variations in constrast -- I'm thinking of the veneer patterns of birch ply or similar. Getting it to work on a flat material like MDF would be a bigger challenge I suppose. That's where re-usable target could come into play, defining the four corners of your stock.

I feel as though something like this could be right around the corner, which makes me hesitant to buy something like the Shaper right now. But the fancy systainer presentation, in the words of Moana, "calls to me."
 
Sweet..............................I’m jealous.

Crank that thing up and let us know how good it is...I know it’s good I’m just annoyed I didn’t pull the plug.  Shame on me...
 
My only frustration is that in between work and commissions I'm booked solid for the next few weeks, and won't be able to start putting it to to the test until mid April at the earliest.
 
Hey Edward, just curious what your first Shaper project will be?

Got anything particular in mind?
 
I've had mine for better than a month now and other than unpacking and buying a sign making trio of bits from Toolstoday...nada.  I hoping this weekend to give it a whirl.  Going to make UHMW round inserts  for my bandsaw as my initial project.  Tablesaw and chopsaw inserts will be next.  Being computer design challenged...mostly because I've always adhered to 3M's "do it, try it, fix" school of design and lack of patience, I'm mostly going to experiment with the built in shape and copy functions.
 
Received my Origin a few weeks back.  Have done a few things with it experimenting...

- Drill press table replaceable insert
- Ribbon rack for my wife to test accuracy of through mortises
- Sign made from cedar

I’ve used Fusion, Graphic for Mac, and SketchUp to do the designs.  For larger projects Origin will be one element of a workflow.  I have used the engraving bit to lightly mark cut lines on large pieces and then use my track saw to cut them.  This works great. 

Accuracy has been very good so far.  Depth of cut is up to 1.5” on the Z axis.  Recovering from a cut error due to getting off track is better at shallow depths thus far.  But like any tool there is a learning curve.  Don’t try hard maple at 3/4 depth and expect a finished cut.  But there are users cutting hardwoods with a rousing bit at 3/8 depth and then a low finish cut.  So 3 passes on 3/4 material.

Like many on the Origin forum, I made 3/4 x 48 x 6” and 10” tape boards and tend to clamp a piece between them on my MFT table.  I slightly recessed the tape in .75 x .03 dados below the surface for reusability and have been happy so far.  There is an active owners group on ShaperTools.com and we have seen printable dominos on paper as an alternative but have not heard much about the cost of tape vs convenience and small footprint that Origin offers.  There are also online tools for doing a grid of holes for 32mm or MFT tops, so lots of potential. 

The unit IS sensitive to surface variations.  I just shim up the piece I am cutting to the tape board and it works fine.  I did try rough sawn cedar on the sign but with cupped boards and slight thickness variations I had to thickness sand out most of the roughness.

The Origin forum has a lot of interesting projects from engraving to joinery, signmaking, pattern making, and full on desks, jewelry boxes, inlay, etc.  I don’t think it replaces a production CNC but it has it’s place in lots of projects and can do things you cannot do with a larger CNC.

Online orders have been stopped as I think they are about to turn on retail with Rockler. 

Neil
 

Attachments

  • 0C045A96-59FF-44C7-9D47-C10FB449844B.jpeg
    0C045A96-59FF-44C7-9D47-C10FB449844B.jpeg
    2.6 MB · Views: 775
  • 6B499E3B-4FB4-4188-9B24-C32ED834B171.jpeg
    6B499E3B-4FB4-4188-9B24-C32ED834B171.jpeg
    136.1 KB · Views: 761
neilc said:
Received my Origin a few weeks back.  Have done a few things with it experimenting...

- Ribbon rack for my wife to test accuracy of through mortises
- Sign made from cedar

Neil, I like the sign a lot.  [smile]

On the ribbon rack, how close are the mating fits between the sides and the cross bars?

For instance, on the vertical sides, if you dimension the cross bar cutout at 1.50" wide, would you also dimension the cross bar width at 1.50" and expect a snug line-to-line fit, or is there some dimensional compensation that needs to be done?
 
Thanks Cheese -

Those were cut with no offset, so the mortise was an inside cut to the thickness of the tendon as measured with my caliper.  It fight snugly but did not require much force. 

What’s cool about the Shaper is you can do + or - offsets in 1/1000 of an inch.  For thin inlay you may want -.001 offset on the inlay for example, but it lets you sneak up on the distance on tool. 

Some guys on the forum have done work with 1/32 bits for finely detailed inlays with leaves and stems in a cutting board, for example and used the offsets to fine tune the fit.  The direct interactivity on tool is very different than a CNC where I have had to redo the CAM portion and post G-code. 
 
Six-point

Thanks!

My wife wanted the ribbon rack and loves it. Made the Shaper an ‘easy justification’ for her.  WAF is always important (Wife Acceptance Factor!)
 
Finally getting around to fooling around with the Shaper.  Super precise and pretty intuitive, but it takes a bit longer to cut than I would have imagined.  Right now I'm just doing a few practice projects, like this wall mounted storage case for my squares.  It's cool that you can do basic designing and shape placement on the fly.  I'm not that skilled in digital design, though, so I'm going to have to devote some amount of time to getting into the software so that I can start making more complex shapes.


Attachments

  • Square Case embedded.jpg
    Square Case embedded.jpg
    298.9 KB · Views: 626
  • Square case, cut out.jpg
    Square case, cut out.jpg
    308.8 KB · Views: 1,073
neilc said:
What’s cool about the Shaper is you can do + or - offsets in 1/1000 of an inch.  For thin inlay you may want -.001 offset on the inlay for example, but it lets you sneak up on the distance on tool. 

Neil...I’ve lived my entire adult working life in .001 or .0005 increments. Whether using a knee mill, lathe or jig grinder, those are the numbers I understand. To be able to machine wood to within .001” is incredible. It grows more than that after a rain storm.  [eek]

I need to get myself off the stump and purchase one of these gems.
 
No...but I found my initial placement of the tape was not optimal, and so I ended up having to put down additional tape and rescan to ensure the machine's recognition of the workspace after it started to cut through some of it.  I have a better sense now of proper tape application.

Michael Kellough said:
Ed, do you really need that density of tape for a simple project? Looks like about 30 feet consumed.
 
A trick I've used with the tape placement is to place the Shaper so the cutter is approximately at the bottom of my project, turning scan on, and then start placing tape so it shows in the screen.  There is no need for tape about 6-8" from the bottom of your pattern.  Instead of placing tape completely across the sheet or piece, I move the machine around approximately where the pattern will be and place tape.  Also, if you run into an area where the machine loses sight of enough tape, you can place more tape and add to the original scan.  I did this over the weekend while making a 11.2" hole in a plywood for my son-in-law's Oneida bucket to fit into on the mobile dust collection cart he was making.  I placed the tape in a diamond pattern and pivoted the machine as we went around the circle to keep the tape in sight.  I figure that I used about 1/3 less tape that way.
 
For smaller projects I've been using a "tape jig" which is about 36" wide and maybe 12" high. So anything 24"w by 12"h in front of it can be cut with no tape applied to the workpiece. Also being conscious of rotating Origin as you cut , towards the center of the tape jig keeps plenty of markers in view. This has been one of the best tools I've every purchased.
 
[member=27522]Luzzy[/member] can I trouble you for a picture of said tape jig?
 
Edward -

I took a 48" x 12" piece of 3/4" ply and routed grooves in it to slightly capture the Shaper Tape.  Grooves were cut every 3".  I did a similar piece that was 6" wide with a couple of grooves in it. That gives me flexibility for different sized projects.  Sometimes I'll put both on one side of a project, other times I'll capture the project between them if I will be routing from multiple sides.  In general you only need tape forward of the Shaper.  And some of the experiments show that keeping a consistent orientation of the unit (generally facing North, for example) will improve accuracy a bit versus scanning in a 180 or even 360 motion.

The grooves are maybe .02" deep or so to just place the tape slightly below the surface to reduce wear on the tape.  Just ran them through the router table with a 3/4 bit and rounded over the edges of the ply to prevent splinters.  I then put satin water based poly for wear resistance on the ply.  Once dry, lay the Shaper tape in them and use a piece of wood or a wallpaper roller to press the edges flat into the groove. 

it works great for many projects.  I've yet to replace the tape on them.

You might want to spend some time on the Shaper forum.  Plenty of examples of workspaces and jigs that are being done there.  One guy did a cool 'taper' table with a tape board to let him do inlaid work on tapered legs. 

Nice to see you starting to get some use out of the tool.  I just repaired three windows in my home that had some wood rot in them and used the Shaper to cut out the rot and then cut a replacement piece from hard maple to drop into the recess.  Amazing what the tool can do with a little time and experimentation.

BTW, I use simple 2D drawing programs for creating my SVG's.  You can also use 3D programs like Fusion 360 or Sketchup, but the 2D ones are great for simple projects iike you laid out above.

I use Graphic for the Mac.  Others use Affinity Designer, Inkscape, or even Adobe Illustrator. 

neil
 
Back
Top