Sharpening a hollow ground blade, tips?

RKA

Member
Joined
Jun 20, 2013
Messages
1,980
I picked up a 6" grinder with a cambered wheel last week and put it to task on an old set of Harbor Fright chisels for practice.  I noticed 2 things.

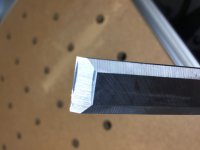
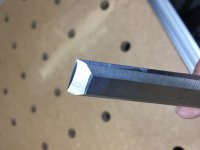
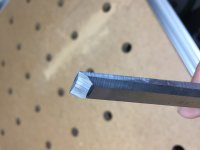
1.  I didn't even cut across the width of the chisel with the grinder.  It wasn't bad and at anything under 1", I should be able to do a good job.  But a wider blade like a plane blade puzzles me a bit (I haven't tried yet, hence my questions).  The cambered grinding wheel only makes contact in a small area, so you're sweeping the blade back and forth across that high spot on the grinding wheel.  I guess in theory, if the back is flat and the hollow grind is inconsistent along the width, it won't matter because a 1000 grit stone will even out all the peaks and valleys on the working edge of the blade?

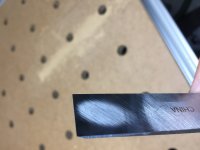
2.  With a chisel, I have a nice large bevel to register on the stone.  There was no doubt in my mind when the edge and heel (not sure if that's the right word) of the bevel were both in contact.  But with a plane blade I'll have less than 1/2 the distance from edge to heel which seems sketchy for someone that can't be trusted to free hand it. 

Any words of advice before I destroy up some nice plane blades (I don't have any harbor fright planes to experiment on...and don't intend to buy any)?
 
Not sure of cambered wheel. But on a regular wheel it is quite easy to get an even grind as long as you are rested on the tool rest and keep at it till you get a wire edge burr along the length.
At which point you can go and work on the sharpening stones.

This Fine Woodworking technique actually uses cambered wheel.
Fine Woodworking

Good luck.  Practice a lot.

Vijay
 
I would not risk destroying a nice plane blade on a grinder. It’s very difficult to get an even edge and it’s very easy to burn the steel.

A set of nice water stones or diamond stones is a good investment. I use the Lie Nielsen honing guide with the water stones they sell and the edges they produce are incredible.

I know the purists eschew guides, but I like the speed and certainly the provide. 
 
My questions were more oriented around the technique.  That video illustrates what I was doing.  I used my index finger behind the tool rest to stabilize the chisel as I swept it back and forth over the crowned wheel.  I didn't find it too difficult, but on a wider blade like a plane iron, I can envision a little less consistency in my movements and the end result.  You can see that in the video as well, although it appears he's doing it intentionally?  I guess as long as I eliminate the valleys in the first stage of the honing that follows the grind it should be fine.  And if I can't it means I need to do a better job at the wheel. 

On a slightly different note, I did enjoy how quickly the honing process went following the hollow grind.  And not having to use a jig to hone was liberating.  [smile]  For me this means I'm much more likely to give a blade a quick touch up rather that press on with a mediocre edge as I've done in the past.
 
We each develop techniques that we hone to where muscle memory takes over.

I find that once I get a chisel or plane iron trued up and sharp, honing it a few times on an 8000 then 10,000 water stone gets it extremely sharp quickly.

Lie Nielsen chisels and plane irons are too expensive (to me) to risk on a grinder. With the guide, I know the cutting edge is perfectly true and not canted at an angle. This saves time on adjusting the plane to get equal cuts after sharpening.
 
Depends on your tool rest.  I use a white wheel of course and have bad luck if I don't bother filling a cup with water when I grind chisels and plane irons.  I recommend frequent cooling.

My tool rest is a steel pipe on a pair of wood blocks.  The pipe spans both wheels. I have a wooden guide with a fence on the side to hold a plane iron square, but I haven't used it in awhile.  I works well though.  I hole the iron and butt my index finger against the tool rest.  I grip the iron like this the whole time I'm grinding so I don't lose the angle when I dip it or look at it.  Hollow grinding takes some practice and it's difficult to do it so it looks flawless.  More important is to get it hollow where you want it hollow and not grind the spots you don't want ground.  I just check the iron frequently and I've learned to grind specific spots by feel.
 
Wouldn’t a Tormach grinder be easier to use? You would get a hollow grind, they sell good rests, and the water bath cools the steel being cut.
 
My earlier reply seems flip but I’m serious about swapping the abrasive stone for a precision made CBN wheel.

In the same way a saw is only as good as it’s blade a grinder is only as good as it’s wheel. Even a cheap Harbor Freight grinder can produce excellent results with an excellent grinding wheel (assuming the shaft isn’t bent).

If you aren’t familiar with the benefits of CBN it’s worth doing a little research but the essentials are:
1. The wheel is round, dressing is never required
    (no abrasive dust flung around the shop either)
2. The wheel absorbs heat so you seldom have to stop and quench

A CBN wheel will cost twice as much as a cheap grinder but together the total is about half as much as the next best setup.
 
Michael,
I didn't want to take the conversation down a path discussing the gear and alternative methods, so I didn't respond.  You are correct and I have done what you suggest.  I'm using a crowned CBN wheel and there is little risk of overheating the blade unless I'm being stupid.  I'm taking light passes on a low speed grinder with pauses every now and again and checking the edge as I go.  And since the wheel is crowned, no part of the blade is continuously exposed to the wheel as I'm sweeping back and forth.  I would be quite comfortable putting my "good" steel through this process.  The risks of overheating are applicable to other grinding methods, but in this case I don't think it's applicable.  I understand there are other methods (each has pros and cons, none are bad and it boils down to preference), but I've chosen to give this one a try after using stones and a jig and finding it a little fiddly for my tastes. 

I did go back and practice last night on a friend's narex chisel set.  He had butchered the tips, so they needed a complete re-do including blunting the edge.  With a little more practice, I found it much easier to get an even square grind across the bevel this time around.  But I still need practice honing.  I am not as consistent as I would like, so it takes a little time to set the bevel side flat on the stone before each stroke.  I'm not using muscle memory.  I'll keep practicing on the chisels before moving to plane blades.  As it stands right now, my technique would probably result in rounded edges on a plane blade. 

One mistake I made was not checking for square when I blunted the tips before doing the hollow grind.  I followed that mistake by not completely grinding out the resulting flat edge that blunting creates.  There was a little sliver of flat that I didn't see on half the bevel and feeling for a burr didn't help because there was already a large burr created when I blunted the edge.  I think if I had blunted the edge with the bevel face down, that burr would have been on the bevel face leaving the back of the chisel clean.  Then when I do the hollow grind I can feel that back edge and know when I've completely eliminated the flat edge. 
 
[member=21249]RKA[/member] you’re on the right track and very observant so you’ll make quick progress.

The CBN wheel is a great improvement over traditional abrasive wheels and will help you get your cutting tools into the right form quickly but (as you know) won’t replace the flat stones (or skills) needed for honing for fine cutting and paring. CBN can get tools sharp enough for general carpentry (except for very soft wood) and rough turning and the finer grit wheels get you close enough that sometimes all that’s needed is a few strokes with a diamond card.
 
The problem with sharpening threads on forums is that they all end up the same way - a million different methods and recommendations ... proving that everyone is wrong and I am the only one with the secret to the right way to do this! 

When deciding on a sharpening strategy, it is important to consider the type of steel you are sharpening. The softer steels, such as O1 (including laminated blades, even the Japanese with very hard cutting layers) can be honed on the full face of the bevel. However the harder and more abrasion-resistant steels, such as A2 and PM-V11, really need to be sharpened with a microbevel. The microbevel may either be a tiny secondary bevel or it may be a product of honing on the face of a hollow grind.

Generally, secondary bevels are easier to do with a honing guide if you are starting out, or if you have no intention of developing the handskills involved. With the latter, lifting the blade a couple of degrees as you move to the next higher grit, requires some practice to achieve relative accuracy, and for this reason fewer stones are preferred (less error involved).

For those freehand honing directly on the hollow, as I do, the process is made quicker if the hollow is done well. The best hollows are those that leave very little steel to hone, and the edge is straight. A straight edge may not require a coarse stone (eg 1000 grit) to straighten it before moving to a middle stone (eg 6000 grit).

The process is similar when using a honing guide: a straight primary bevel can be more easily converted to a secondary bevel with a middle stone if there is little work to do. This is why grinders such as the Tormek, belt grinders, and dry grinders with CBN wheels score so highly - they leave a cleaner and straighter primary bevel. Tormek blade guides, and similar blade holders, such as the Veritas, also facilitate a straighter grind and edge. Excellent work may be done freehanding and with white and pink wheels, but these do require more hand skill.

More commonly, for those starting out, the magic bullet is not a great grinder or the best honing guide or the stones one uses. The magic bullet is knowing what to do, and what to do is to create a wire edge each time you hone a bevel (whether primary, secondary or tertiary). That is a guarantee that you are honing to the edge of the blade, and that is what you MUST do to create a sharp edge. All the above comments are geared towards achieving that wire. Anything less and all you are doing is polishing above the cutting edge. It looks pretty but is dull.

Honing on a full bevel is easiest when the steel is soft, and this is especially important if using the slower cutting media, such as oil stones. I included laminated Japanese blades in this category since the backing layer is often very soft cast iron and the hard cutting later is very thin - essentially the same deal as a honing on a secondary bevel.

Paul Sellers once posted a confronting video in which he sharpened plane blades with a 250 grit medium. The planes cut. Some (like myself) commented that this was not a true representation of sharpening needs, that is, the wood was soft and straight grained. But the point is that even a low grit can do the job. 16000 grit waterstones are not automatically the answer.

The other recommendation is that what ever you use, use it for one year before you make any further changes. It takes time to get the best out of something.

My "Ultimate Grinding-Sharpening Set Up" ...
http://www.inthewoodshop.com/WoodworkTechniques/UltimateGrindingSharpeningSetUp.html

UltimateGrindingSharpeningSetUp_html_71b2c2d0.jpg


Regards from Perth

Derek
 
You don't mention what tool rest you are using. Is it the stock one?  I have a cambered wheel on my cheap grinder, and use the stock tool rest, but I had to adjust/reshape part of the back of the tool rest so that the part you are running your finger on is roughly perpendicular to the wheel. If it is badly angled (like mine was) then it makes it harder to try and slide back and forth over the wheel at close to the tip of the crown. Does my description make sense?  If not let me know.

If you have an aftermarket rest than this likely isn't an issue. But thought I would mention it if you are using the stock tool rest.
 
[member=55238]msweig[/member] I'm using the cast iron tool rests.  They seem to work fine with chisels (at least with respect to the issue you raise).  I still haven't tried this with a plane iron.  I fear I'll end up with something similar to derek's results with the concave wheel (in his link).  I'll try it this weekend and see.  I did consider the tormek rests Derek uses, but I'll carry on with what I have now and see how it goes before I go looking for a fix. 

[member=4358]derekcohen[/member] Thanks for the article.  I think the key difference is you are using a flat wheel and I'm using a cambered wheel.  With a wider edge like a plane iron, I may end up with a slightly wavy edge, but the more I think about it, it may not matter significantly (as long as I'm within spitting distance of a straight edge).  The wheel I'm using is 80 grit (can't get anything higher in a cambered design for my little grinder).  So my first stone following the wheel is 500 grit.  That seems to level and smooth out the edge quickly, but I probably take more passes than necessary to make absolutely sure I've cut past any irregularities in the edge.  As a result the finished/polished edge is nowhere near as fine as you're getting with your process.  The first chisels I did were around 4-8x's deeper by my estimation (the polished edge).  But I did notice the last chisel I tried was only ~2x.  I got more comfortable with the process I guess?  I questioned whether I honed enough, but some quick tests after the 8K stone confirmed it was sharp.  Paring some end grain on popular made me smile.  :)
 
Here is the very first chisel I tested the hollow grinding on. It’s a cheap harbor freight chisel used for construction duty so I wasn’t going to cry if I screwed up. Curiously, when I lapped the back I found it had a perfect hollow in it! The very last chisel I tried had a small sliver of polished surface by the edge (in contrast to this first attempt).


Attachments

  • 10A4804F-F5C2-4C1A-BB45-A7E79E23BA9F.jpeg
    10A4804F-F5C2-4C1A-BB45-A7E79E23BA9F.jpeg
    1.5 MB · Views: 746
  • AF994515-F957-4DD4-B6CF-AD4E4A61C642.jpeg
    AF994515-F957-4DD4-B6CF-AD4E4A61C642.jpeg
    1.1 MB · Views: 722
  • 671EA60A-384D-466E-8D66-747CF5CF11D8.jpeg
    671EA60A-384D-466E-8D66-747CF5CF11D8.jpeg
    1.1 MB · Views: 730
  • 1BCB8564-3056-4BB0-8935-D77DB0A91BB3.jpeg
    1BCB8564-3056-4BB0-8935-D77DB0A91BB3.jpeg
    1.3 MB · Views: 655
Back
Top