Shop reconfiguration/Breakdown MFT

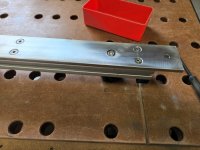
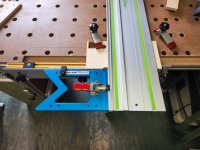
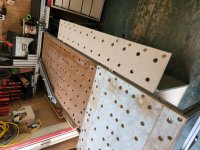
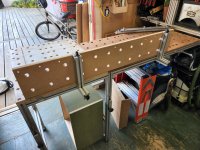
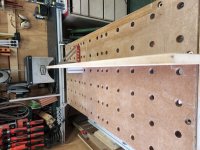
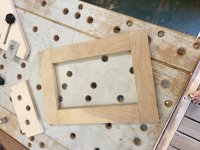
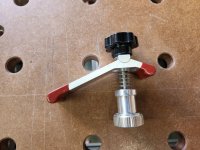
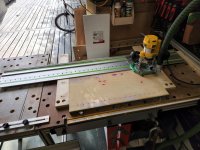
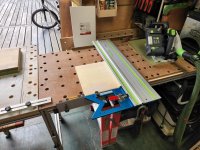
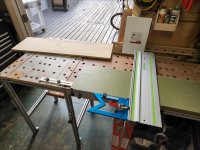
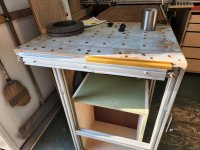
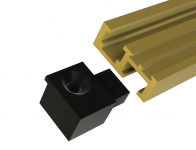
Another beautiful summer day, more time to play. Completed the Domino jig with an adjustable 90/45 fence (ala Carmonius/Veritas), a 25mm offset spacer, and aligned the Domino to the jig.

[attachimg=1]

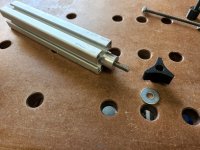
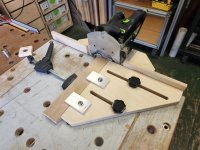
Aligned the domino to the fence
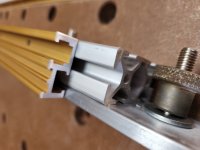
[attachimg=2]

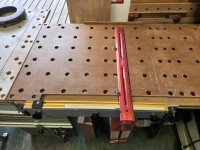
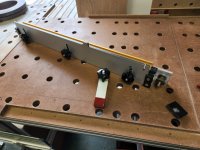
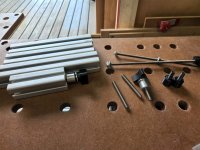
25mm spacer for use when moving the fence from side to side
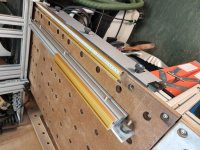
[attachimg=3]

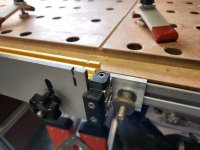
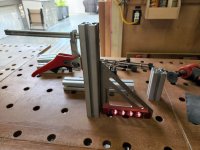
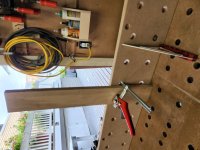
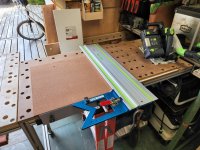
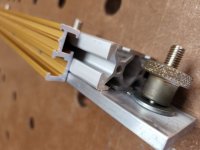
Fence attaches with 2 Axminster headless dogs

[attachimg=4]

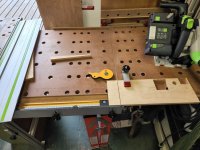
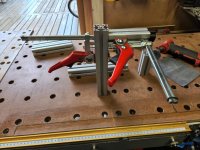
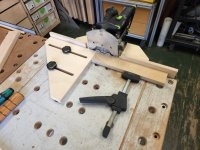
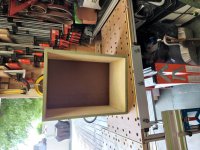
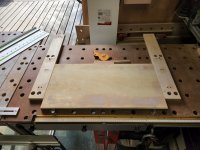
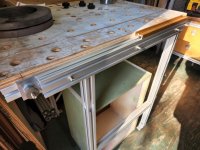
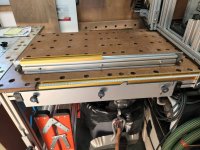
Added some hold down tabs

[attachimg=5]

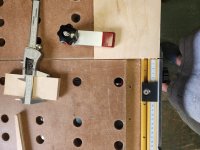
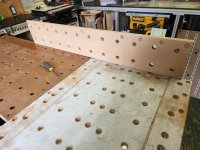
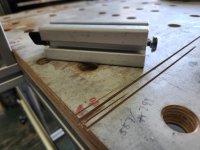
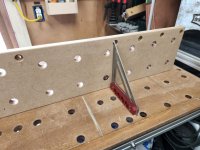
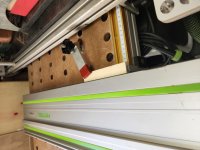
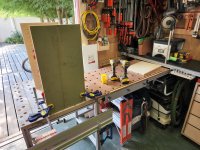
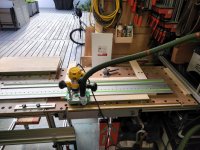
Tested the alignment

[attachimg=6]

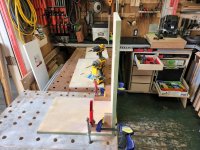
Locked the domino location

[attachimg=7]

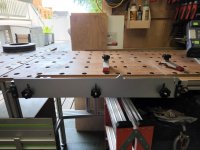
Now I just need to find a place to store it all...

[attachimg=8]

And see if anything in the house needs any doors added.

RMW
 

Attachments

  • 20220806_124035.jpg
    20220806_124035.jpg
    236.1 KB · Views: 2,838
  • 20220806_170957.jpg
    20220806_170957.jpg
    227.8 KB · Views: 2,785
  • 20220806_154207.jpg
    20220806_154207.jpg
    208.1 KB · Views: 2,746
  • 20220806_170050.jpg
    20220806_170050.jpg
    264.6 KB · Views: 2,781
  • 20220806_165110.jpg
    20220806_165110.jpg
    243 KB · Views: 2,785
  • 20220806_153555.jpg
    20220806_153555.jpg
    266.4 KB · Views: 2,755
  • 20220806_153513.jpg
    20220806_153513.jpg
    250.6 KB · Views: 2,784
  • 20220806_152549.jpg
    20220806_152549.jpg
    237.8 KB · Views: 2,824
These hold-downs would be useful on any MFT.

[attachimg=1]

[attachimg=2]

Repurposed some old dogs (taught them new tricks...) using a few inches of M8 threaded rod, a random spring, UJK M8 knob and WP hold down clamp. Side benefit is they are the perfect length to hold narrow material for rips with the fence setup, the saw misses the clamp by perhaps 1/4".

I did have to lightly file out the slot in the clamp so the M8 wouldn't catch on the edges & used thread locker to secure the threaded rod to the dog.

RMW
 

Attachments

  • 20220810_143448.jpg
    20220810_143448.jpg
    139.7 KB · Views: 2,641
  • 20220810_143458.jpg
    20220810_143458.jpg
    224.1 KB · Views: 2,645
The spring is a good add. I have a couple hold-downs like that and they are a pain to keep aligned.
 
Bob D. said:
The spring is a good add. I have a couple hold-downs like that and they are a pain to keep aligned.

Stole the idea from the Veritas Domino jig.

RMW
 
Nothing earth shattering, but a proof-of-concept for me. Starting with some salvaged plywood from cabinets I pulled from the old shop, I was able to move through the steps to a finished wall cabinet smoothly and with easy access to the tools/supplies needed.

The latter is the big deal for me, having everything within arm's reach and readily available.

Sizing material:

[attachimg=1]

[attachimg=2]

[attachimg=3]

32mm boring:

[attachimg=4]

[attachimg=5]

[attachimg=6]

Assembly:

[attachimg=7]

[attachimg=8]

Total elapsed time ~1 hour (started with the material ripped to final depth) while learning some nuances (i.e. cut the sides 0.5mm short of N X 32mm):

[attachimg=9]

A totally unimpressive result I know, but it's a turning point on the end goal of finally completing our closet project after living here for ~12 years.

RMW


Attachments

  • 20220820_094544.jpg
    20220820_094544.jpg
    245.8 KB · Views: 2,513
  • 20220820_092247.jpg
    20220820_092247.jpg
    325.4 KB · Views: 2,472
  • 20220820_091834.jpg
    20220820_091834.jpg
    324 KB · Views: 2,448
  • 20220820_090257.jpg
    20220820_090257.jpg
    259.2 KB · Views: 2,476
  • 20220820_085650.jpg
    20220820_085650.jpg
    285 KB · Views: 2,522
  • 20220820_090402.jpg
    20220820_090402.jpg
    256.4 KB · Views: 2,494
  • 20220820_093925.jpg
    20220820_093925.jpg
    310.7 KB · Views: 2,501
  • 20220820_084306.jpg
    20220820_084306.jpg
    302 KB · Views: 2,492
  • 20220820_083831.jpg
    20220820_083831.jpg
    262.7 KB · Views: 2,485
festal said:
Thats an interesting LR32 system.  Can you explain?

[member=71889]festal[/member] there is more detail here however it boils down to a simple way to make balanced (unhanded) panels in increments of 32mm. I loved the LR32 rail/router plate but hated the offset arm thingies, this was my solution.

The 2 sets of 20mm holes are 32mm on center side to side so by shifting one or both they will handle any 32mm panel increment using the MFT 96mm pattern. The 6mm pin holes are spaced 16mm apart so I can shift the pins for either a 16mm or 32mm start. First row of holes is 37mm back from the front edge, the other holes are spaced for standard drawer slides.

Hope this makes sense. Probably easier to explain with a video, but setup takes a couple minutes and the panel stays in place until complete.

RMW
 
Working on V2 of the guide rail cutting fence dingus. This one is meant to be movable with the calibration built into it. V1.1 needs to be recalibrated whenever the fence is removed from the MFT, and the Incra track messes up the MFT surface for other uses.

[attachimg=1]

[attachimg=2]

[attachimg=3]

[attachimg=4]

Any suggestions on how to attach the Incra track to the other extrusions? Double sided tape is not secure enough (tried/failed) and I'm reluctant to make a permanent connection with epoxy.

[attachimg=5]

Incra track reversed:

[attachimg=6]

For once the slots/features simply don't line up, & I'm reluctant to introduce another extrusion to marry these up. The ends of the Incra slot on top needs to be open otherwise I'd print an end cap with a fastener hole for the 80/20.

I think I can sneak in M3/M4 tapped holes but the slot holes line up close to the edge of the 1020 extrusion @ the mating line of the 1/4" flat stock. Unless someone has a better idea I'll probably take this route.

Suggestions are appreciated.

RMW
 

Attachments

  • 20220826_083301.jpg
    20220826_083301.jpg
    153 KB · Views: 2,308
  • 20220826_083643.jpg
    20220826_083643.jpg
    245.9 KB · Views: 2,298
  • 20220826_083633.jpg
    20220826_083633.jpg
    253.7 KB · Views: 2,318
  • 20220826_083219.jpg
    20220826_083219.jpg
    297.4 KB · Views: 2,308
  • 20220826_083227.jpg
    20220826_083227.jpg
    251.7 KB · Views: 2,287
  • 20220826_083313.jpg
    20220826_083313.jpg
    146 KB · Views: 2,295
If you can’t join with the very small versions of the usual fasteners you might do well enough with screw nails and CA glue.

Size 00 screw nails have 3/32” diameter heads.

At McMaster

CA glue will release later if heated to 250 degrees F.
 
Michael Kellough said:
If you can’t join with the very small versions of the usual fasteners you might do well enough with screw nails and CA glue.

Size 00 screw nails have 3/32” diameter heads.

At McMaster

CA glue will release later if heated to 250 degrees F.

That's a good thought, overlooked the reversible nature of CA glue.

I was mistaken about not being able to use a printed end cap and leave the slot open, running off a test piece now:

[attachimg=1]

I may still use CA glue to secure the rest of the extrusion anyway, belt/suspenders.

Thanks Michael.

RMW
 

Attachments

  • T-Track Plus LH End Plug.png
    T-Track Plus LH End Plug.png
    120.1 KB · Views: 1,178
That’s much better. I was wondering what the small overhang is for at the edge of the countersink but I guess it’s to support the screw head better and match the profile of the t-track but stop short of the slot?

By the way, which 3D printer did you choose?
 
Michael Kellough said:
That’s much better. I was wondering what the small overhang is for at the edge of the countersink but I guess it’s to support the screw head better and match the profile of the t-track but stop short of the slot?

By the way, which 3D printer did you choose?

You nailed it. The countersink clipped off the edge of the print otherwise.

[attachimg=1]

Fit the first time, just added a fillet on one edge and enlarged the countersink 1mm, and I'm printing a set.

Ender 3 V2, which cost $270 sitting on the front deck. I'd dabbled with a $700 Kickstarter printer years ago and never used it, so this time I went cheap in case history repeated. Learning enough of F360 to be dangerous and with STL export it's now foolproof enough that even I can make use of it.

Given the quality of [member=60461]Bob D.[/member] prints I'm lusting for a Prusa now, but this thing won't die and provide me with a rationale.

RMW
 

Attachments

  • 20220826_113452.jpg
    20220826_113452.jpg
    160.5 KB · Views: 1,164
"..but this thing won't die and provide me with a rationale."

Spilt coffee has been known to kill more than one 3D printer.

'Accidents' happen. :-)
 
I'm calling v2.0 of the rail square fence basically complete. After some tweaking the 3D printed parts position the Incra track and fence without any movement, ensuring the calibration remains.

[attachimg=1]

[attachimg=2]

[attachimg=3]

Some 8mm SS thumb screw knobs are due to arrive any minute, and I need to shorten the threaded studs sticking out.

The 1/4" flat bar is connected to the 1020 with M6 flat head SCS & tee nuts, then counterbored for the fence bolts with a little JB Weld to secure.

[attachimg=8]

Clamping is simple with the WP hold-down clamps or Axminster ducks. On a couple test cuts, bang on square over 6" and w/i 1/10th of a mm by eying the scale.

[attachimg=4]

[attachimg=5]

[attachimg=6]

The whole assembly can be moved anywhere on the BD-MFT and aligned to the dogs if needed. Currently I'm not using the holes/dogs for alignment of stock but that may change.

[attachimg=7]

Time to paint it blue, file for the patent and flog it to Hans & Co.... and fill in the rabbet on the MFT top.

RMW
 

Attachments

  • 20220827_122605.jpg
    20220827_122605.jpg
    280.5 KB · Views: 1,126
  • 20220827_124332.jpg
    20220827_124332.jpg
    292.3 KB · Views: 1,118
  • 20220827_111500.jpg
    20220827_111500.jpg
    296.1 KB · Views: 1,120
  • 20220827_111238.jpg
    20220827_111238.jpg
    248.7 KB · Views: 1,109
  • 20220827_111635.jpg
    20220827_111635.jpg
    101.1 KB · Views: 1,130
  • 20220827_111947.jpg
    20220827_111947.jpg
    260.7 KB · Views: 1,127
  • 20220827_111857.jpg
    20220827_111857.jpg
    199.7 KB · Views: 1,127
  • 20220827_111849.jpg
    20220827_111849.jpg
    231.7 KB · Views: 1,135
My ADHD is kicking up some dust. I’ve been watching some YT demos of welding table fixturing (Fireball Tools) which germinated an idea. Grabbed some drops of 1515 extrusion and cobbled together hardware to attach to both the MFT extrusion and into dog holes.
Random setups:

[attachimg=1]

[attachimg=2]

[attachimg=3]

[attachimg=4]

[attachimg=5]

[attachimg=6]

[attachimg=7]

[attachimg=9]

[attachimg=10]

Other than basic extensions of the worksurface I'm thinking of uses like holding cabinet panels while fastening or assembling drawer boxes.

Not sure where this is heading but I’m interested in any thoughts.

RMW
 

Attachments

  • 20220828_110420.jpg
    20220828_110420.jpg
    297.4 KB · Views: 1,071
  • 20220828_121205.jpg
    20220828_121205.jpg
    221.6 KB · Views: 1,067
  • 20220828_110420.jpg
    20220828_110420.jpg
    297.4 KB · Views: 229
  • 20220828_121734.jpg
    20220828_121734.jpg
    281.1 KB · Views: 1,075
  • 20220828_110817.jpg
    20220828_110817.jpg
    290 KB · Views: 1,071
  • 20220828_110826.jpg
    20220828_110826.jpg
    309.6 KB · Views: 1,061
  • 20220827_125007.jpg
    20220827_125007.jpg
    291.3 KB · Views: 1,075
  • 20220828_120231.jpg
    20220828_120231.jpg
    267.6 KB · Views: 1,063
  • 20220828_113756.jpg
    20220828_113756.jpg
    317.8 KB · Views: 1,082
  • 20220827_125014.jpg
    20220827_125014.jpg
    200.7 KB · Views: 1,091
Richard there is so much clamping/work holding and fixturing stuff available for 5/8 holes on 2 inch centers that I am thinking about adding one of those welding tables and using it for my main table.

I’m thinking something in the 24x36-48 range. Leading the pack for me is a Buildpro table with slots between the plates. I could use my table clamps in the slots. The surfaces are pretty much dead flat. 

This one
https://www.trick-tools.com/BuildPro_Welding_Table_22_x_38_inch_TM52238_4160

Or this
https://www.trick-tools.com/BuildPro_Welding_Table_47_inch_x_38_inch_TM54738_4156

Ron
 
rvieceli said:
Richard there is so much clamping/work holding and fixturing stuff available for 5/8 holes on 2 inch centers that I am thinking about adding one of those welding tables and using it for my main table.

I’m thinking something in the 24x36-48 range. Leading the pack for me is a Buildpro table with slots between the plates. I could use my table clamps in the slots. The surfaces are pretty much dead flat. 

This one
https://www.trick-tools.com/BuildPro_Welding_Table_22_x_38_inch_TM52238_4160

Or this
https://www.trick-tools.com/BuildPro_Welding_Table_47_inch_x_38_inch_TM54738_4156

Ron

Ron, those tables are drool-worthy. If you haven't seen the Fireball videos on fixturing, take a look, there are some great ideas to consider before buying a table. I have a 24 by 48 tab/slot table which is nice, but the Build Pro tables are another level. It's a good size for a DIY shop. Go for it!

I just printed off a few dogs with 5/16" countersunk holes to test out some ideas on fixturing the MFT.

[attachimg=1]

Using the 8020 uprights in the table dog hole, then these dogs in the fixture holes, the open holes provide for clamping points and further alignment with dogs.

[attachimg=2]

[attachimg=3]

[attachimg=4]

[attachimg=5]

I'm like a kid at Christmas with the new Erector Set (which anyone under 40-ish will need to Google...).

RMW
 

Attachments

  • 20220828_153422.jpg
    20220828_153422.jpg
    297.8 KB · Views: 1,039
  • 20220828_153722.jpg
    20220828_153722.jpg
    236.8 KB · Views: 1,038
  • 20220828_153712.jpg
    20220828_153712.jpg
    303.9 KB · Views: 1,035
  • Flanged Dog.png
    Flanged Dog.png
    84.2 KB · Views: 1,035
  • 20220828_153430.jpg
    20220828_153430.jpg
    246.3 KB · Views: 1,054
Diresta did that. He has a huge welding table that he uses for other stuff as well

Sent from my iPhone using Tapatalk
 
Back
Top